Although the day began bright and sunny, as is typical for this area it is currently raining. Great for growing plants, and the rain water that I used yesterday washing clothes has been replenished (and then some!), but this weather really makes me question my sanity. Why haven't I built a workshop yet? Have I finally succumbed to madness?
Back in the days when I lived in the "Great white north", I would think to myself how wonderful it would be to live in an area with less extreme weather, warm days and never any snow......Paradise! Think of all the work I could accomplish!
Now that I'm here, all I want to do is sit and listen to the birds sing, the rain drip, listen to the earth breathing. Island time mentality? You wouldn't believe how loud the frog's cries of love can be! Some people find the calls debilitating, but I just revel in all of this. Possibly this is still my juvenile infatuation with Hawaii, but I still blame my fear of the mainland on the trauma of moving here from Oregon....... but I don't know how much longer that one is gonna carry me,haha.
Anyways, the other day it was raining.......and I've been thinking a lot about saws.
Since some people have asked me about my workshop....
Here it is. 4" x 10" of pressure treated glory. It has a bronze screw towards the front right corner to act as a stop for planing lumber. Andre Roubo, eat your heart out. At least the last 2 feet stays dry.....sometimes.
2 seconds ago the water was jetting out of the downspout, but now it's just a trickle. At least the barrel is full.
It's a rainy day......what better thing to do on a rainy afternoon than hammer on some saw blades!
My Chilean Internet friend/Japanese tool aficionado Sebastian (http://laborlimaetoolworks.blogspot.com/) sent me this 240mm beauty just before we moved here, a well-loved Ryoba that has been converted (by Sebastian) into a madonoko, with a ChoMasaru style tooth.
http://mypeculiarnature.blogspot.com/2014/12/chomasaru-la-sebastian.html
Sebastian cut all new teeth on the crosscut side of this ryoba, filed in nice deep gullets (which gives these saws their "window-saw" name, madonoko) and raker teeth, all great stuff, sharp and pointy. This is a fast cutting little beast of a saw that also leaves a remarkably fine surface to the cut face, similar to my uber-fancy Nakaya D210C kumiko saw that I mentioned in the previous post, except 4x faster.
Sebastian turned this abandoned tool box junker relic into a GOOD saw! One problem remains to be addressed. The saw exhibits a fair amount of drag in use and tends to bind in the kerf of the cut.
And here is why.
Bent. This picture is taken sighting down the length of the crosscut side of the Ryoba, and I can see at least two good kinks along the length. This was no surprise to Sebastian, but he is a generous guy and he wanted to reserve some of the fun for me.
So. Bent handsaw.....what do you do?
I don't claim to be an expert of anything, much less Japanese saw metate, but I do love this sort of thing. I'm not shy about hitting things with hammers obviously, but information on any kind of western style handsaw repair is, ummmm......cue sound, *crickets chirping in the night*......
This is all absolutely amazing to me. About 5 years ago, there was a brief upsurge in interest in western handsaws and how to sharpen them. Sharpen them..... great! Everyone needs to be able to sharpen their tools. How about those bent blades, though? Have you ever bent a saw? Did you try to fix it by bending it over your knee?
Around 10 years ago, Bob Smalser wrote a series of posts on straightening western style handsaws on the sawmillcreek forum and, to this day the series has become one of the only resources of good information on how to fix a saw that doesn't cut right. In the Internet world of virtual experts (*ahem*), Bob is one who knows what he is talking about. If you haven't read everything of his yet, you might start here....http://www.wkfinetools.com/contrib/bSmalser/strSawBlade/strSawBlade1.asp
The situation is far worse for Japanese saws. Not only is there less information on sharpening, there is almost none on actual repair. This is doubly unfortunate, as the blades on Japanese saws are both thinner and harder. As with the Japanese kanna, nokogiri are high performance machines. In careless or uneducated hands they can bend, and worse, they can break. What we are left with is the market shift towards disposable blade saws. And oddballs like me who wonder what it is that we are missing out on.
As an inveterate Internet scrounge, here is some of what I've found.
Japanese saws from a western perspective.
Starting here........http://www.ibiblio.org/japanwood/phpBB2/viewforum.php?f=12&topicdays=0&start=50&sid=099c531a7212504dbd72a9cf935f4a64 and more.
- Mark Grable
- Dave Burnard
- Jay Van Arsdale
- Scott Nehring
- Jim Blauvelt
These guys all participated in the old HMS Japanese tools forum about 8-10 years ago. The info from just these handful of sources is better than the 95% of the crap out there....trust me. I can add actual links if you are feeling too lazy to do your own research, but the important fact is that Mark Grable studied with one of the last great Japanese saw makers, Endo Tomoya, Miyano Dai Endo, Yataiki (Miyano Tetsunoske III).
http://www.daikudojo.org/ShopTalk/yataiki_article.htm
The other guys are mostly just end-users, but seem to be good people and know their stuff. Dave Burnard is an actual hyper-enthusiast like me and was studying all sorts of super cool Japanese blacksmithing related metalurgia before he dropped off the map.....Dave? You out there? I've got some questions........have I ever!
Sebastian has been lifting the bar ever higher, in his quest for the best Japanese saw in the world. Well, actually, we seem to be two people, cast from the same mold but half a world apart. He too loves bringing new life to old tools, and possibly more important, what the process teaches you about life in general. He is a bit younger than I ( not much, though!) and still harbors faith in mankind's ability to act in its own best interests.....sigh. I'm not talking tools here.
As he has been teaching himself to sharpen and re-point Japanese handsaws, the purity of his intent has gotten the attention Mark Grable, as far as I can tell the only westerner who knows which-end-is-up about Japanese saws. Fortunately for me, I've been able to "eavesdrop" on a few of their conversations ( Boy, do I sound like an Internet stalker or what?!) by following the "comments" on Sebastian's blog. Mark doesn't write much, but what he does write is pure gold, especially considering the extreme lack of first-person knowledge on this subject.
Please keep in mind that these are brief tips from Mark to Sebastian, and were not actually intended to become instruction manuals on Japanese saw sharpening/straightening whatever. My sincerest apologies to all parties involved.
With Sebastian's permission, here are a few excerpts from his blog.
From:
http://laborlimaetoolworks.blogspot.com/2014/12/dozuki-rehab.html#comment-form
Mark Grable :
About straightening ...
1) work from both sides
2) work by halves - sneak up on straight little by little
3) don't focus on a couple square centimetres
4) don't hit harder than it takes to have an inspect-able result
5) polished smooth hammer faces and anvil
6) hardest possible anvil
7) heaviest solidest anvil possible
8) start on modern western softer thicker blades
9) clean rust free blades
10) light from front diffused no light from sides or back
11) flex blade from edges compressing between hands as it is held in front of you at eye level almost but not quite dead on edge, so that light glances past the blade, like the Sun at dawn, and dusk. flex one way, then the other, look at underside, then at top side. you are looking for shadows indicating compression which distorts an edge, an area in center, or ar neck, heel or anyplace. UNTILL THIS IS DEALT WITH, you can't get a flat blade.
12) use a one and a half - two pound hammer with a face 26 mm D and a convex surface 1 mm high at center to strike glanceing blows away from the compression, from edge of compression to edge of saw. IT IS TRIAL AND ERROR, so check frequently for results of say, six blows to a side. If it gets worse, change plans.
13) have a plan
14) if plan doesn’t work, stop and look at the situation; 90% is in not mis-perceiving because it's a twilight brain thing. Maybe Right brain.
15) Keep you Hara (navel chakra) clear - this is the energy the nokogiri will remember
16) It's only a saw. You are only You.
This is now my Bible. Better than some, I would say, haha!
Working thin sections of steel are not uncommon to other trades (Automotive bodywork comes to mind) so more research.....
Here is one of a few.....bent fenders anyone?
http://67-72chevytrucks.com/vboard/showthread.php?t=459877
Thin sheet metal work is not a subject that is entirely new to me, having fixed up seemingly innumerable cars back in the day, but never was the result of my endeavors so crucial. In my ignorance, I though that Bondo was how dents were SUPOSED to be fixed. Maybe I'm just getting old? Still, understanding the mechanics of HOW the saw manifests it's injury is important. I know that this is swiftly getting into the realm of TMI, but this is a little peek into how my brain works.
I should probably just jump in. Time for some pictures.
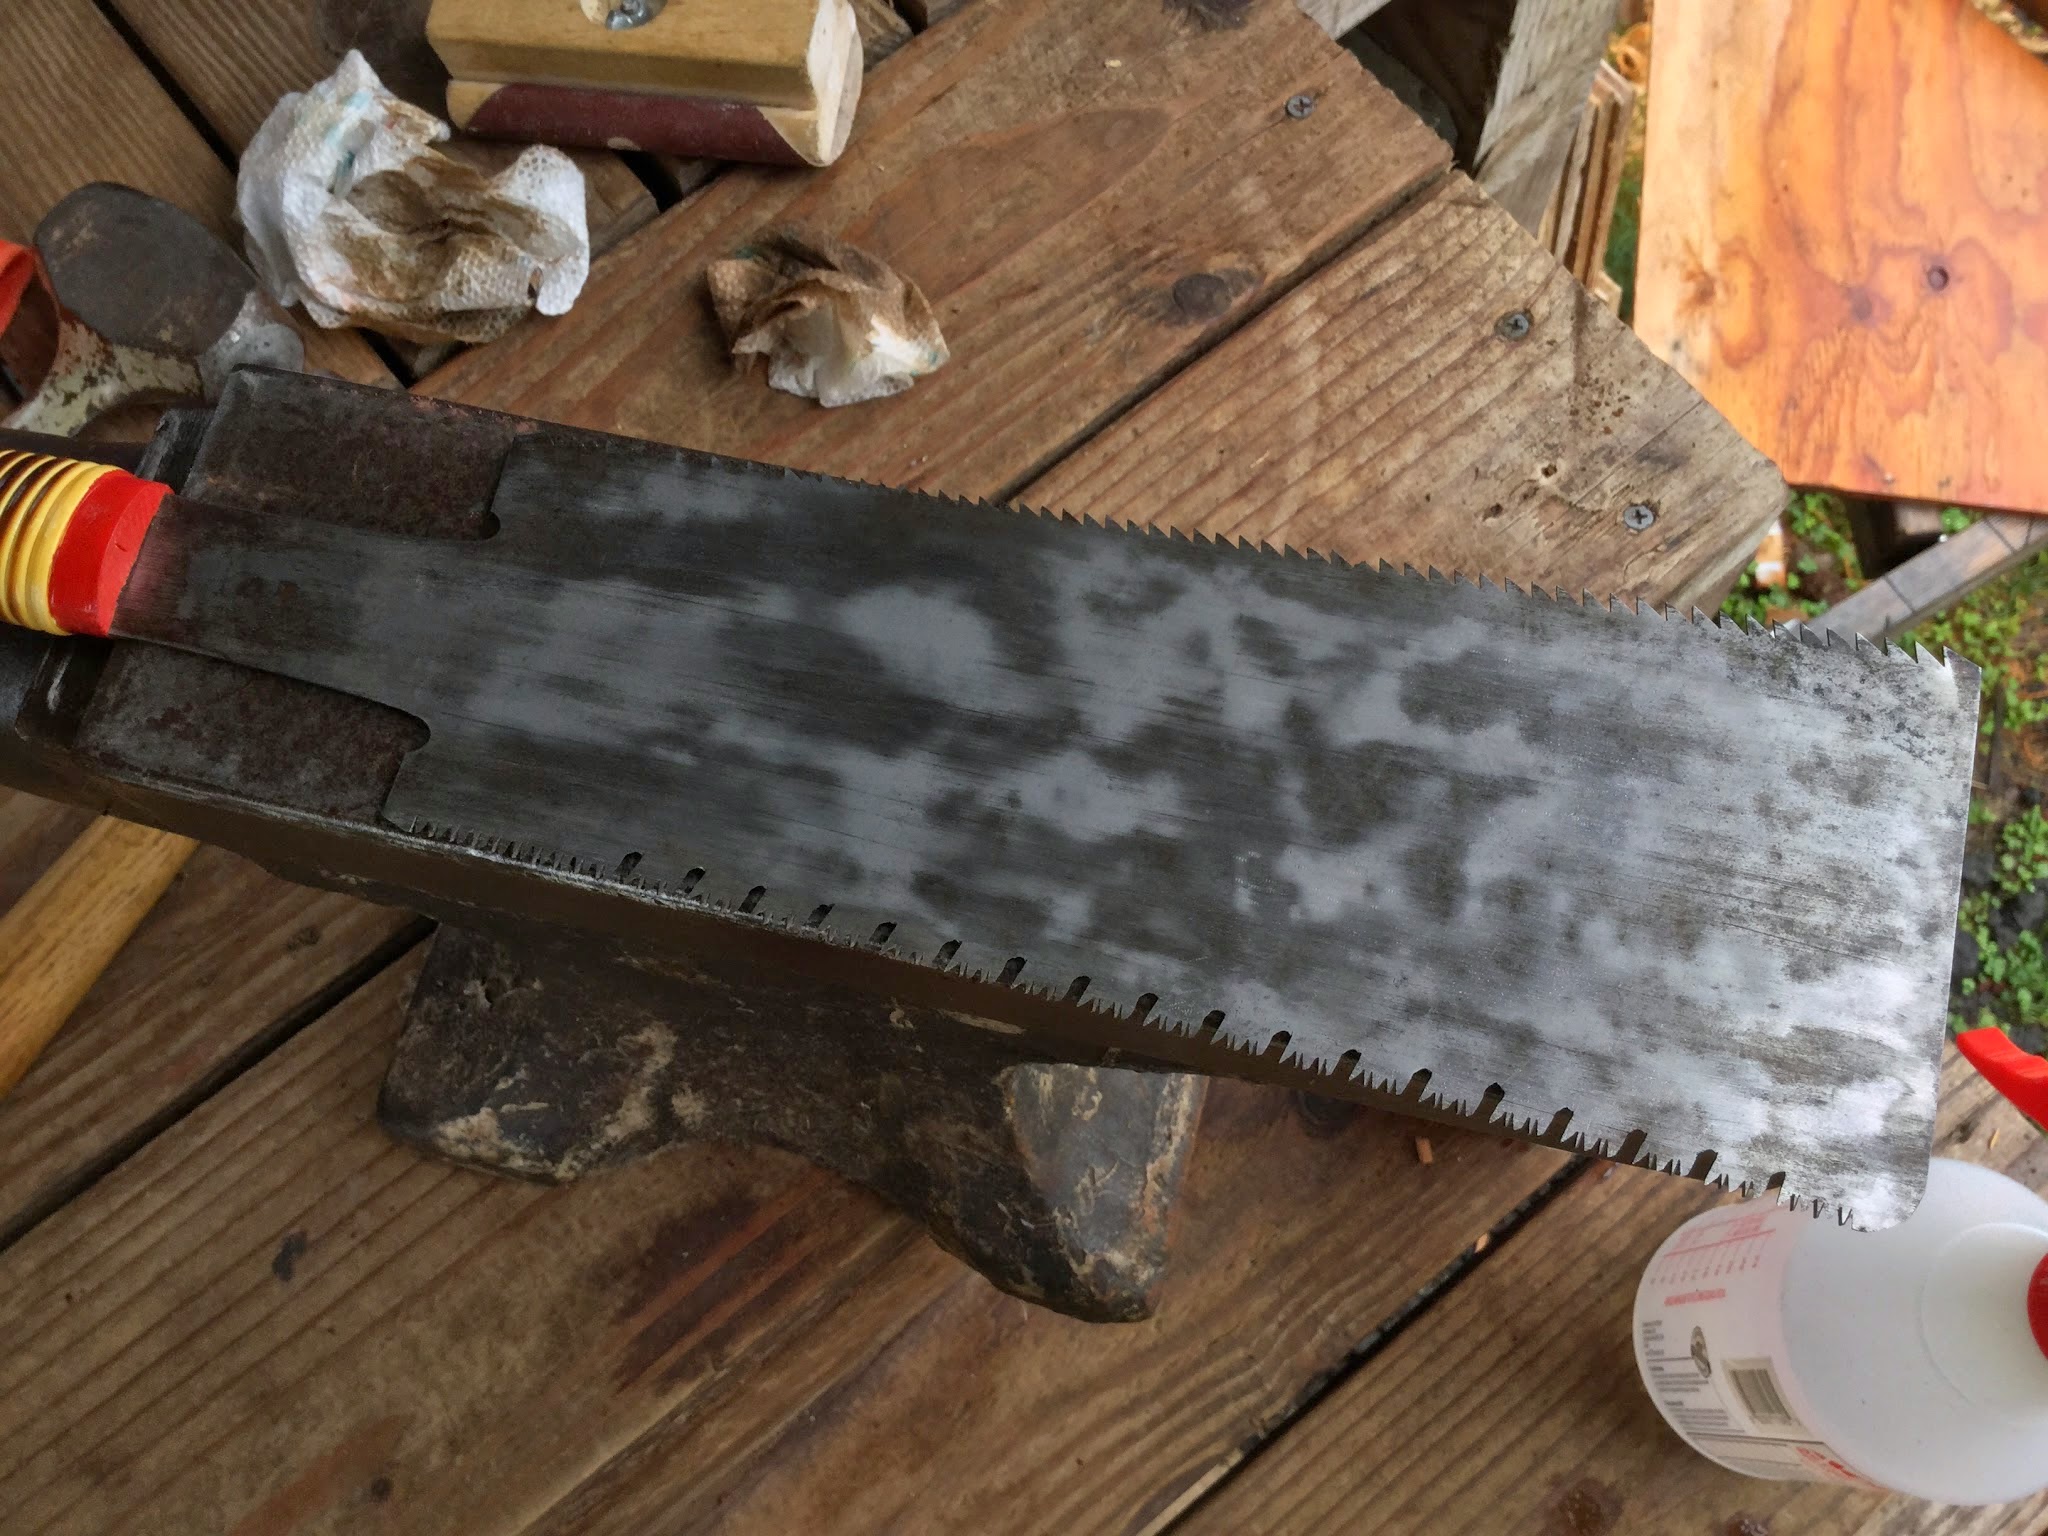
So I take a chunk of #1000 waterstone and briefly scrub the saw plate for a moment to reveal the bumps and hollows.
Far from flat, but it sure has a story to tell! Each of the brighter, sanded areas is indicative of a high spot that needs to be brought down. What is more important to me is that nearly every bulge and swell is a story.
If I zoom in a bit.......
Notice that right around the middle of the saw there is dark shadow 1cm wide that stretches nearly the entire width of the saw. This is the worst of the kinks. Someone was using this saw, the cut bound up and the saw bent just a little bit. Over the years, the cumulative damage manifests itself as a patchwork quilt of bumps and hollows. I love this stuff!
If you hold the saw obliquely, you can see how the reflection gets distorted by the imperfect plane of the metal.
To work on this poor guy, I am principally using two hammers here, a 2# ball-pein and 12 Oz. or so.
.
This isn't indicative of necessity, but just what I've got laying around. The bigger hammer is what I use for my general blacksmithing work, while the smaller is just for general work. The main point would be that a polished face is good, scarred anvil face (mine!) would be bad (Mark's # 5).
Nothing fancy to show, really, just tapping on (and around.....Mark's #3) the high spots, then flipping the saw over to address the other side (Mark's # 1 and #2, VERY important, work both sides!). Referring back to the images of the sanded surface, hit the bright spots, then flip the saw over and hit the opposite. If you hit hard in a "center" on one side, don't hit as hard on the reverse side.
If you only hammer one side of the saw, you'll end up with a potato chip. Think about this.
In one of Sebastian's prior posts, he gives graphic representation of what is happening to the saw from all of this hammer abuse.
http://laborlimaetoolworks.blogspot.com/2015/01/correct-me-if-im-wrong-straightenin-one.html
Take one large bump....
Give it a hit.
The force gets distributed to the surrounding areas.
Where once there was one large bump, we now have an undulating family of bumps and hollows. The bumps are more numerous than before, but smaller in size.
Do this enough times, you end up with a minutely rippled surface that resembles a flat surface.
So when I say that you need to work both sides, what does that mean, really? It is a bit tricky, in that you don't want to hit the EXACT same spot, because the that sort of negates the work that you have done. This might be one of those theoretical /practical dichotomies. In practice, you will be hammering the saw plate for......1000's of times? So things should even out here, I suspect.
I bang on the poor saw for a while, then lightly sand the surface using some halfway worn out sandpaper, to highlight the areas that still need work.
Notice that the low dark spots are fewer in size and number?
But I can't quite make the saw perfectly straight yet. Frustrating, yet.....
A small discovery.
This saw has been repaired at some point in the past.....awesome! If you look closely, you can see an old crack running transverse to the body of the saw, that has been welded! Right about middle of the picture, you can see that the saw has undergone a repair.
Ha!
No wonder I am having difficulties!
But still, I try and try and try and try. A few minutes every other day lets the steel relax between sessions. I have other projects to be working on in any event, haha. I'm not sure that the "rest" is necessary, but it meshes well with my general work flow. Is this another lesson? it surely can't hurt.
You might notice that the reflection is becoming clearer?
Getting better.
I know that much of this post has been both wordy and vague at the same time. I plan to go into this saw straightening in more depth, so if you are still interested, more is on the way.
One other note.
Hawaii is warm and humid, what am I doing to preserve my tools?
Macadamia nut oil, I shit you not, the best oil that I've found so far. Far better than anything else.
Kind of hard to find though.......


 Posted with Blogsy