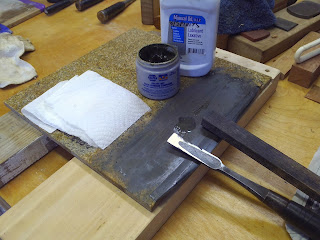
There's more to show about working with the loose diamond grit, at least as far as using it in lieu of a coarse sharpening stone. Out of all the combinations that I have tried so far, the maple plywood showed the most promise.
In light of that, I made a full sized lap out of solid maple,
charged the plate with a pinch of #125 diamond grit,
and got to work.
As with the plywood, the solid wood lap bedded nicely. The grit rolls around for a bit, then gradually gets less noisy as the abrasive sinks into the substrate.
The single application of grit didn't spread out very far, so I applied a second pinch and worked that in as well.
You can tell that the abrasive grit is bedding into the substrate, shearing the metal rather than rolling around, by how little definition there is between the soft iron and hard steel laminates.
If you look closely, you can also see why I want a coarse grit for fast stock removal....
Zoom in and take a look at that crack! It's about 3mm long, at least what I can see so far. It might extend further, but I won't know for certain until I do ura-dashi.
Speaking of ura-dashi, that's probably why this blade is cracked in the first place. I suspect that someone was not as careful as they could have been, and used a big hammer on a poorly supported blade. I doubt that I could do a very good job, field sharpening using a regular carpenter's hammer, and I'm glad that I took the time to make a special ura-dashi hammer. Now I enjoy the process!
I have a few hammers that I can use for ura-dashi, but here is a simple one made from an old tack hammer. *NOTE* THIS IS NOT HOW TO SUPPORT A BLADE FOR URA-DASHI! This is just an old photo showing the hammer marks.
The key point (for me) is that the hammer have sharp edges. I want something that will dig into the soft iron, rather than skidding or slipping. The nasty marks get removed during sharpening, it's nothing permanent.
Another point about ura-dashi: A nice ren-tetsu wrought iron is a LOT (!!) easier to work with, compared to regular soft iron. I think that the main reason that wrought iron is used in better blades is specifically to make ura-dashi easier. My guess....but it can be a huge difference. If you are starting out and have a choice, pick a blade made with wrought iron!
OK, back to the blade repair.
I grind the edge of the blade until all evidence of the crack is gone.
I square it up on the disk sander.
And back to the grinder to hog off some of the waste on the bevel.
I try not to hollow grind the bevel, and leave about 0.5mm at the edge......
....and back to the sander again, to even things up.
I am setting the bevel angle at around 28° for starters. The blade was originally around 25° or so, so the bevel face will look a bit uneven for a while.
There is still a lot of hand work ahead, working that bevel down. THAT'S why I want a good coarse grit stone!
The diamond lap works well enough, and it only takes a minute to remove the grind marks left by the sanding wheel.
Still lots of work left, though.
The nice thing about making your own lap, is that you can make it big enough to use with a grinding aid. I made this lap 3" x 10" to work with an eclipse-style guide.
And the punch-line?
Worn out, crap-ass Al-Ox sandpaper glued to a piece of glass is about 10x faster, haha!
Want a great coarse grit sharpening stone that is fast, stays flat, and is cheap? $15 will buy a roll of PSA backed sandpaper that will grind 100 blades, AND be faster than any grindstone. Hell, the 3-pack of 3M 3x 80 grit sandpaper, glued to glass (use a good spray glue), would be sufficient for most anyone, and you don't even need to order anything, just drive to the store.
Sad, I know...... I'll keep looking for the perfect natural stone, though. I REALLY hate sandpaper....
It's definitely time for ura-dashi.


