Showing posts with label Yusui. Show all posts

Saturday, July 18, 2015

Finishing up the Japanese style saw vise


It's about time to finish up this project. The rains have stopped, the rainbows are out, and I've got some saws that are in need of some sharpening. It's time to finish the vise!


I'm great at starting projects, lousy at the finishing stages.. I'm too enthusiastic for my own good.


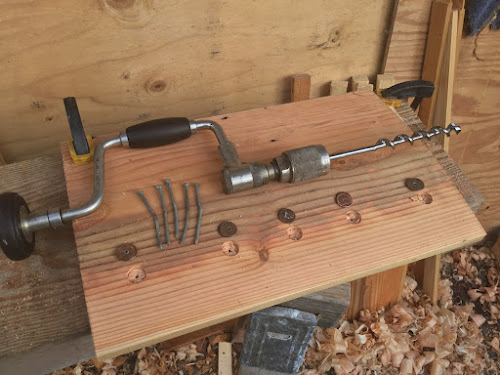
From the previous post, the two halves of the vise have been shaped, now it's time to attach them. This being my first attempt at a Japanese style saw vise, combined with my choice to run the wood grain the "wrong" way, it would be wiser to attach the halves using some means that would let me adjust or separate them when I undoubtedly need to. So, of course I choose the permanent (but much cooler) means of attachment....riveting them.


My rivet stock will be some old bent nails that are never in short supply. For the roves, I drill the centers on another thing that is seldom in short supply, pennies.


I bore shallow recesses to get everything below the surface. When I do this next time, I will bore less deep or skip the recessed thing entirely. Although it gives a neater finish, when I inevitably need to grind these off later, access will be a bitch.


The nails are lightly galvanized, but a little phosphoric acid removes that quickly. Jasco Prep&Prime to the rescue!

The zinc galvanizing causes the acid to get all foamy, but the nails are under there. I give it 15 minutes.


The reason for removing the galvanized coating is that I want the nails in as soft a state as possible before peening, so I need to anneal the metal first. Burning off the galvanizing works great, but also causes the formation of nasty gasses that can cause brain damage/kill you/etc. I'm challenged enough as it is, so prudence prevails. I don't get to say that very often.


A propane torch, get 'em red hot, then let things cool, the slower the better.

I thought that the lava rock worked well as a fireproof surface. Talk about an appropriate material.


If you happen to find yourself moving out into the boondocks and haven't yet built your forge (everyone needs a forge, right?), a good propane torch and a decent sized piece of ceramic blanket insulation makes a sort of workable emergency, half-assed forge. The ceramic insulation is key though. I wish that I brought some. 20/20 hindsight.


You can make a small propane forge from a tin can, and using sheet rock mud/sand mix as a refractory lining. It is handy to have around for making small tools and blades, but the key word here is small. A charcoal forge is SOOO much better. Quiet, too.


Peen the nails to lock everything together.


I cut the wedge from more of than mystery ham-wood stuff that I suspect is something like Brazilian cherry.

Whatever it is, it's hard, finishes smooth as glass, and it's more than my crappy kanna blade can handle. Rather than re-sharpening every 10 minutes, I decide that it's finally time to open up my treasure chest of tools. It's time to pull out the big guns!

"Rashomon" kanna, by wholesaler company Cubs torosaburo. Our favorite luthier, Tanaka Kiyoto has a couple of these kanna and was surprised at the blade quality and toughness. He puts the steel toughness just shy of HSS and some of the "super" steels. He doesn't know how actually forged the blades, but he was impressed.


http://kiyond.blogspot.com/2014/11/youtube_13.html


I bought this kanna from my Japanese tools pusher, Junji. It had a huge crack in the main blade and generally looked like hell. I showed some of the blade repair here, but haven't gotten around to fitting the blade into the dai....until now. It feels at least 4x more durable than the plain-Jane kanna that I have been using, yet the blade is still fairly easy to sharpen. Laminated blades are awesome!


The wood that I used for the wedge is probably too hard and slippery. The vise works wonderfully, 'cept the wedge likes to pop out at inopportune moments. I'll try roughing up the surface, see if that helps.

Next step....sharpening my old kataba saws. I plan on converting this old guy into a madonoko tooth pattern but first I will see how well it works as is, with the original modified rip tooth it has now. I've been thinking real hard about the mechanics of saw tooth design, and now is my opportunity to do a fun compare/contrast project.


Ellie is using the ugly saw, but doing great work. She's making a rabbit hutch.....more pets. Ellie, the rabbit farmer.

She did her layout using the bamboo sumisashi.


Focus and intent!


If you look closely, she's spot on the line.

That's my girl!


Friday, December 5, 2014

Last is first, first is last----having a bad "kanna" day.


Sometimes they are your best friend, sometimes you want to chuck them out the window. I'm having a bad kanna day. Not really bad, just a little annoyed is all.


We are moving, literally in just a few days, and I just received my last kanna from my tool seller friend Junji (eBay seller yusui).


Unlike the other kanna that I've bought, this one is a "known" blade, and WAY better than anything that I would normally dare to purchase. So my first famous blade is also my last purchase (for the foreseeable future). First is last, get it?


"Kanzan", by Hideo Ishido Teruhide. 


Hideo Ishido passed on in 2006, I believe. I'll do my best.


It's a little hard to see in this photo, but just below the lamination line, to the left is the stamp of the Tokyo plane manufacturers co-op.


There is a nice feather pattern on the display face.

It is in pretty good condition, and lightly used. Definitely used though, so I can be comfortable putting this guy to work. Whew! I don't know what I'd do with a really nice kanna, you can only look at them so much, before you need too remember that they are just tools, haha.


Matching sub-blade.


There are stamped markings on the front side as well.


(Damn this iOS mobile app!! My apologies for the strange picture sizes.)


This kanna is very close to being ready as is, but the blade protrusion is slightly uneven. I need to shave a small amount from one side of the blade retaining groove. As I use these tools more, I am coming to the realization that "less is more", meaning that you should only do the barest minimum required to get the job accomplished. This is not to be confused with the easiest way, or the least amount of work. Perfection is a floating target at best ( and an illusion at worst), but you do the best that you can.

With my first few kanna, I adjusted the fit of the main blade to accommodate more lateral blade adjustment than was really needed. I was carving out the sides of the grooves so that there was about 2mm of gap on either side, but that's not the proper way of accommodating a blade that sits unevenly. Maybe it would help if I explained how this came about.


My first kanna had been sharpened unevenly, so that the blade edge was no longer perpendicular to the long axis. Seeing this, I thought, "Sloppy bastard, too lazy to do a good job, etc etc", then proceeded to square things up. It turns out that the dai had been cut slightly uneven, so the guy who was sharpening the blade funny was right, and I was wrong.

Now I had a kanna that was taking a bigger bite on one side, so to even things out, I needed to tap the blade over to one side. That meant deepening the grooves. Now the blade is sloppy, and I still need to tap that blade over to the right, each and every time that I use it. Forever. A better fix would've been to sharpen the blade so that it was no longer perpendicular to the long axis. Smart guy, I am.

We are so used to thinking of things as needing to be square, straight, flat, whatever, that it's easy to shoot yourself in the foot. These tools just aren't made that way. It's tough, but there is no standard/perfect/anything. You need to think. There are general rules and guidelines at least. Thank god, cause thinking isn't always my strong suit.


In my perfect world, the main blade of the kanna would slide down perfectly to within maybe 3mm of where it would start cutting. It would be perfectly centered, and would take an even thickness shaving the full width of the blade. There would be only 0.5-1 mm of clearance at each side of the blade, to accommodate any changes in humidity that might cause the blade to bind. If I *could* somehow get that perfect fit, then it would be a relatively simple matter to keep it that way. If I happened to sharpen the blade unevenly, pretty soon I would get shavings that taper to nothing on one side, so I would then refine my sharpening technique. I would be learning. It's cool!

I strive for a perfect world. It's an ideal, not a reality.


I laugh at those guys who need to have every tool ever invented, but sometimes it is nice to have some specialized help. I was sceptical of ever using a knife with a left hand bevel, but here is a good example of one, seen in use.


Right hand bevel, left hand bevel, and a 3mm chisel.


The left bevel knife really is handy for trimming flush to the underside of the groove.


Then the right bevel gets to do the other side of the groove.


The blade bed already has tape on it, so at least I don't need to feel guilty when I make the blade fit too loosely. Someone else beat me to the punch, haha.


Time for a preliminary bed check, using the straightedge light gap technique. I am going to borrow a picture from Kiyoto Tanaka (because he's a DUDE!, and the best in the world!) that serves to illustrate my ideal bed configuration.


This photo....it's perfection. There is a minimum of contact at both the front and rear of the bed, and just a sliver touching right before the blade......THIS IS THE MOST IMPORTANT AREA! You can also see how the hollow in the bed of the blade gradually becomes deeper, then sweeps up to contact just before the cutting edge. 

Perfect.


This is what I've got.


Close, but needs some tuning. The notch is where the blade protrudes, so you can see that the bed is touching behind the blade. We want the opposite. We want the light to shine behind the blade.


One more thing. When I get the sub-blade aaaaaalmost to where I want it, it overrides the main blade on one side.


You can see the sub-blade osae-gane peeking out at the left. Crap! I hate when that happens!


The osae-gane fits perfectly, so never being one to take my own advice (much less others).....


......I take a bit off the side.


Just a smidge, I swear!


A little scraping, for starters.


And finally, a first test on some stringy, mystery mahogany.


Not too bad.

 It's a start, and is certainly workable as it is, but I want to see what this baby can do. The idea of getting the thinnest shaving possible isn't about the thin shaving. It is a simple matter to get the plane to work, to cut a shaving, to smooth the wood. That is easy. To get it to work perfectly? That is what the thin shaving thing is about. Any fool can get the damn thing to cut.


I messed up the edge when the osae-gane overrode the main blade, so it's time to sharpen. 


As is with almost all of these, the bevel isn't perfectly flat, but because I'm, uh, time constrained, I just concentrate on the edge itself. It pains me, because I REALLY want to see what this blade looks like polished, and I can't quite get all of the edge right, either. It needs to be redone, but that will have to wait. The rentetsu is even and fine grained. The lamination shows perfect heat control, and has no evidence of carbon migration. Very nice welding.


I try to get the osae-gane as close to the cutting edge as possible.


I think that I can see a thread of edge down in there.....


The African khaya shavings are very glossy.


However, something just isn't quite right. The blade isn't taking a full length shaving, and only partial in width, too. The board is only a short thing, and a quick visual confirms that it's not the board's fault, so it must be the kanna. I had a day like this a few months back, and it can be maddening. Everything is there, but something is off.


When the kanna isn't working right, the first thing I always check is the condition of the edge. It seems obvious, but almost every problem is rooted in sharpening, one way or another. 80% maybe?

I just sharpened, and although the blade isn't as perfectly sharp as I would wish, it doesn't explain the lack of proper performance. If the blade is fine, then it had to be the dai.


The dai looked ok when I performed the light gap test with the straightedge, but I'm often not as thorough as I could be, so it seems likely that I have missed some spots. A quick, yet nearly foolproof test is the "sandpaper stuck to a piece of glass " test.


High spots are lighter, the lower are dark. The hollow at the center of the dai is fine, but all of the light areas along the edges represent material that needs to be removed before this kanna will work properly. 


The section of the bed behind the blade needs attention, too.


Light test.


This usually goes back and forth a few times. Scrape, check the gap, then scrape a different area, probably.


Don't forget that little bit to either side of the blade mouth.


The difference is remarkable. When the bed of the plane is configured properly, you can feel the kanna sort of squat down as the cutting edge bites in. That's when the kanna will make its distinctive *Skweeeeep* sound and pull shavings the full length of this Bubinga, no problem, but......


This mystery wood (soft maple, perhaps) has a mild curl to the figure, and gives no problems, but still....


I feel like the sub-blade/osae-gane could be set a little finer, but it doesn't want to cooperate. This kanna is getting tired...... or maybe it's just me. Best not to push too hard, at this point.


It is a gray day, so photos of glossy, reflective surfaces are in short supply.


It's glossy, trust me.


 But *still*.....something is not quite right. I can check the blade bed, I haven't done that yet. I can fiddle more with the hollowed portions of the dai, they're not quite perfect yet. And I can do a better job sharpening, too.  

It has to be......*something*!


At least I can make it pretty.


Friday, November 7, 2014

More ura-dashi-----refinement

I guess that I had alluded to my writing a post on performing ura-dashi on chisels....... But I'm not. Yet. What I have right now is a kanna blade that is causing me some difficulties, so I took some photos of the process. Lots of photos.

Tapping out the back hollow (ura-dashi) on Japanese plane blades, chisel blades, knife blades and carving tools....... Everything takes a hit. Ura-dashi is faster than just grinding away at the stones, preserves the all-important steel hagane, and also serves to maintain a proper fit between kanna blade and dai. And it's fun!

Ura-dashi is a necessary skill to learn if you want to get the best performance from these tools, but it has a reputation for being a process fraught with danger. It's scary the first few times, but (and I can't stress this enough) get the right hammer and it's a piece of cake.


I got this old kanna recently that showed evidence of having had some pretty serious work done to the bevel. It looked as though the blade had chipped out very heavily, necessitating a more extreme session of ura-dashi than typical. Rather than the edge coming to a point, it ended abruptly at an approximately 3mm blunt tip.

When a blade requires very forceful measures to correct it for warp, twist, or has had an unfortunate encounter with a nail/rock/concrete floor, the pros will often grind the edge back a few millimeters before performing ura-dashi. This gives more support to the steel, reducing the possibility of making the damage even worse. This looked like one of those cases.

Things are coming along nicely. I have already corrected the slightly mushroomed head of the main blade, and gotten a good start on forming a new bevel. This is a 65mm blade, BTW.


I was able to hammer the upper portion of the blade back into shape, but the perimeter was starting to fragment, so I had to resort to filing a decorative chamfer. Frustratingly close to the original profile, but no cigar.


The main blade had been cut back so severely, that the secondary blade needed amputation as well (or possibly the damage was so bad that BOTH blades needed shortening, yikes!). So, ura-dashi for the osae-gane, too.


This is perfect, to my eye.


You can't make a silk purse from a sows ear, as they say. This osae-gane was well forged, and the urasuki was nicely ground. I just try to keep things looking "proper". Sometimes you get lucky......


....and sometimes you don't (get lucky, that is). This is the main blade.


The tiniest remnant of the original damage. The crack only became apparent after starting the back-flattening process. What I *really* don't like is that the crack runs longitudinal to the length of the blade. It is possible that this will propagate right up the middle and make the blade unsalvageable, but my fingers are crossed.


I grind the blade back another 3mm, about 1mm past the visible damage.


Right back to where I started, haha!


Hopefully that gets all of it. I won't know until I've completely finished sharpening the blade


More ura-dashi.

There is a bit of a push/pull interaction going on during this process, particularly in such an extreme case as this. The hard steel hagane is.... hard, and doesn't bend (well, it bends but it doesn't retain the bend. It is highly resilient and resists permanent deformation). The actual bending is due to the soft iron being bent and displaced/deformed by the hammer blows. The blade was made using a relatively hard wrought iron and it feels a little stiff. This isn't the easiest blade for ura-dashi. Maybe the steel is very stiff, too?

You hammer the bevel, displacing and expanding the iron, causing the cutting edge to be deformed downward. This induces tension into the blade.

The little squiggle to the right of center isn't the crack, it's a piece of lint.


I check for flatness using a #1000 grit diamond stone. You can see the barest hint of the flat beginning to form at the bottom edge.


I do 90% of ura-dashi using just a tiny (8 oz?) tack hammer, but this blade calls for the big gun!


A 32oz ball pein hammer is nearly the LAST type of hammer that I would choose for this process, but it is close to hand. A nice funate pattern genno would be perfect for this. Someday....


I am trying to achieve a perfectly straight, flat, land (the ura-ba, I think) at the edge.


This is looking good. It is a beginning.


The problem is that there is a lot of material yet to be removed from the bevel. I figure that doing this process in stages will minimize the stresses on the already stressed-out steel. Some of the pros advocate an even slower pace, and do just a little bit of ura-dashi over the course of days or weeks. I'm patient, but.....

Back to the bevel then. Heavy files remove the iron quickly.


And here is where the push-me, pull-you comes into play. The ura-ba was looking perfect before setting the bevel, but now the line has become uneven.


I target a very specific region to focus my attention on. Only strike where needed. Don't hit the steel part, only the iron (I know you've heard that one before). Strike heavily towards the base of the bevel to affect a broad area, lighter and closer to the cutting edge for a more localized effect.


The ura-ba is more even in width, but now there is a new condition to address. The corners are no longer making contact with the evidenc accentuated by the different directions of the scratch patterns.


I switch up directions occasionally, so the scratches act as an reference.


Back to my usual hammer. Small strikes, as close to the corners as I dare.


Magic!


There is a small spot at the far right that is still not touching fully, but that will come out as I finish.


A note: As I look at all of these photos, I guess that it should be clarified that I am right handed. I hold the blade in my left hand, with the head of the blade close to me, the bevel of the blade furthest away. Nothing weird or original about my posture, pretty typical. I would take a picture, but I only have two hands (*sigh*..... If only.....).

When tapping, I keep my hammer arm elbow tight to my side, for a controlled/restrictive movement. If your elbow is flapping around, your accuracy goes out the window.


The blade is now shorter and thicker than it was, so the blade is now a tight fit in the dai. There had been a paper spacer...... Gone now.


There is still a long way to go before the blade reaches the proper position.


It's time to actually sharpen the blade, but before I do that, I take a few measurements to see if I need to remove more material from one side of the blade, or the other.


It looks like I will be favoring the left when I sharpen this guy. The left is closer to the surface, and would be the first side to protrude, all things being equal. I want the blade to protrude evenly of course so I will try to remove more material from the left of the blade.


I do that by applying more pressure to the left side as I grind away at this thing.


I've been singing the praises of this sandpaper, but got the name wrong, haha. I was calling it 3X (actually a Norton product, and a good one, too), but it is 3M sandblaster. This is very tough stuff, and lasts an incredibly long amount of time.


This single piece has been used on a number of blades, and doesn't feel sharp at all. It still cuts, though.


That dust is mostly iron. About 50% of the grit is missing by now, and it's long overdue for replacement. If you sweep off the paper occasionally, it cuts faster.


Almost there.


After the #60 grit sandpaper, I jump to a #400 diamond stone.


A full, even width bevel.


And one last time, I check the back side for flatness.


It looks good.


Well, maybe just one more.....


And one thing to note about the blade in the picture. The line of hagane is flat and even. If I had just ground down the blade without performing ura-dashi, the line would be thick in the middle, tapering to nothing at the corners.

 Remember the chisel in the last post?


And, lest you think that all I do is sharpen tools.....


We have rebuilt almost our entire house, with the exception of one small area. The dreaded bathroom.


Just in time for us to move, haha!


I need a shower.