Monday, November 25, 2013

Toolbox stock preparation and ease of tool sharpening

Strike one off of the list. I made some bases (finally) for some of the sharpening stones that I use at least some of the time...


They aren't lined up for a photo op, there is actually a greater purpose at work here.


I sunk some holes and filled them with silicone to act as non-skid.

Why is it that silicone is so contrary, sticking where you don't want it, but when you do want it to stick....

I first tried wax paper, no love there. I thought about poly-ethelene sheet, but decided to give this a shot. I waxed the work surface about 5 times and the stuff STILL didn't want to let go. Only 2 pads popped out. The silicone has a bit of wiggle to it that I might find too objectionable, though. We'll see.


I roughed out some stock for the toolbox project...


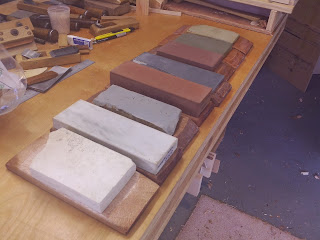
The pile on the left is what I got planed before I decided to stop. The kanna were a bit dull to begin with, due to planing a bunch of black walnut the other day. Time to sharpen!


55mm, 65mm, 72mm or so.

This is the progression that I use, from left to right, thick to thin cut. Secondary blades are not in place for the photo and the one in the middle? That one I am still trying to figure out. It's only set for 1 blade right now and I may keep it that way. I just need to tighten up the throat.


Different dai thickness's.

The middle kanna is a bit of an oddball. The dai is thinner, not from use, it was just cut that way. The wood used isn't the usual red or white Japanese oak. Examples of those species happen to be on either side. The grain is completely different and the feel is very dense. It shows a very attractive ribbon pattern with ray flecks and for whatever reason seems very tiring to hold and use for any amount of time. This might be due to the thinner/lower height, but I've got other kanna made of white oak that are just as thin and are not tiring..... Strange. The "pull" is a bit higher, but it does cut well and the iron is very easy to sharpen and holds an edge pretty well.


You can see from the height of the urasuki (the back hollow) that this blade is practically brand new.

This blade was laminated using lots of steel, what kind.... I wish that I knew. It is REALLY easy to sharpen, but holds a good sharp edge. In comparison, the blade on the right will last for generations, it's that hard. For all I know, it already has.


Nice ren-tetsu kanna blades.


Easy to sharpen------>hard

The stones are out, might as well do a few extras. The relative ease at which these different blades sharpen is remarkable. The tiny 28mm kanna blade on the left is super easy to sharpen and actually holds an edge well. It fits a (probably) cheap kanna that took a lot of work to make functional but now is a favorite. The blade on the right holds a great edge but is a b***h to sharpen. It has a circle stamp on it that I "think" indicates a special type of aogami steel.

The chisel....... ohhhh, my poor little chisel. This 24mm is a joy to sharpen, gets RAZOR sharp and works wonderfully for paring things flush. It had a lot of hand forged character and is well made...... but was tempered a bit too high, making it soft. Cutting anything harder than pine causes the edge to fold.

A tool that is too hard is very bad and will chip and shatter at the edge, but I actually LIKE that situation. That means that I can draw the temper myself and get the steel just the way I want it.... JUST soft enough to hold an edge without chipping. Right now I choose edge retention at the expense of ease in sharpening, but maybe this will change in the future. This chisel is TOO soft and it wouldn't be right to sell something that doesn't work to it's potential.... This one needs to go back into the forge to be re-hardened. Not today, though. I've got more wood to plane.

I cut some of the thinner POCedar to use for drawers and such. I started to plane it down and it felt as though the tools were fighting me, the wood was tearing out, nothing felt right. I went back and cut a bunch more wood on the tablesaw so I would have extra for other projects and this time, when I used the planes, things worked well. This is the stuff that is soooo hard to learn, to listen to your inner-self and KNOW that you are doing something wrong. If I had continued, I would probably still be at it NOW, so I figure that I actually saved time by shifting gears. I know that I did a better job.


Saturday, November 23, 2013

A tool box design (finally!), goal.... KISS.

This came up for auction on Ebay yesterday..... Finally, a tool box design that I like!


Japanese tool box, Tansu style.


Familiar no-hardware lid


4 simple drawers


Design brief, get the damn tools off of the workbench. I've got tools piled on top of tools, chisels rolling all over and anytime that you reach for something, you have the very real possibility of losing a finger (or at least some blood). This guy should keep me and the edges separate and, even though this will still live on the top of the workbench, it will reduce the clutter somewhat.

Actually, I'm not a fan of having drawers in a tool box. The sound of metal drawers being slammed open and shut while accompanied by loud cursing....... Yeah, been there, done that. "Where's the FRACKING 19/56th's WRENCH?!!". I've also got a problem with open boxes, too. Bottomless pits, they are. Possibly worse than drawers, I haven't decided. Well, I've got to do something and it might as well be this.

These last time the pile threatened to overwhelm, I built this in anger....


Pine box

I love to build simple boxes.... my problem is that I have a hard time KEEPING them simple. It always starts with the simple chamfer, then spirals out of control. How a simple beveled edge turns into a carved, rolling bevel is probably a worthy subject for a psychology dissertation. I love simple restraint when it comes to design, and I hope to someday be able to achieve it.

I went to the lumber yard, saw a big stack of nice pine 1x12's and thought... SIMPLE PINE BOX (SPB). This is what happened. Finger jointed and pinned, elliptical carved base trim and handles, shellac and wax. The size is 12x16x32 and it was supposed to be a tool box of sorts. Now I don't know what it is. My wife says that it does a good job holding sweaters and stuff, so I guess that it's not a complete failure. It got too fancy, though. It's supposed to be a wooden crate, for gawds sake. I might like it better if it had a stand.... hmmm. That's how it begins.

I made this the other night, for a remembrance. I had some ideas, some of which worked, others that didn't. The first version got scrapped entirely. Wishes/fishes/horses/beggers.....Nothing showed up in photos, of course, so you'll have to take my word for it.


Family heirloom walnut. The underside of the top is a reverse cove, very shallow. That worked. The base cove is more pronounced, with a slight chamfer on the arris. This ended up being too much, muddying the whole. The horizontal lines, are also too prominent.


Soooo close. The top is a simple beveled plane on one side, and an elliptic curve on the other. On paper, the elliptic looked nice, but in 3D it really flattened what would have otherwise been a very nice line. "I curse you, Z axis!"

The trick with the tool box will be to keep things simple. KISS principle applies. I want a chisel drawer, a deeper place to put planes and long enough for saws. I plan to follow the plan for the box at the top of the page pretty much as-is. Maybe I'll add another drawer for carving tools.... And bamboo pins..... Forge some nails and pulls, maybe a lock set....... Now might be a good opportunity to learn urushi..... Yeah, and hidden dovetails....... So it goes..


Sunday, November 17, 2013

DMT vs. Suehiro, sharpening mania and "True grit"

Why can't we all just get along?


Some kids just can't play well together.


Not just scratches, but specks too! Zoom WAY in.

I don't know what the deal is but these two just don't work together. HUGE scratches nearly every time I use the DMT diamond stone to flatten the  Suehiro 3000. Even worse are the occasional spec of whatever. I'm not sure if it is diamond or just a metal shard. Whatever they are, they DO chip blade edges.

This is a real bummer because I use the DMT quite a bit. In less than a year, the surface has become feathered out at the edges, with just base metal remaining. The thing never was particularly flat to begin with, being bowed along its length and slightly undulate. I use it to flatten the backs of irons, chisels, waterstones, pretty much anything that needs to be flat. Oh yeah, the DMT is also making the"Thunk!" of death which signifies incipient delamination. Before I resort to buying an Atoma diamond stone, I'll probably try a kannaban as I definitely have a thing for the old and obscure. You can't get much more oldschool than grit on a piece of steel. Yeah, kannaban and a chunk of cement....... that's the ticket!

I broke out the  artificials so that I would best know where any scratches were coming from. That is always a trick when testing a new set of stones. Say what you will, the man made stones are consistent in grit...... or are they? Even the artificials make their own distinctive pattern of marks caused by the relative size range of the particles used. Yeah, range. Not all one grit size. OR......the type of binder. A different binder will cause the abrasives to release at different rates, leaving a different finish.

I am testing out the new Siletz river shale and the finish that it left on a chisel was pretty good, but not perfect. Just a trace of scratching, but is it REALLY coming from the shale or somewhere else? I also wanted to see how it would finish a plane blade made using wrought iron as the base iron, so back to work I go..... but I keep getting these random but very distinct scratches, like something is imbedded in the stone/s. I had a nice, fast progression but would be left with a near perfect smoky mirror look.... with just the trace of scratches remaining.

Now this is COMPLETELY immaterial, it was a VERY good edge, but my curiosity ya know. Did I need to spend more time at the lower grits (like 2000)? Was the scratching from natural/synthetic/diamond? Back and forth, one stone at a time using contrasting indicator scratch patterns, using known (haha!) stones to polish up the edge, then back to square one again. And again. And again....

Suffice it to say that even MY mania has limits, and for the time being ALL stones are being put away....

Time to build something.