Wednesday, February 26, 2014

Kanna ER.... Japanese hand plane Evaluation and Renovation: Part I


All of my Japanese tools are purchased on Ebay, generally directly from Japan. If you know what you are seeing, there are some great deals to be had on good, serviceable tools, but most will require a bit of work first. Heck, even the NEW Japanese tools need work before they can be used. It is a different cultures, with different expectations and if you want to use some of the greatest tools available, you need to get used to that.

I am going to document the process of a typical Japanese carpenter's hand plane (kanna) restoration. This plane is a good example of what you will find on eBay, not too fancy, but a good starter kanna. Much of what I will do might affect the collector value, but I'm not worried about that. This is for a tool that you intend to actually USE!

The plane was purchased from my friend Junji (Ebay seller yusui) and he gets LOTS of good stuff, ships at cost (2kg/4.4 lbs is about $30 w/tracking and takes 10 days) and is very honest and helpful. Domo arigato Junji!


First, some forensics....


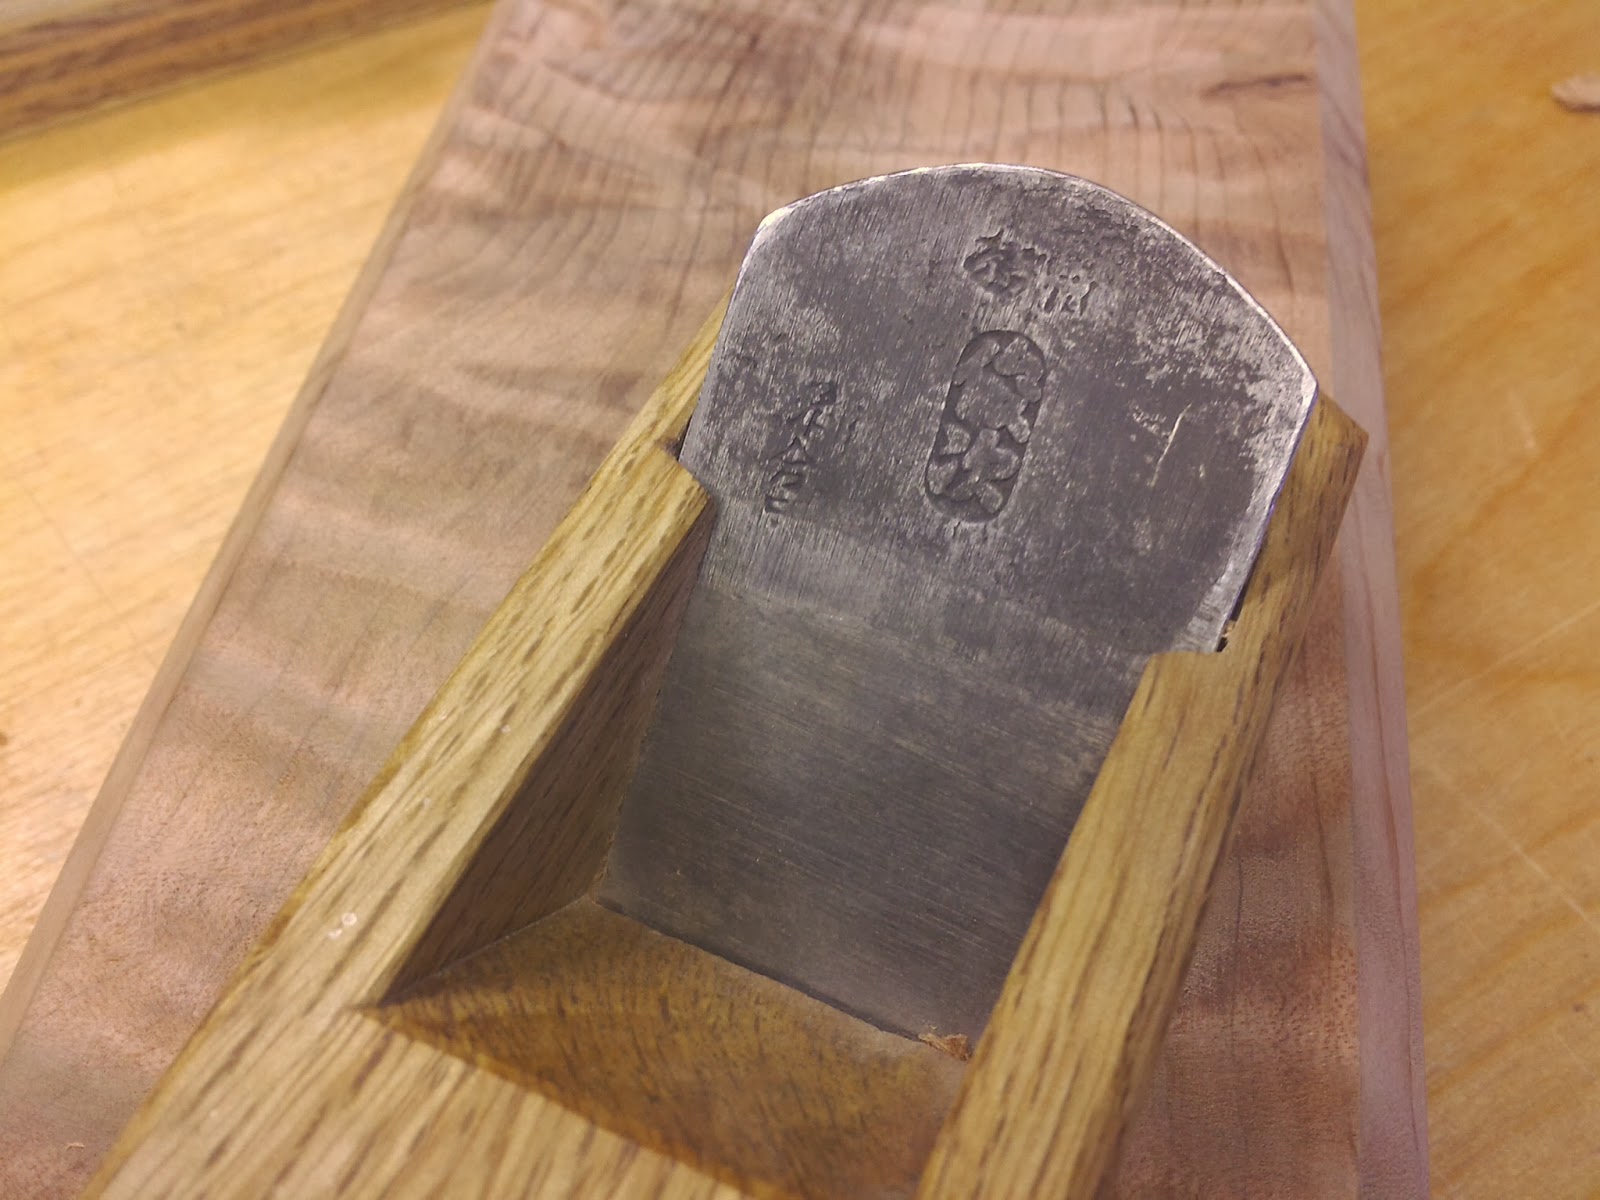
Long head to the blade, so it hasn't been used/sharpened much. The body of the plane looks good, a bit stained, but tight grain Japanese oak and a nice patina.

The kanji symbols *look* like they are hand chiseled, but are actually stamped. The back blade doesn't fit down into position, it's too tight. It has probably never been fitted properly.


Neither blade is too beaten up and they still have a good shape to them. Lots of kanna blades are squashed and folded from years of using a hammer to adjust the blade depth.

A better view of the stain....


Notice the angle of the dai body at the far right of the photo above.

And to the left, below.


An interesting angle to the dai.... This was cut at the factory/manufacturer. You can also see a tiny wooden plug where the retaining pin goes into the side of the plane body, just to the right of the blade in the photo. This is polite. To see the pin itself is considered.... coarse, rude, sloppy, kind of?


Cracked dai, very common..... Huge mouth opening, too.


Some very faded printing is visible on the angled face. I think that it probably says "Hit here!" or something similar...


The crack isn't very deep, though. The dai was cut with a flat grain orientation (masame) with the growth rings running parallel to the upper and lower surfaces, side to side. Medulary rays run up and down. While this is the most common way to cut a wooden dai in Japan, it is also the most prone to splitting.


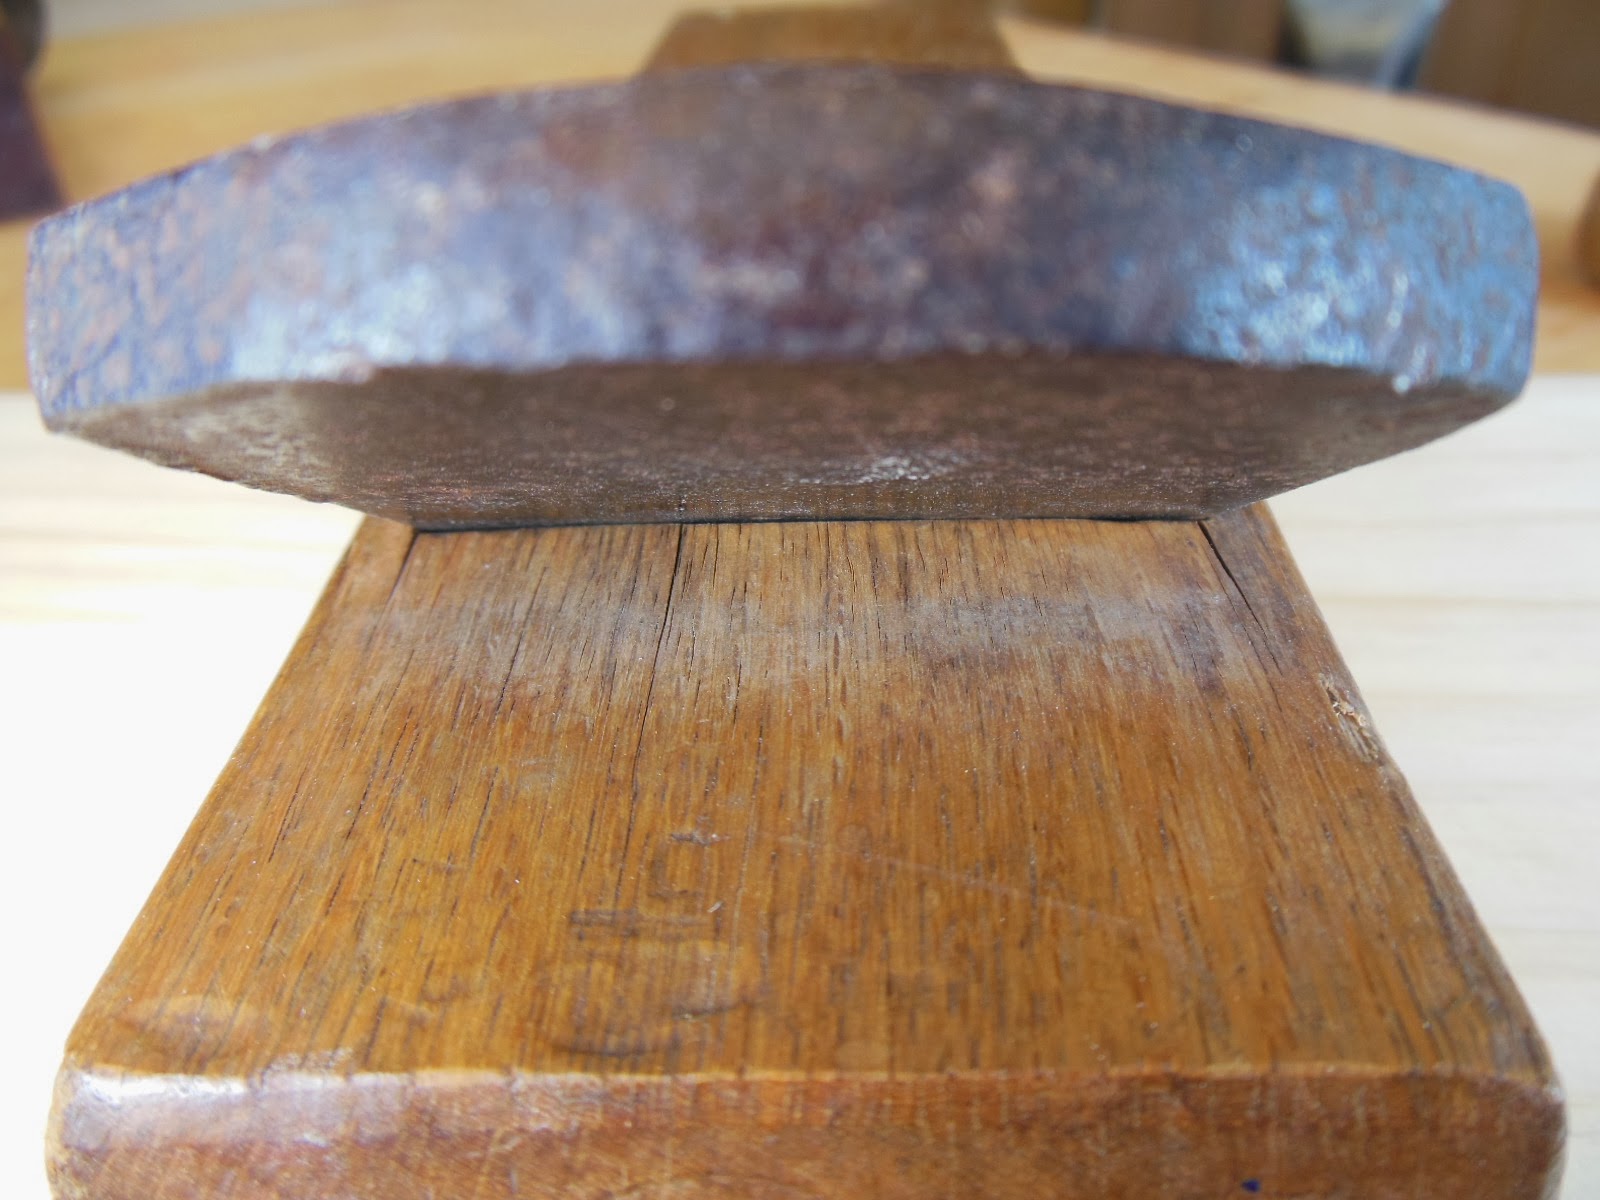
And HERE (!) is one reason why this kanna body has split. The blade is WAY to tight laterally. You can see cracks at either edge of the body where as the wood has shrunk around the metal blade, forcing the wooden body to crack. 

The cracking of the wooden body, in this case, is indicative of a poorly seasoned dai. The wood still had a bit of moisture retained in the cells, and as this kanna sat on a shelf in a hardware store, it continued to shrink, crack, and split. While unsightly, this is NOT a big problem. Even well seasoned dai's will split. That's why sooooo many of the used kanna have a bolt running perpendicularly through the body.


As the body shank, it also warped in different directions, too.

 Longitudinally......


... and transverse.


Again, this is normal stuff. Some Ebay sellers will say that something like "The body of the kanna is straight as an arrow with no.....". It COULD be..... Anything is possible, but it probably isn't, haha. Hyperbole runs rampant on the 'bay.


How are the blades?

This is the back, where the writing is. The back faces you when you are using the tool, as though the tool is an extension of yourself.

Rusty, of course.....


... but not mangled or disfigured by careless sharpening. 

Look out for deeply pitted rust in the urasuki, the hollow lookarea just above the cutting edge. This is the future cutting edge, and deep pits make the blade pretty much unusable. A badly rusted ura is one of the few deal-breakers, for me. Just about everything about a kanna can be fixed but if the pits are too deep, you can run out of steel before the pits are gone. That leaves you with...... an oak 2x4 with a chunk of metal sticking out the top, haha. An unsharpened, fresh from the blacksmith blade is the easiest to work. Ahhh, a fresh palette (almost).

Rust on the front of the blade is irrelevant. This is the front.


It is very hard to judge the blade quality, at this point. The bevels are rusty on both blades, preventing me from seeing if ren-tetsu wrought iron was used for the backing metal. The back blade looks like it is stamped steel, not forged and laminated like the higher quality chip breakers.


Still, not too ugly. These will clean up beautifully. I like the ark of the chip breaker. Nice shape....


So far, I am rather certain that this is DIY level tool, meant for occasional use by the homeowner and not intended for the pros. The blades look good. Not fancy, but good. The body of the plane is actually repairable and is probably done moving, so future warpage should be minimal. It hasn't been abused, just kind of neglected. It is PERFECT for this project.

Now comes the fun part! This kanna probably never worked very well for the original owner, and it is completely unusable now....... what can we turn this into?


Continue to part 2.....


Tuesday, February 25, 2014

Waterstone pond..... and accessorizing your sharpening stones


Rough stock. An old, decrepit sailboat, full of still valuable teak.

This


Into this 


A stone platform for a new waterstone pond.


Also ……

Old, OLD old-growth redwood, washed up on the Oregon coast about 6 years back. Some of it turned into windowsills for our house but this ribbon figured piece.... What will IT be?


The surface, as left by a Japanese plane, then a file.


 The plane gave a good finished surface with some minor blemishes, and just the slightest bit undulate.... Following the surface grain. I lightly hand sanded with 330 grit, even though I know better. Muddy. Then draw-file using a flat mill file. Better. VERY hard to avoid ALL tear-out, particularly in a such a soft wood as redwood.

Still, I can do better..... A different plane, one of my favorites, a small 42mm ko-ganna, single blade. Bought from Junji (eBay seller yusui), then cleaned/tuned and put to work.


The kanji is hard to read. Nothing too special, just a good, user plane. The blade does use a nice ren-tetsu wrought iron for the backing metal, though. Each blade is different. I love that.


Tight mouth = reduced likelihood of tear-out.


Much better. Sharper grain definition. The sheen is back.


Notice the difference in surface quality. The chamfer is much rougher than the other two faces.


The rougher chamfer is the file finish. I may leave it this way, I haven't decided. And what is this to be, you may ask? My original intent is for it to be a box enclosure for a 1200 grit synthetic waterstone. Something practical for kitchen knives, and nice enough that it doesn't get stuffed into a drawer, never to be used.


The inside has been hollowed and will get lined with some thinly planed teak. The base platform will be Brazilian walnut...... We'll see.


I am of two minds divided. Stone enclosures, while great for oil stones, are less well suited for thirsty synthetic waterstones. Some man-made stones suck up a LOT of water and the box prevents drying out.....AND the man-made stones are messy, too. This kind of defeats the purpose of a nice box.


This is what is in our kitchen.....


.... an old carborundum oilstone in a simple, fitted mahogany box. It gives a nice, toothy edge to knives. I mostly use this dry, but sometimes with water. If I use a LOT of water, I can expect the box to swell/shrink for the next two weeks or so. A more rational mind might just use oil instead of water (so messy!) OR, say, cut the box for a looser fit, hmmm?


Rational..... bah!


Monday, February 17, 2014

Table tune.... kanna sole manipulation


Some days things are easy. Others, well...... If your Japanese plane (kanna) isn't performing the way that you would like, it is probably due to one of two things.

  1. Sharpening deficiencies (+80% probability).
  2. Your sole is in need of adjustment ( Whoa!!.... Karmic, dude!).

Wooden bodied plans are alive, in the sense that they move, breathe, change, and adapt to new conditions. There must be a lesson for me somewhere in there.

Periodic kanna dai maintenance is a fact of life. Like many of the finer things in life, a price must be paid, but this is a price that we all can afford and it will actually pay dividends in the long run by fostering awareness..... connectedness.


The other day, I noticed that the sole of one of my finishing planes was looking a bit odd......


The lighter patches are wear points from contact interference. Too much contact. Although this really isn't too bad, I thought that this would be a good example of periodic maintenance, the typical day-to-day of kanna life. To maintain good performance, we need to get rid of some of this.


Ideally, we would see marks at only these two locations that the chisels are pointing to. Two bars extending the full width of the plane and around 5-10 mm in thickness.


Retract the blade just a bit and grab a GOOD ruler ( or an actual straightedge!) and take a peek. Again, this plane is close to what you want to see....


Contact to the right of the blades leading edge..... air gap of just a sliver..... and contact all the way at the end of the plane, far right. There is too much contact to the left of the blade, however. We'll get to that in a minute. First, the mouth, the Ha-guchi.


You can see a thin slice of wood that I glued into place to close up the mouth a bit ( the blade is retracted about 1mm). This area extending 5-10 mm down from the leading edge of the blade is "THE MOST IMPORTANT PART" of getting a kanna to work well. You need full contact here......


Longitudinally (also notice the sliver of light to the left of the blade. No touching!).....


and horizontally.


Also at the very back of the dai ( AND front of the dai, if you want a 3 point contact).


To the left of the blade (actually the front of the kanna), I am going to remove ALL contact. That will leave only the two bars, a 2 point contact. A third bar, all the way to the left, would be a 3 point. I think that a 3 point is easier for learning because it makes the kanna more stable in general. I use a 3 point, mostly.


I had set this kanna for a 3 point, but now I want too try a 2 point. I need to remove just a thin bit of wood, just a few shavings and only in a few spots.


Now, for comparison, here is a different plane. This would be a good example of almost ALL Ebay kanna and even a lot of new Japanese planes. In Japan it is expected that a craftsman will know how to take care of his own tools and will adapt the tool to fit his needs. The cheap crap is sold ready-to-use. Over here, we pay EXTRA for a tool that needs no set-up, pretty much the opposite, haha.

Again, this is what you DON'T want to see!


Contact at the far left, then again at the middle of the span to the right. Exactly opposite, bizzarro world kanna!


There is a pronounced  horizontal dip, right at the leading edge of the blade.

If you could get this plane to work at all, tear-out would be..... problematic.


OK, back to kanna #1. I sometimes I double check that the contact bars are all in-plane by using a piece of sandpaper, adhered to a glass plate.


I use two tools for removing excess material. A dainaoshi kanna ( a small scraping plane).....


... and an old blade from a western style block plane. 


The old plane blade is soooooo soft compared to the Japanese blades, it is hard to imagine ever using them again for real work. They make GREAT scrapers, though! A few licks on a diamond stone raises a burr, similar to a cabinet scraper.


I took off just enough material to kill the gloss, and just the high points, no more than needed. A good blade can outlast multiple wooden bodies ( and the owners!), but I don't want to cut a new dai any sooner than I have to.


Scrape


Tinfoil makes a great feeler gauge. We are talking microns here, but it makes all the difference in the world.


You can take a cleanly planed FLAT piece of wood, wet the surface of the wood with a slightly dampened cloth.....


.... take a swipe. You can see the areas that are making contact. I will scrape a bit more towards the bottom and call it good enough. There is a lot of very sophisticated physics going on here, with both the body of the plane and the wood being planed changing shape in response to the force (you) being focused by the blade. You can actually FEEL the heat being released as you are planing, and some blades will get discolored, as though being burned. Amazing.


This is not high performance tuning or anything, just normal stuff. It's pretty easy, just takes a few minutes, and will get your planes working well once more. It's not rocket science but if you want to use some of the sharpest tools imaginable, this is the price. I might do this once a week/month/whatever. You do it when you have to.


I need to work on my sharpening skills, these are ragged and thick. The blade isn't very sharp. Embarrassing.....


AND my magic chisel box is full of fixers in need of love.


So many projects. Soon.


Sunday, February 16, 2014

The OTHER kind of planer----sharpening DW675 carbide blade inserts


I was planing some wood the other day (surprised?) and it felt too much like work. How sharp are these blades, anyway? It turns out, not very. The DeWalt DW675 3-1/4" planner uses a double sided solid carbide blade, and while I seem to remember flipping them a few years back, there has been a lot of harsh use since then.

Carbide inserts are great! Long lasting and, at least if you have some diamond hones, easy to sharpen. REALLY easy compared to HSS or D2 tool steel, and since carbide won't get all that sharp ANYWAY..... you don't have to feel like a slacker for only going up to a #600 grit or so. Yes, I actually sharpen disposable inserts. In less time than it takes to go to the store and back, I can hone the inserts to good-as-new sharpness. The store doesn't have these inserts anyway...... this is WAY faster than waiting for Amazon.


Old/new


2 blades 180 degrees apart, 3 gib screws per.


 I just used the skinny little wrench that comes with the planer. I think that it's a 10mm. I guess this would be lefty-loosey (that saying still doesn't make sense). My hone is a double sided Smith's diamond hone from the Walmart fishing department. I think that I paid $7.95 about 10 years ago and the damn thing still works fine. Not very precise, but good for this type of thing.


I do one blade at a time.


The retainer is a 2 piece arrangement with  the carbide blade sandwiched in between. There are registration grooves that ensure proper alignment, and it seems like a practical design. Simple, but effective. There are also 2 set screws to adjust the height. I just leave those alone, as we're only removing the tiiiiiniest amount of metal, not trying to grind out big chips.


This is the carbide insert, bevel side up, right at the edge of the workbench. Right behind that is a piece of plywood that I use to hold the blade down. The plywood is also beveled, but that is just to give clearance, NOT to act as some kind of jig. This is WAY to easy to need a jig, just squint and free-hand it. 


Here is the blade, clamped down and already honed. It is sticking out maybe 2mm, just enough to work on. The hone is a coarse (#240 'ish?) and fine (#600?). I do both.


Don't forget to hone the back, too. Then put it back together.


When I reset the blade, I let the insert protrude just the smallest amount, about 1/64.


That's it. Maybe 15 minutes to do both inserts, all 4 edges. Really.

We are surrounded by soooo much discarded waste, much of it originally bought out of "convenience". Being able to maintain and actually improve your tools, make them as sharp as you could wish for, learn how to actually DO something..... That make the concept of "convenience" laughable. If I were to give one piece of advice to a woodworker, it would be "Learn how to sharpen your tools". Dull sucks.


Now....... Time to tune up the Japanese plane....