Saturday, August 30, 2014

Found!!...... but is it Wrought iron?


So it's in my mind that there are some interesting metals out there, I just need to learn how to "see" them! A friend had an old truck axle for me, to use in making a hammer (or 10!), and on the way back home we took a little detour.

In a backwater slough, we found the remains of an old log boom. Back in the day, huge rafts of logs were floated downstream to the lumber mills. A log "boom" was a string of logs, tied together, which acted to hold the mass of logs in one area, like those pole/strap thingies at the bank queues. What we found was some old logs with a bunch of spikes and metal rods still stuck in them.

Wrought iron?

Here is a 12" spike, in pretty good shape.


If you look REEEEEEAALY close, you might see a trace of "wood" grain, but is it wrought iron?


Look REALLY close.


There were some sections of 1" thick bar, 1'-2' long. It forged very nicely....


But etching didn't show much.


The break test.....


Is this the "grain" that they keep talking about?


Here is the break test on one of the spikes....


Not much grain, but possibly a bit. It looks a bit laminar. When these samples break, they tend to fail slowly, gradually.


Here is a big nail, from a different log. Most likely modern, and probably not wrought iron.


The grain looks homogenous, and when bent, the sample broke cleanly and was abrupt.


Here is the break test from a piece of known mild steel.


Some laminar elements, but mostly homogenous, and the break was clean and abrupt.


A soft (I think, not marked HC in any event) railroad spike.


Interesting grain, very coarse at the core, finer at the outer surface, and the break was very abrupt.


Most of these pieces of metal have been sunk into saltwater soaked logs for God know how long. Even at the most corroded points, there was no real "wood grain" to be seen. It just looks like rusty metal.

I put the most heavily corroded sections in the electrolysis tank overnight.


There we go..... Looks like wrought iron to me!


The exposed portion has no real grain visible, maybe a touch, if you know what you are looking for.


The other end that was hidden under the thick rust sure has a dramatic wood grain look to it.


I love how the end has flared out, due to hammering or corrosion, I don't know.


Same thing, rusty, but a different type of metal.


The pattern of corrosion looks different, even after electrolysis. More pitting, less wood grain.


The end, though..... That looks like a stranded composition to me.


Some of the erosion is very dramatic.


This should make for some very interesting patterning, when forged into a blade.


At the rate that I work at, this 60 lbs should last quite a while.


Ugly..... Interesting, potential!


I've started a few blades.


The kuri-kogatana shows promise, but the marking knife has some cold-short tearing, so it will probably get trashed. Good practice!


I've forge welded this stuff into billets, folding the layers again and again. Some I've twisted, then etched, but nothing so far has exhibited any dramatic patterning. I think that this is just a very "clean" form of wrought iron, highly refined, and with little of the slag that gives wrought iron the dramatic patterning that I so like. The lack of dark inclusions, combined with the excellent forgeability leads me to this conclusion. That's both good and bad. Good, high quality wrought is easier to work, supposedly, and is probably better for a novice like me. It doesn't look as cool, though.


Wrought iron came in different grades, intended for different uses. There was talk a few years back about substandard wrought iron rivets possibly contributing to the sinking of the Titanic.

Bad rivet?


Wrought iron was rapidly being superseded by steel at the time of building in 1911-12, and while steel rivets were used for most of the ship's construction, wrought iron rivets were used in the more restricted areas of the ship. Possibly some corners were cut, and cheaper materials were used, to maximize profits? Surely THAT could never happen!


Here is a beautiful rivet, by Ballard Forge (I believe).


Nice.

Finding wrought iron "In the wild"


Wrought iron kanna blade, nicely forged (not by me, ha!).

I am working feverishly to improve my forge welding abilities (to little effect, it seems at times), emulating the style of blade construction that I admire so much. Hard steel/soft iron. For hard steel, I have been using old files (Nicholson, Simmons, Heller etc). Finding that stuff is easy. The trick is finding the soft iron.

Most of the soft metals that I have found are considered "mild" steel, with a carbon content of <0.40%. While this material doesn't have enough carbon to achieve a serviceable, durable edge, it DOES harden a bit after quenching. One of the beauties of a hard steel/soft iron blade is that it results in a combination that is easy to sharpen. Harder iron means more difficult sharpening. I want SOFT iron!


The gold standard of soft iron is "wrought" iron. Real wrought iron isn't commonly available. It has  not been produced commercially for something like 50 years now. I'm not talking about "wrought iron furniture" type iron.

The Eiffel tower is made from REAL wrought iron (thanks Wikipedia!).

Home Depot wrought iron isn't.

This is almost always mild steel bent and welded together to LOOK like true wrought iron. I want the real stuff.


The trick is finding true "wrought" iron. I had decided that I wanted to start working with this material a few months ago, and have been looking ever since. How do you find this stuff? What do you look for? Is it actually THAT rare?


Just the other day, literally minutes before pulling the trigger on some salvaged wrought iron from a seller on eBay, I found a VERY rusty piece of metal, half buried in the yard. Our house seems to have been built on top of a garbage dump, so this wasn't that unusual. Uncovering random junk, that is. It could be worse..... At least it's not built on top of an Indian burial ground ("Poltergeist" anyone?).

I forgot to take a photo of the metal in its "as found" condition, but it looked like your average rusty junk. At the same time, my daughter found another chunk of heavily rusted steel, about 10' away. Wrought iron?


The only methods of field testing that I've found for distinguishing between "real" wrought iron  and ordinary mild steel, are three:

  1. The bend test. True "wrought iron" has a typical (stereotypical?) stranded or fibrous appearance, at least when bent, then broken. Sometimes the exterior surface has a bit of a wood grain look. Notice the "stranded" appearance of the break?
For sale, http://www.oldglobewood.com/real-wrought-iron.html 


2. Spark test.

http://en.m.wikipedia.org/wiki/Spark_testing


3. Acid etch.


A quick swipe with ferric chloride brought out the character in this kanna blade.


Simple, right?


Laminar corrosion 

Severely corroding metal sometimes exhibits a peculiar form of corrosion, termed "laminar" corrosion. I used to see this form of degraded metal underneath my car, acerbated by the conditions inherent to a Midwestern winter. This type of rusting can look very stranded, a bit like wrought iron.


The two pieces of metal that we found were the same size, 1/2" x 1/2" x 12". Both were VERY corroded, and neither showed any visible "stranding" or wood grain look. Out of curiosity, I tossed them both into the forge, just to feel what it was like to work such ugly, corroded stuff. I thought that they would just crumble apart, they were that bad.

To my surprise, both pieces of metal forged just fine. That was interesting, but of even more interest, was that one piece (the one that my daughter found) was MUCH softer than the other. The chunk of rusty crap that I found worked about like any other piece of steel, but the soft one she found worked like butter, well..... More like clay maybe. Really nice, though!

Wrought iron has a reputation of being difficult to work, at times. You are supposed to work it at a very high heat, nearly the same temperature that you use for welding. If you work it too cold, it can start to fall apart, unravel almost. This is due to it's filamentous nature.


I forged this down hot, to see if the metal would split once it got too thin. It didn't, so I hammered it out flat, but cold. It shows very good integrity, better than mild steel actually. It reminds me of working copper. I soaked the sample in ferric chloride for an hour, getting a slightly mottled look towards the tip, but nothing like my kanna blades show (and that only takes a few seconds).


I tried the "break" test. The soft sample is on the left, the harder is on the right.


Neither sample exhibits the characteristic "broken stick" look of wrought iron. The picture was taken after the samples had been out in the rain for a few days, resulting in some surface corrosion. See how much cleaner the sample on the left is? Weird!


We also found a rusty nail in the yard (imagine that!). It also forged well, felt soft, and the break looked a bit fibrous.


So, is this stuff wrought iron? I don't know. What I do know is that it is a really nice material to work with.... and I want more!


Wednesday, August 27, 2014

Quick rust bluing--- Back in black!


The black finish left by the Birchwood-Casey Super-blue just wasn't doing it for me this day.


The photo misleads, making them look a bit better than in real life. Cameras usually work the opposite, right?


The product is just fine, very fast, easy to apply, etc, but the result is not particularly durable. The cold bluing process affects just the very surface of the metal and, while great for very minor touch-up, it is not as well suited to high wear areas like the heads of kanna blades and such.

There is a simple process that you can perform, in your kitchen (maybe..... Your call), using ingredients that you already have, that results in a very durable black surface on iron and steel. Rust resistant, too.

Rust bluing. Red iron oxide (Rust, bad!), can be converted into black iron oxide (Magnetite, I believe), which will prevent future formation of the bad red rust. The process is very simple, but, I'm warning you now..... It looks scary, and feels oh so wrong!


First the scary part. It is actual rust that gets converted, so the metal needs to be fully covered in red nastyness. Not big chunky rust, more of a thin film of oxidized metal. Traditional rust bluing is a slow process, employing various techniques to rust the surface of the metal. Simple exposure to the elements works well, but humidity tents are faster. An old favorite is the manure pile (as my friend Brandon reminds me).... Just stick in the metal (Deep. Keep one hand free, to plug your nose!), and the next day the steel will be nicely rusted.

I don't have any manure handy. Manure works well because the moisture, combined with the heat of decomposition, speeds the formation of rust. We can do one better, by using a mildly corrosive solution to speed the process along. I have been using a simple hydrogen peroxide and salt solution. That I do have.


Before I start..... The process IS corrosive to the metal, so prudence dictates that any areas where I DON'T want rust (edges) need some protection, a resist.

Resist coated bevels 

I outline the ura, too.

In this case, I used clear nail polish from the $store. I have used paint, permanent marker, and varnish, too. Nothing has worked perfectly, but failure of the resist isn't that big of a deal. I still try, though.

This is a very simple process, nothing is exact. Most anything will work, so feel free to adjust. I am STILL adjusting, and things just get easier. Hot liquids (hydrogen peroxide, in this case) can accommodate a large amount of solute (salt), so I warm the peroxide using a heat gun. You can use a microwave to heat the peroxide to boiling and make a super-saturated solution, but I find that this works just fine. Maybe 3 tablespoons per 1 cup of peroxide? It's not exact.


The only aspect of this whole process that IS exact, is the need for cleanliness. The parts need to be clean and oil free. They NEED to rust, and anything that impedes that process will affect the outcome, leaving things looking blotchy. I typically solvent wash (acetone or lacquer thinner usually), then use a spray cleaner like 409 or spic-and-span (sp?), then finally, hot soapy water. I have just used the hot, soapy water and it was OK.

Now that the part is clean, it needs to stay that way. I wear rubber gloves to avoid contaminating the part with my skin oil, but that's the only reason. Nothing here is toxic..... Cool!


-----------------------
Side note.

I have noticed that some metals will respond differently to this process, and be quicker to form oxides. High carbon is fast, while the softer iron is slower. Certain blades are more resistant than others. A small Japanese hammer head doesn't want to rust at all. I wonder what kind of iron it is..... Very strange!

Anyways, one way of achieving a more even effect, is to activate the metal surface. A brief soak in vinegar works well, and is available in the kitchen. Phosphoric acid, muriatic acid, or ferric chloride might not be (not even in MY kitchen. There are limits!). Brief exposure seems to give the process a jump-start.

---------------------


Put the peroxide/salt solution into a corrosion resistant container, then submerge the metal parts. The activity will be immediate, and looks rather alarming. Bubbles will rapidly form on all exposed metal, instantly oxidizing it, and thereby forming rust. A foamy, rust colored scum will accumulate within minutes.


Hydrogen peroxide, salt, and heat. The perfect rust promoters!

After 5 minutes or so, I remove the parts.


Yuck.

Dry them with the heat gun. This is scary, because the parts rust, right before your eyes!


Even worse! It looks like your worst nightmare (Yeah, I know..... If my worst nightmare is about rusty tools, I've got an unhealthy attachment, a phobic disorder, or a very unimaginative mind. Rusty tools rank pretty far down on my list, all things considered).


I card off lightly, using 0000 steel wool.


Don't remove the rust! Rust is what you want! A thin, even coat of light, surface rust. 5 minutes of oxidation won't form deep pits, or anything. It looks worse than it is.


Now comes the magical transformation ( *insert "magic" sound*).


I use my magic crock pot (on high heat), but boiling water, in a pot on the stove, works even better. Heat, applied through a conductive media, in the absence of oxygen, transforms the red iron oxide to black magnetite. Chemistry, physics and magic belong together, in my mind.


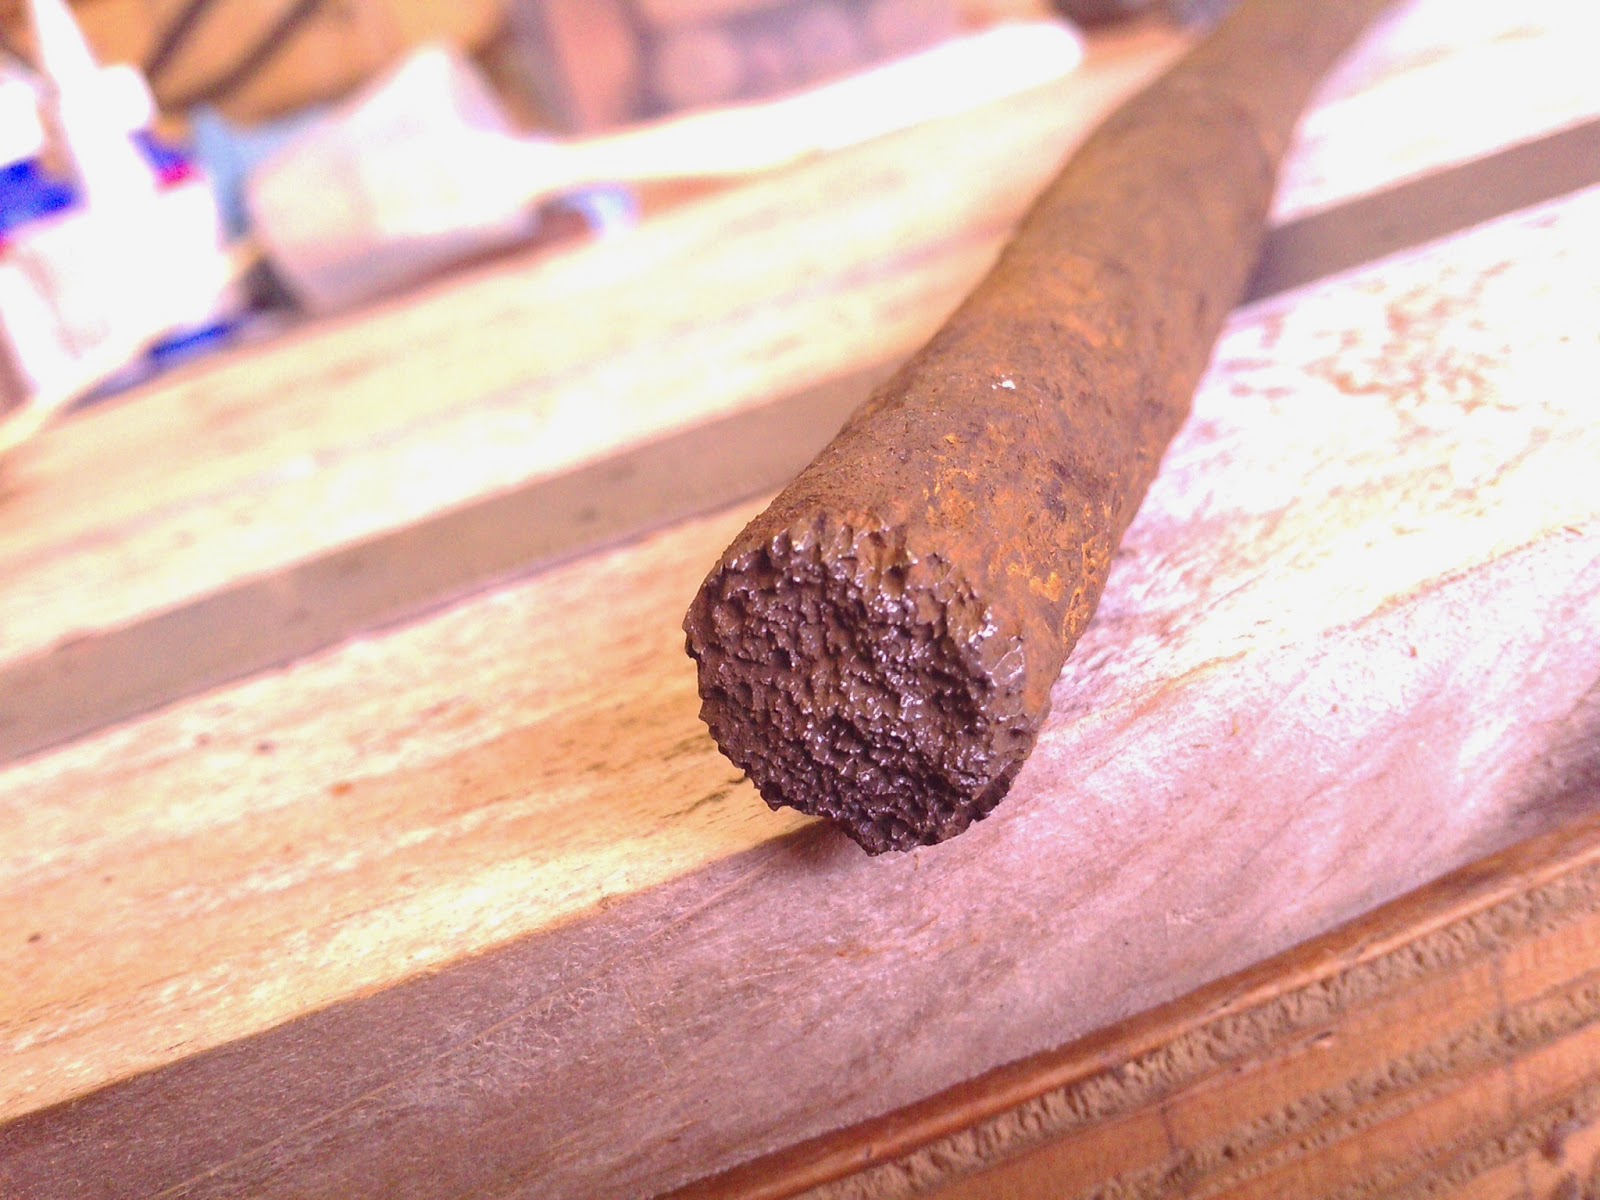
After 20 minutes in the crock pot, most of the red rust has been converted to black oxide.


In this picture, the thinner black is the new black oxide forming on the bare metal. The thicker, dark black is the original forge blackened surface. Rust bluing forms a thick, durable surface, but requires multiple cycles to build depth. Good stuff.

The hot water in the crock pot is depleted of oxygen. No oxygen means no rust, so you can leave the steel in the bath as long as you want, basically. Boiling water is well below the tempering temperature of any blade, so no worries about soft edges either*. Boiling water will convert the red oxide in just a few minutes.


*And may actually help to relieve some retained forging stresses. Odate wrote that he was advised to try putting a difficult, temperamental kanna blade onto a hot tin roof to relax it. This is much the same thing. More on this later......*


Might as well do them all.


The handle of the chisel is covered by electrical tape, as is the ferrule. The blade will be submerged, and I don't want any water to touch the wood of the handle. Water could accidentally wick up at the blade/ferrule joint, causing rust to form inside, under the ferrule. I only want rust were I can see it.


Repeat the process, rust, then boil.

Things are looking REALLY scary after the third rusting!


The solution will be good for two applications, but making new promotes more vigorous rust formation.


Four cycles is enough for now. Not perfect, but good enough.


The resist has peeled, and the bevels look like hell. They will look better after sharpening.You can repeat the process until the surface is so thickly developed that it resists new rust formation. This self limiting aspect is what gives rust bluing such a well deserved reputation. It is durable, very effective, and achievable using simple means. AND it's a safe process!


Oiled, sharp, and ready to go. The wooden bodies came out well, too.


When you are satisfied (or bored), give everything a good coat of oil. The rust bluing offers a measure of protection against future rust formation and has a micro porous nature, perfect for sucking up, and holding, lots of oil. With a protective oil, it's a VERY good finish.


---------------
Another note....

Got a tool that you want to blacken, but only have 1 hour?

Quicker quick-rust bluing.


  • Clean/degrease
  • Heat small amount (1/2 cup) hydrogen peroxide
  • Add 1-2 tbs salt and stir
  • Paint the tool with the peroxide solution and let sit for a few minutes. Rinse the brush before reuse.
  • Dry using a heat gun
  • Fully immerse the now rusty tool in boiling water for 3-5 minutes
  • Repeat till satisfied. You can reuse the original solution if you don't contaminate it.
I don't even bother with full immersion any more. Just brushing the tool is good enough. Less wasted solution and faster, too. The trick was using the heat gun. It dries the metal quickly, and the retained heat helps accelerate the rust conversion. I've gotten pretty fast at this. I can have a batch of tools boiling in the crock pot, while simultaneously rusting a second batch using the solution. By the time the solution is dry, it will be time to remove the first batch from the boil pot.

I can do about 5 cycles in 40 minutes, then an extra long boil for the last 20 minutes. You can leave everything submerged overnight, then do one more (boil only) in the morning. The water will look like black tea, and makes a good iron rich fertilizer for the garden. Nontoxic!

------------------


Cold bluing solutions (Birchwood-Casey, Brownell's etc) sort of dye the metal, affecting just the surface. Paint forms a film, lying on top of the metal. Rust bluing is similar, but it's not paint, it is the actual surface of the metal, slightly transformed.


Another beautiful aspect of a rust blue finish is the maintenance. Every metal finish treatment is subject to wear, and requires periodic renewal. Rust bluing is maintained and renewed every time that you oil the metal. Over the years, as red rust forms and then gets oiled, it will gradually turn the black to a rich, dark brown. Birchwood-Casey has a metal treatment that simulates this look too, called "Plum Brown". OK, but not the real thing.

Cosmetically preferred over paint, effective against rust and durable in use, old fashioned rust bluing was the gold standard of metal treatments. This is the finish that the frontiers men applied to their guns, meant for hard use, under extreme conditions. It's also time consuming and laborious finish to apply (compared to a chemical dip.....) so, like many good things, is pretty much gone.


Who would a' thought? Rust?!


Saturday, August 9, 2014

Hammer head..... How I battle the forces of inertia!


The new/old kanna has one aspect that I am not thrilled about.

Hammer head.

You can see how the grain of the wrought iron has been distorted. 


Just about every kanna that I've bought has had this condition to one degree or another. When you are a carpenter, you don't carry some special little frou-frou brass hammer for adjusting your plane, you use what's in your hand! That's a steel hammer, ergo.... Hammer head, the mushroomed-over top on the blade. Plastic deformation of metal sounds a bit wordy.


Compounding the choice in kanna blade adjustment devices is the material that the kanna blade is made from. The tool that I want (and sometimes actual get, haha!) is a higher quality plane, and they usually have blades made from wrought iron.

Wrought iron is a great material for kanna blades, because it is soft, so it sharpens easily. Being soft also means that performing ura-dashi (tapping out) on a blade made with wrought iron is MUCH easier, than on a blade made from regular modern soft iron. Ren-tetsu, good for kanna (but not for chisels, maybe).

Wrought iron being soft, and easily deformed, causes the head to smoosh and fold over. I wish that this didn't bother me, as this whole "make pretty" thing is rather silly. This tool works great, as it is. It doesn't need to be pretty. Almost as bad (To me... I'm crazy!) is the way a blade looks when you grind off the folded over part. Then you are left with a misshapen blade, outlined in bright, shiny metal. It draws the eye.


So, I try to hammer the heads back into shape.


Polished tools help. The hammer gets a bit of assistance from an old cold chisel, reshaped and polished. I found it on the side of the road. The idea is to apply force, opposite to what caused the deformation in the first place. The chisel gets underneath, where the hammer won't fit.

Even though the wrought iron is soft, there is only so much that it will tolerate. It would be nice if we could apply heat, but that would draw the temper, ruining the edge holding ability.

The iron may tear, but hopefully it will be a net gain, overall.


It's looking pretty good from the front, back to it's original shape.


Not as nice from the top. Here you can see that the iron has exceeded its threshold of resiliency. Much of this will still need to be filed away. You do what you can.


After filing the nasty parts away, I etch the blade with ferric chloride (PCB etchant), just to get a better look at the grain of the wrought iron.


I love this stuff! Each blade is different, and so beautiful.

The top gets planished to a faceted, hammer finish, then etched, to peek inside.


I didn't want to change the shape anymore than needed, so a little bit of the damage is still there. If I had just used a grinder to remove the distorted metal, I would be left with a flat-top, lopsided kanna blade. This hammering process can preserve much of the iron and come close to regaining the original profile. It does take work.


It isn't apparent from the photos, but the hammered surfaces are actually rather bright. I would like to tone that down, to blend in with the original finish, but this blade doesn't have much original finish, so.....


Birchwood-Casey Super-Blue, gun cold-process bluing liquid to the rescue. You can apply it to small areas, to blend, but the darks might not match. I obviously did everything in sight. Cold bluing is not very durable, and can fade within hours, weeks, whatever. Handling will accelerate the disappearance, but it's easy to reapply.


Something must be in the air today, but the super blue is actually turning blue (often it's black), and I don't really WANT blue, so.......


Rust bluing. We're going old-school!