Monday, December 30, 2013

Amblygonite? - Making a new quartzy waterstone

I was thinking about yesterday's waterstone experiment with the quartz-like yard stone. I pulled out one of my college geology reference books (purchased for $60, the university offered to buy it back for $7.... what a scam!). The stone has a small grain size, similar to finely ground sugar. Not exactly like quartz, which has a typically larger crystal development, and it was a bit too soft. Hmmmm......

Too hard to be gypsum.. Calcite? Metaquartzite? I splashed a bit of vinegar to check for efflorescence and while the stone itself didn't fizz, the dust from grinding DID fizz. DING!  I think that we have a winner!

Amblygonite. Phosphate group, mohs' 5.5-6, short prismatic triclinic crystals, cleavable white/grayish masses, translucent vitreous lustre. Soluble (with difficulty) in acids. I can't find any reference to it's efficacy as a sharpening stone, go figure.


Here is how I make a natural waterstone. Well, not MAKE the stone, but you get the idea. I suppose that this is all a ridiculous amount of work for a sharpening stone that will probably be mediocre, at best, but I enjoy it and they do look neat. I like the irony of using what is obviously a ROCK to make my tools insanely sharp.


This is the rough surface of yesterday's stone. Kind of sandy, but actually very small crystals. Not sandstone or quartz, though.


Cleaves along defined planes. This makes things MUCH easier.


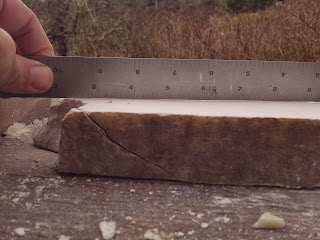
Roughly flattened using a diamond cut-off wheel on a hand grinder. I should have asked for a diamond cup-wheel for Christmas. Maybe next year...


If I want to save myself some work, I get within about .5mm using the power tools. 


These would make things a lot easier. A 4 inch diamond cup wheel and an 8 inch lapping plate...... Oh yeah...


I wet the work surface, then use it as a flat reference plate. Sort-of flat.... flattish.


Bring out the diamonds! I took a few swipes, then decided that it was still too early, so....


Living at the beach means that you have an unlimited supply of abrasive media. I think that the pine needles and wood shavings help too.


A splash of water, a pinch of sand, and a block of basalt. Stone age lapping technique. This goes faster than you might think. Way faster than using the diamond plate, strangely enough. Unless the stone is REALLY hard. Making the basalt block took.... a while. Maybe 1 hour/face...I could do it faster now that I've gotten so much practice, hehe.


NOW it's time for diamonds. No question about the slurry color (it's white).


1200 grit will leave a decent, reflective, polished surface.


And a new, strange, sharpening stone. Average size is 220-100-28 mm. I wonder if it will work?


My old scraper blade, not really sharp. Old Akio Tasai? I think that I've seen these markings somewhere....


Lots of black slurry using ODC#2 nagura. The ODC is soft, like chalk, and I only give the stone a few swipes, barely enough to see. I don't know where all of this slurry COMES from. With no nagura, the stone is very slow and almost no slurry is produced. In use, this stone feels a touch softer than yesterday's stone. 30 seconds work.


Hard to see, but a few heavier scratches and not quite as even grit, but not bad. 1200-2000 grit.


 The Frankenstone isn't the fastest, but it still only took 15 seconds to erase almost all of the scratches from the white stone. That means that the white stone makes very even and shallow scratches. That IS good.

From picking this stone up in the yard, to putting the tools away, this project took 1 hour. That includes flattening the top and bottom surfaces (but only polishing the top) and taking photos. I was done at 45 minutes, then realized that the stone was still covered in moss, so I had to clean the darn thing, too. THAT took longer than the actual hand grinding part.
__________________

High grit finishing stone are the ones that people get excited about and command the big $$$, but a good lower/mid grade stone is the MOST important for daily use. These are the stones that set the edge geometry, making a fine polish possible. I get kanna blades with rounded bevels and it seems to take FOREVER to get the edge evenly polished. Just when you think that you are ready for the next finer stone, whoops, missed a spot. If you just polish the very edge, at every sharpening session you end up chasing an ever steepening bevel until, instead of slicing the wood fibers, you are scraping them. That's hard work.

Right now, my fast progression is:

  1. Diamond (for new-to-me blades. Ughh....a real love/hate thing)
  2. Synthetics 1,2,3k (fast but MESSY and, for lack of a better word, boring)
  3. Frankenstone (3000-5000k)
  4. "Ink" stone (8000k)
  5. Ozuku (8000-10000k
New stuff might take 30 minutes. Once I have set the bevel, I do 2-5 in about 10 minutes. I'm slow.

For fun/touch up's:

  1. Synthetic 1000k
  2. Oregon coast sandstone(600-800)
  3. "Tamba" aoto (1200k)
  4. Frankenstone (3000k)
  5. Jyunsyou (6000k)
  6. "Ink" (8000k)
  7. Ozuku (8000-10000k)
If my bevel is good and flat, maybe 3 minutes.


Strangely enough, I have been looking for a GOOD natural waterstone in just this grit range. I don't know if this is a GOOD stone, exactly, but it IS hard. The natural sharpening stones that I do have are a touch soft for regular bevel setting. I am looking forward to putting this one to work. If this stone works well......


  1. White stone
  2. Black Frankenstone
  3. "Ink" stone
  4. (Blue/green stone) Ozuku
Almost have a DrSeuss rhyme in there. 


Sunday, December 29, 2013

Toishi envy....

The pile of kanna parts and pieces was really getting in the way, time to finish up some more tool rehab and rehabilitation...


Wow! Seeing these in a pile makes me think.... I don't know what it makes me think.... I DO need to make a tool rack, that's for sure! The tool R&R was mostly just blade repair, dai adjustment and fitting, correcting warpage. The usual round of tasks that are required for most of my Ebay purchases. These were all beaters.....clean and functional now.

Speaking of Ebay....I have heard that most of the Japanese tools are overpriced, non-functional items that no one in Japan wants. The good stuff stays in country and is bought and sold elsewhere, cause it ain't on "the bay". Where is it? The good stuff?

It's at Yahoo auctions, Japan. I am SO envious! REALLY good stuff (like I've NEVER seen on Ebay!) and about 1/3 the U.S. prices..... It looks like most sellers won't ship international.....*sigh*... speaking of envy...


Tanaka Kiyoto, my Toishi hero, has been trying out some newly mined stones.

From the blog "Perspective of guitar production house", craftsman Tanaka Kiyoto.
Nao natural whetstone is operated by a really great sounding guy who is bringing some REALLY nice stones to public attention. He is digging them from the parent stone, cutting them to size, testing (using some very impressive kanna blades!) the performance on a variety of tools, and writing about his findings. Reading his blog and follower comments makes me realize how little I know about Toishi and how they are properly used. It IS good to know that other people have the same affliction, of wanting to sharpen things just for the pleasure of sharpening. I need to learn if there is an actual word or phase for this.... maybe there is a support group?

What Nao natural whetstone has is native rock...... nice stuff. What I've got..... Remember the picture at the top? The white thing in the background... that was either a doorstop or a piece of rubble from the old stairway to our house, I can't remember which. I tripped over it for about the 100th time, then thought "What the heck....".


Crunchy quartz


Smooth quartz

"Use what ya brung". I know. Too hard. Doesn't release grit. Too scratchy.... Yep, all of the above. I'm starting to feel as though my day isn't complete without firing up the diamond wheel grinder. I cut and smoothed 2 sides to 1200 grit, just to see if there was any difference in the grain orientation. If that was, it was not too significant.


This was about 30 seconds work, beginning with a diamond nagura slurry. It did something..


Much better. This was 15 second, maybe, using the ODC nagura. 2000 grit or so.

This thing actually worked to a degree. I will use it a bit more to see how much of the abrasive action was due to the surface profile left by the diamond plate and how much was the actual stone itself. It seems to be a somewhat slower mid-range stone, around 2000 grit, but with a very consistent and shallow scratch pattern. The finish is more akin to a sandpaper finish, rather harsh and reflective, but also easily erased by a higher grit stone. The ODC nagura helped the stone produce a nice creamy slurry that cushioned the feel considerably and made for a tolerably smooth feel. I was quite surprised, so much so that I had to double/triple check, then compared the resulting finish to......


My green "Ink" stone. It took about 30 seconds to erase the quartz scratches. Hazy mirror.


Ozuku asagi, 30 seconds more and full mirror on steel.


This was totally for fun, I was expecting NO success at all. What I found was a pretty big surprise. Not world class, by any means, but.... interesting. I tried: straight water (slow, a bit rubbery, some "grabbing the earth/stiction"), diamond nagura (smoother, much faster), ODC #3 (coarse crunchy grit, thicker creamy slurry, fastest), diamond again, water again, ODC#1 (smooth nagura, thinner slurry, better feedback, slurry degraded too fast).

Then: "Ink" stone, Ozuku, quartz w/ODC#1.... Ozuku, quartz W/ODC#3, Ozuku finish.

Back and forth quite a few times, but the scratches are really easy to erase. The stone may have "mellowed" in use, we'll see. Very hard. Rather slow. Might be good for flattening ura's?

Interesting yard rock. Not anything like Nao natural whetstones, though. His Wakasa waterstones make my heart go all a'flutter. Check out his blog to see some of the shavings he pulls.... beautiful smoky mirror finishes, WAY cool ren-tetsu iron kanna blades..... My eyes are green....


Thursday, December 26, 2013

Frankenstone!!! ( broken Tsushima waterstone repair)

Merry Christmas!


It was the week of Christmas and I really needed to get some things done. Why do we wait till the last minute for so many important things? I had gotten two old chromolithograph prints for Renee about three months prior, intending them to be Christmas gifts. It's not like this was a last minute purchase or something, but I DID need to make some frames. That WAS last minute.


I bought these 100 year old prints from Rudy at Geological Specimen Supply and they are soooo cool! Thanks Rudy! He sells through Ebay as nightlights42 and is absolutely top notch. Buy stuff from him (and he sells rocks, too)!

My *ahem* medical condition makes travel a bit uncomfortable (and I hope to be able to use that excuse for as long as possible!), so while my family was away on Christmas visiting family, I had other projects in the works.

Remember this?


These bits and pieces of rock are actually the remains of a large Tsushima black nagura waterstone. They were evidently mined from an underwater mine (really??), years before and have some nice attributes (very fine, even grain with no inclusions, medium hardness and good slurry production) and some not-so-nice (a pronounced tendency to fracture being most notable). This was from the last of a large lot of Japanese natural waterstones that Ebay seller stellers_j has been auctioning off for the last 6 months. If the pieces were 40mm cubes, the bidding would have gone higher because then they would have been in a more recognizable form/size. Full size stones sell for $200-300, 40mm cubes for $30 or so. As it was, I was the only bidder, go figure......

Most, but not all, of the pieces are there and the breaks are clean. Perfect for Super glue! It's funny, I used to hate this stuff, now I use it all the time. Maybe they improved the formula or something. Anyway, it is dirt cheap, flows into thin cracks by capillary action and does a good job of sealing end grain and hardening wood. The loctite was a "plan B" and was not used because the super glue was....


Super!


Not bad! 5000 'ish and very smooth. Definitely a keeper.

Depending on the porosity of the stone, you may have uneven wear at the adhesive seam line. That is the case with this stone, but it's not bad at all. The are a few chunks absent and it would be nice to add some sort of filler to balance out the shape, otherwise the top third of the stone couldn't be used very effectively.I had the plan of filling in some of the missing areas with an epoxy/something blend but after performing a few different tests using epoxy and silica thickener, wheat flour, and pulverized ODC nagura respectively, I decided to go a different route. The epoxy+additive was just too rubbery feeling and wore WAY differently from the real stone. Sacrificing one of my synthetic stones would be one option. Or.....


We have a number of these sandstone concretions laying around the yard, and I found one that was about the same grit and density as the black tsushima nagura. It even had a fossil snail shell in the center! A little bit of artful carving, using the diamond wheel grinder and some 5 minute epoxy (harder and more brittle than the good stuff, perfect for this function)........

 Ladies and gentlemen..... *scary music*...


FRANKENSTONE! Oldschool fossil style. Top.


Bottom. Three pieces were added here.


The line in the middle is from the burnishing action of the epoxy, kind of like a leather strop. Black tsushima nagura finish on the left, fossil sandstone on the right. Almost identical. Amazing.


The wear rate is similar, with the sandstone being just slightly softer, and both produce slurry. The black tsushima slurry is smoother, also more abundant. The sandstone FEELS slightly rougher and sounds different in use but finishes almost identical. No scratchy bits *touch wood*.

The epoxy filled areas are thankfully minimal, although as time goes on I'm sure that voids will appear. I did spend a fair bit of time fitting the pieces. It would have been preferable perhaps to just cut flat-plane surfaces, as this would have been faster and more efficient and also resulted in the thinnest possible glue line. It wouldn't look as cool though and this whole project is the antithesis of efficient, so there. The feel of the epoxy is mildly annoying, but for this price I have no complaints. Just use it like a normal stone and hope that the neighbors don't show up with torches and pitchforks, screaming for blood.

_________________

Even though this stone is now all shot through with glue lines, the stone type is still fragile. This would be a perfect candidate for a string-wrap, as are many other aoto's. Give me a few days to enjoy the fossils before I cover them up. I'll take pictures.


Sunday, December 22, 2013

Fighting the inevitable-rust removal for lazy people

These tools have followed me for many a mile....


My grandfather gave these to me, oh.... 25-30 years ago? This is pretty much the way that they have always looked and I hadn't really given it much thought. Then, the other day while obsessively polishing some new-to-me tool, I suffered a moment of all too rare insight. Some of the tools that I already have are pretty cool! Seeing something every day, well, you tend to not see it anymore.

And I do use these nearly every day. My hands know them and the sharp edges have been rounded down from decades and generations. New tools are harsh and bright and the steel feels funny. Brittle, rather than strong and resilient. These are old, but are beginning to lose the battle against dissolution. Ah, time (and spit!), the universal solvent....


Electrolysis bucket. Rebar distributed around the perimeter acts as the anode and connects to the positive lead on the battery charger. Wow! Ugly bucket AND charger, haha! New chargers have protective blocking diodes and stuff, so they might not work. Not an issue here, obviously. Hey Dad, if you were wondering where your old battery charger went, here it is...


Rusty stuff is suspended in the middle. The rusty tools (shown here in a metal basket) are the cathode and get connected to the negative lead. Make sure that the rusty tools don't touch the rebar, or all this will be for nought.


Baking soda, a few tablespoons worth, improves the conductivity of the water that will fill the bucket. You can use more powerful chemicals, but cheap and safe baking soda works fine. These tools weren't too rusty, so I left them in the bucket overnight @2 amps, then scrubbed with a synthetic pad.

IMPORTANT! Dry and oil the newly clean stuff IMMEDIATELY, or it will instantly rust! Electrolysis, acid washing, de-greasing..... all of these processes leave the surface of the metal unprotected. You need to oil or paint right away. Today, not tomorrow!


See the nice, burnished Gray finish? Electrolysis doesn't harm well-adhered paint or bluing, but will oxidize bare steel to a nice dark gray. Fine by me. Check the progress periodically, but don't worry. The tools won't dissolve and you won't get shocked. You can put your hand right in the water and, provided that your charger works properly, you won't feel a thing. Not even a tingle. At these low (sub-6 amp) power settings, you don't harm the tools any and it will make the rust disappear. This is the safest way to remove rust, bar none. Rust removal for lazy people.


**Caution!** The electrolysis process removes rust and...... sometimes the black finish on Japanese tools is a RUST finish! You can put a thick rust oxide finish on steel by allowing/forcing the metal to rust, then submerging the rusted metal in boiling water. The red iron oxide turns into black magnetite..... rust blackening. THIS MAY OR MAY NOT BE REMOVED BY ELECTROLYSIS! I have used electrolysis on some blades.... fine. Other blades... finish was removed. Go figure...... I'll let you know when I learn more.

Sunday, December 15, 2013

"Soft" waterstones for kitchen knives

A soft waterstone for sharpening knives.

 I like a SUPER flat bevel on tools so that I can be sure that I am finishing right to the edge. Also, then you know what you've got as far as bevel angle goes. If my plane blade is at a 30 degree angle and is still dulling too fast..... well, then I've got issues with the steel. I can't bring the angle any higher because I will run into clearance angle interference so that pretty well means that the plane is only good for certain woods...... The key is to know your angles.

With plane blades at least, flat is best for me. I like flat chisel bevels too, but that is more out of habit than anything else. A rounded bevel can be good on a mortising chisel, for instance, to give support to an edge that sees a lot of abuse..... Most of the Japanese tataki-nomi that I see with rounded bevels have VERY short handles, though. The westerns often have NO handles, and mushroomed ferrules, haha! I still can't get used to the feeling of wailing away on a chisel, using steel hammers no less!

I'm going off on a different track here, but one thing that I would like to write about, in the future, is how old tools have been altered by their previous owners. I have been joyously reading Stephen Shepherd's "Full Chisel" blog....

http://www.fullchisel.com/blog/

MANY years of wisdom here, both in terms of his experience working with period tools AND multiple years of blog postings. Great stuff! A recurring theme is the knowledge of those who came before. They did that stuff for a reason, you know. Wisdom of the ancients and all that, but also that the last guy to sharpen the tool........ he might have used that thing every day for 20 years. Maybe the bevel is set at 35 degrees because at 25 it won't hold. Do you REALLY think that you know more than he did, based on some generic "rule" that you read in some expensive magazine? Just sayin'...... maybe try it as it is for a while, then MAYBE change it. I would save a lot of time if I followed this advice.

On yeah, wisdom of the ancients. Finishing stone lore. Soft steel, hard stone. Hard steel, soft stone. Kitchen knives=hard steel=soft stone. This is algebra that I can understand.


Soft Akapin waterstone.


4 sides skin, lightly  varnished.


Test subjects, a small laminated kitchen knife and my favorite chisel. The chisel is to test for any unacceptable tendency to dish and to gauge the abrasive qualities ie: size, durability, consistency and slurry formation.


Pretty even water absorption.


8000'ish hazy finish.

This stone was soft enough to scratch with my fingernail, so I assumed that it would be ridiculously prone to dishing, but this was not the case. It firmed up and ended up being about as soft as my 5000 rika. Pink/brown slurry formed very quickly, turned black with iron particles, then just as quickly turned brown. VERY smooth, it feels like sharpening on a piece of velvet. Don't let your edges drag or you'll get gouges.


Time for the real deal. Baseline is synthetic 1000 king, 3000 suehiro rika, 5000 suehiro rika.


Easy as can be, the slurry cushions the action and lets the blade float, but keeps it from digging in. Tolerably fast, too. Jumping from a 5000 synthetic to this is a bit much. I would use an intermediate, maybe my jyunsyou.


This knife even has layered jigane, not ren-tetsu, but definitely layers. Old 1940's iron. The stone really brought out the definition between metals. The stone makes too much slurry to leave a mirrored finish, but it does leave a VERY fine hazy surface. Soothing, not harsh. 


Synthetic. Notice the lack of definition.


Smooth, hazy mirror. Nice.


Hopefully the next stone works as well. It WILL need a bit of work.....


Amazing what people will buy....