I don't have a name for it, but it looks simple enough. A post, a beam, a rod tenon and a locking wedge...what could be simpler?

Right up front, I didn't finish in time.

Game called on account of rain. No wait...darkness...yeah, darkness!
So what have I been doing, when I should've been cutting my practice joinery? Useful work, true, but not really as fun. We need an improved porch roof, for starters.

Three simple awning frames. My wife asked, and I said "Sure! No problem! Be done by the time you get home from work, dear.". Famous last words, but by now she is used to this sort of thing from me. Nails and screws are fine, but what if....
Simple joinery, nothing tricky or particularly challenging, aside from the usual issues of ever degrading lumberyard wood quality. You need to assume that the wood will be warped, cupped, out of square and probably wet, too. Why does framing lumber have such rounded corners now? Is it due to liability risk, people getting too many splinters? Round corners suck for accurate framing. What the heck?!
One of the cool things that I have been doing is.....sumisashi! The bamboo pen is just the most incredible marking tool ever! I am smitten, truly. So, I've been making a handful of bamboo pens, then took the remaining end section and made a little rag filled ink cup to dip the pens in. I coated the inside of the ink pot with wood glue, to prevent the ink from seeping throught the open pores of the bamboo. It seems to work well, though not very attractive.

So simple, practical, and accurate. With care, I can draw a 0.2mm line easily, and the tool is MUCH more durable than my $10, 0.2 mm drawing pen that I'm almost too afraid to use for fear of dropping it and ruining it forever. Nope, I'm an old school bamboo pen convert.
Anyways, I spent my week goofing off, when I should've been cutting this joint. Guilty as charged. I'll finish tomorrow....promise!
The reason that I wanted to do these joinery practice sessions, was that there is a real lack of basic, beginner level information on joinery layout, cutting sequences, tips and tricks to know. I AM a beginner at this, so I don't really know the tricks yet, but hopefully others can learn from my mistakes at the least. Cutting these joints 1x keeps things fresh in my mind, where if this was the 100th time I had cut this, I would've forgotten the information that is relevant to the novice.
This time around, I hope to better document the layout process...at least better than I've done before. I'm not going to even suggest that this is the "right" way, but it is A way.
Here we go. In excruciating detail, haha.
As the day was swiftly waning and I only had a few hours to work on this joint, this is going to be the "quick and dirty" version. For me, this is good enough and as I improve, things will look more to the quick side, less to the dirty. At least that's my hope. We'll see.
I grab two chunks of scrap 4x4 fir and on each piece I quickly surface two faces, 90 degrees to each other. This gives the bare minimum for a reference corner, adequate for this work I figure. This lumber is only nominally the same size and not particularly high quality or square.
Mark for centerlines.
Mark for length, two faces can be taken off the single "good" corner.

Flip the stick away from you.....mark.

Then flip the piece towards you to get the final surface marked.

This is assuming that you care to mark all faces. If you saw straight, two faces are enough. Or one. None, if you are good I suppose. I mark 4 and cut two cause this saw is so awesome it just cuts where you want it to.
I set one block atop the other to mark the size of the mortice/tenon combo.

I figure that I will divide the stock into 3 even widths, so I use the ruler trick, the one where you slant the ruler (in this case 6", a multiple of three), tick your divisions, then extend the parallel lines.

This establishes the mortice.
I take the measure off the mortice.....


Then finish marking out for the upper dovetailed portion. I pick an arbitrary width of 3/4" for the narrow neck part of the dovetail. Ignore the extra line...whoops.
I transfer the width of the mortice to the other piece.

These lines get extended to define the morticed area that will receive the rod tenon.

Even though I have one accurate corner to strike perpendicular lines from, I'm trying to get in the habit of using the centerline as a point of origination.
When I need to mark a perpendicular line, take a measure, whatever, I go from center, using my ruler as a straightedge to run the ink against. A sashigane is on the way though!
I figure that I will make the shachi-sen retaining pins 1/4" thick, by 1" long. Sebastian was kind enough to take one for the team, showing us how to avoid orienting them backwards, so I am being extra careful here, haha.


I am using Sebastian's big saw for this work. It is a wonderful beast! There is a general carpentry rule of saw use, that you should use the biggest saw that you can handle, and this guy practically steers itself. The only difficulty I have is getting a clean start to the cut. If I waiver just the slightest bit, I get a sloppy looking line. If I start the cut against a block of wood however, then I get the crisp definition that I want. Cheating maybe....I don't know.

I start removing material.

Then realized that I forgot to draw the lines on the end first.

Oops.
I should've done this first.

So now that the tenon is marked out, I realize that my mistake was well timed because it caused me to slow down a bit. A good thing too, because I had been intending to cut both the tenon and the rod mortice area at the same time. They share the same line, right?

Actually, I need to cut one side of the line for the tenon, the other side of the line for the mortice.

That was a close one! A saw kerf mistake here would make for a pretty sloppy fit.

To get as much cut depth as possible, I use my azebiki-noko to get as deep as possible, defining the walls of the mortice.

The second face I cut slightly differently. This time I cut the cheek of the mortice as far as I can, but as soon as my cut starts to deviate.....

...I flip the piece and finish the cut "against" the grain.

Rip cutting against the grain feels rougher, wrong somehow, but is more accurate. When ripping with the grain, the saw wants to follow the softer grain, so my cuts can wander a bit. If I cut against the grain, that tendency is minimized. It's faster too, because the teeth of the saw are trying to dig in and bury, taking bigger bites of wood. It feels like I'm being mean to the saw, though.
Here we are, not the neatest or most accurate, but this shows a hint of how the mortice and tenon cuts are not quite on the same plane.
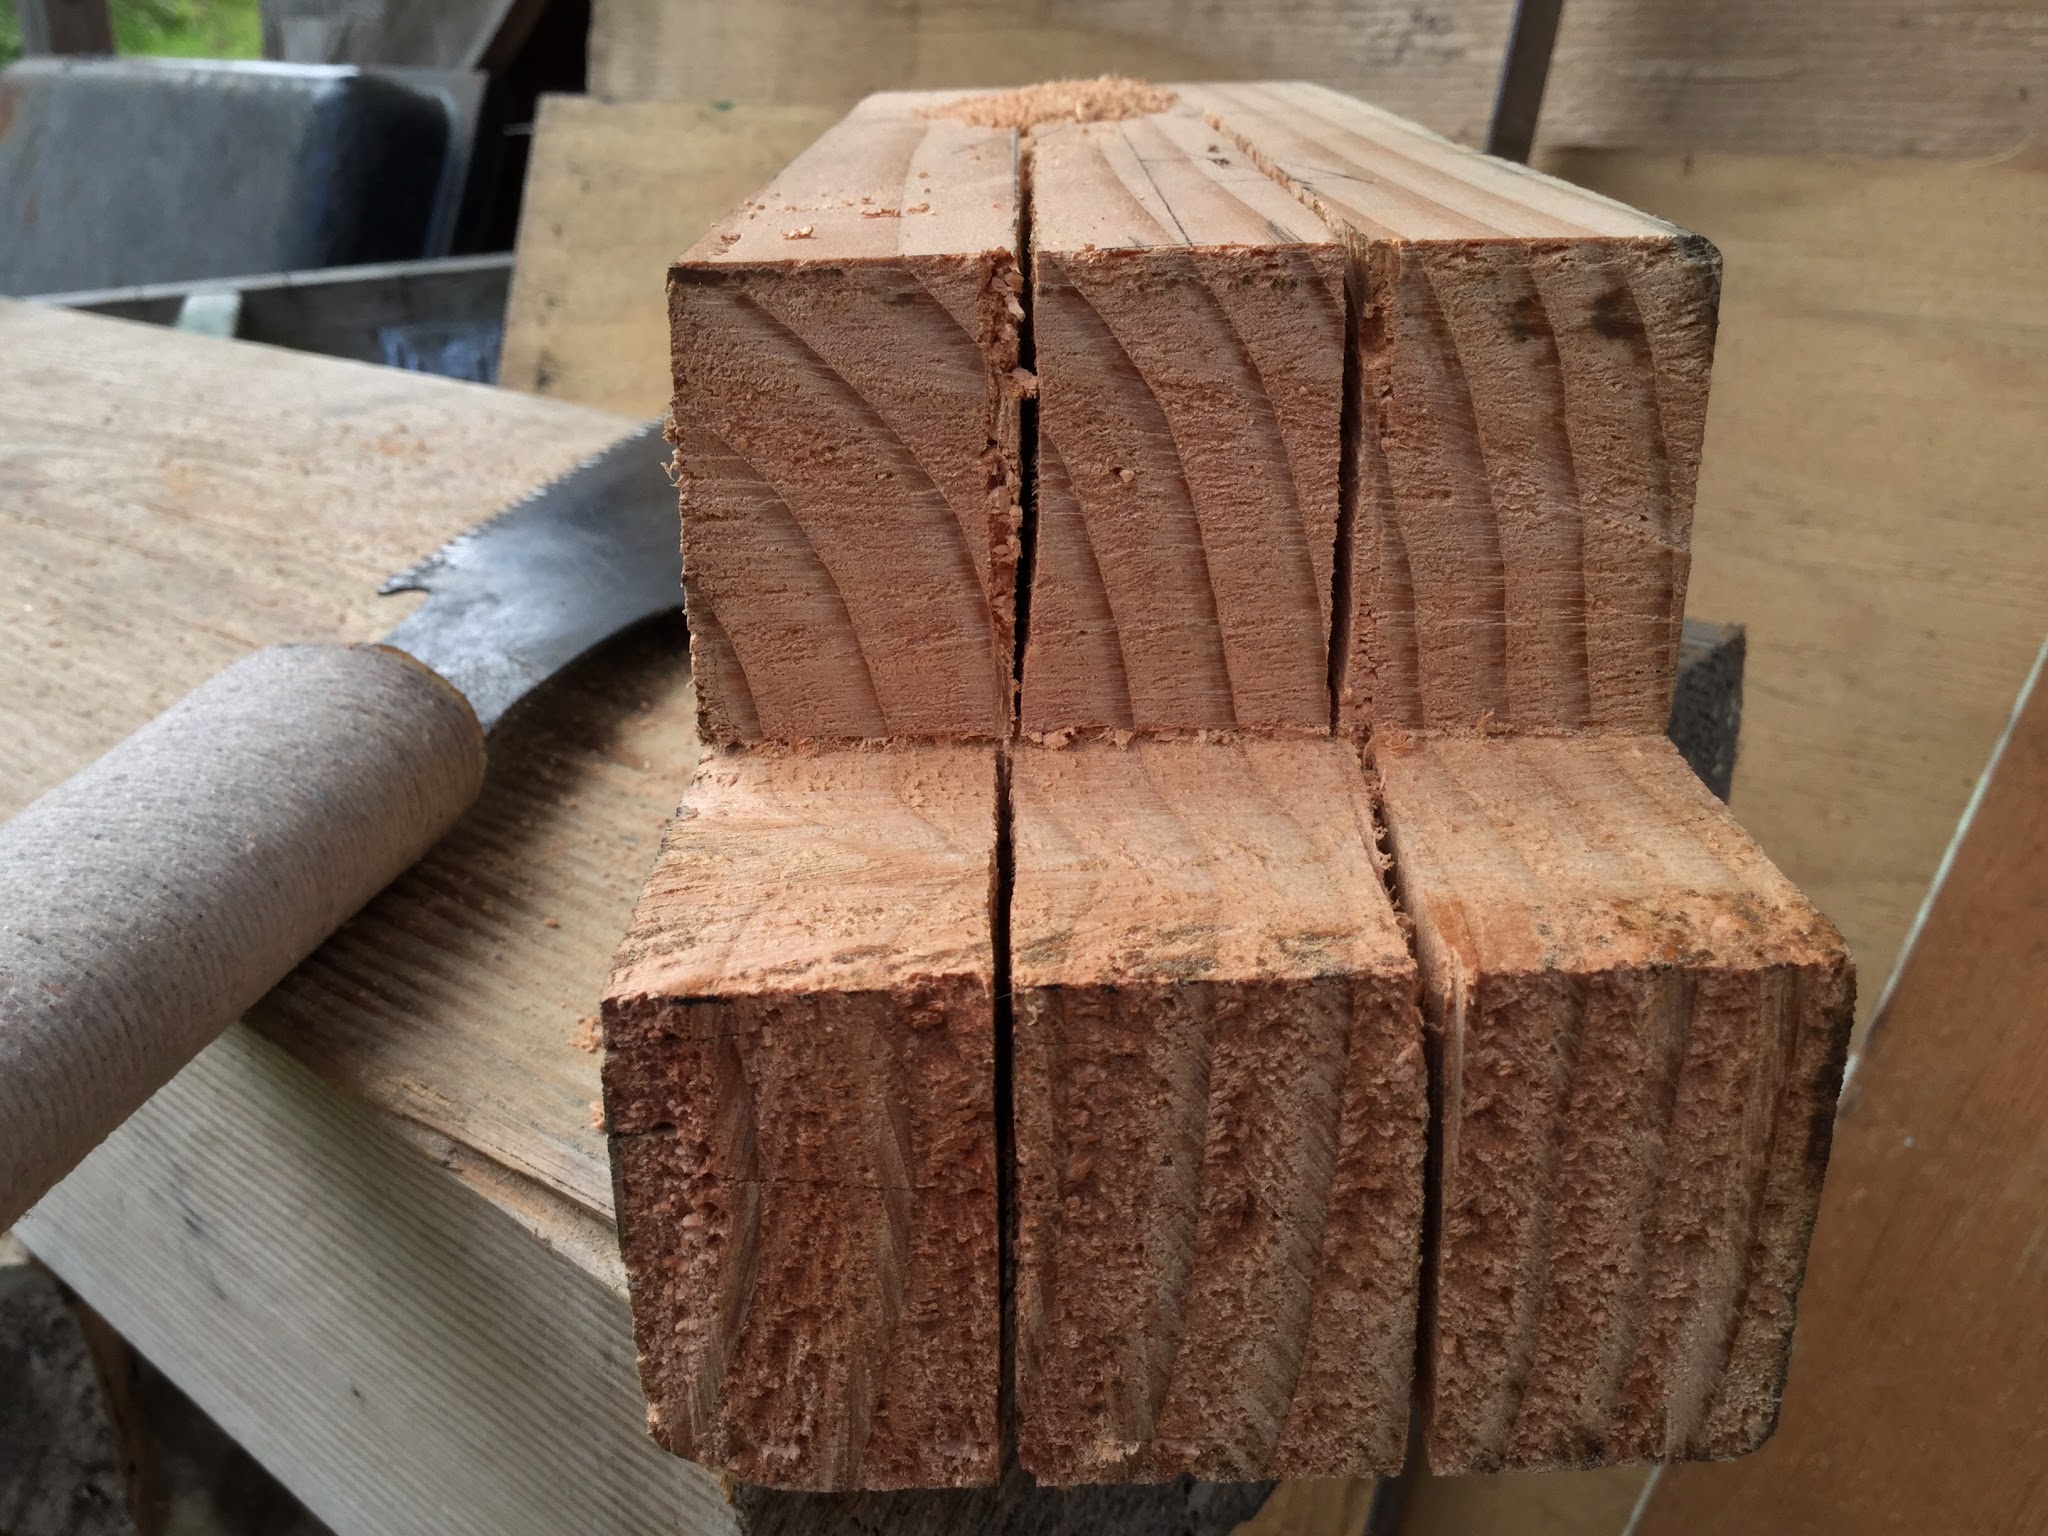
Cut the tenon one side of the line, the mortice on the other. I sure am liking this big saw.
I cut out the waste, revealing the tenon.

Drill the end of the mortice.

Because I cut these walls as deeply as possible, the waste chips out easy and fast.
Tolerably clean and vertical.

I clean up the endgrain a bit, using a kiwa-ganna.

I love these planes, and really wish that I had the other half of the set, the one that has the blade tilting left. These planes are very handy, though a bit of a hassle to set up. This is a nicely made "Umehiro" and I have a nice laminated chip-breaker for it, but still haven't fit it yet.
And......one of the first Japanese tools that I EVER bought!

This tiny keyhole saw.
WAY back in 1988, I was 18 years old, poor as dirt, and my mom gave me money to place an order from Garret Wade tools. I bought a $39 replaceable blade dozuki (the "craftsman" model, or some such crap), Toshio Odate's "Japanese tools" book ($50? Expensive!), a Shinwa ruler (best $12 ever), and this little saw ($9 I think). I've still got the ruler, too, though the other stuff fell by the wayside years ago.
The book became a gift for an architect friend, while the saw started to shed teeth with ever increasing frequency. It began as a slight vibration during use, then began to drift off the line. Soon it bound up, got slightly bent....you know where this is heading, right? A replacement blade was $28 + $8 shipping and handling fee. That wasn't going to happen. Sigh....
This little saw though, this saw has been a champion! It has been bent and straightened more times than I can count, cause it's a fiddly little bastard, but the steel is good enough to handle the repeated offenses. It is still amazingly sharp, especially considering the wide variety of materials it has cut over the years. A wide variety of soft and hard woods, many tropical, bone intentionally, flesh and stone by accident. Brass even. Tough bastard. I've touched up the teeth, using a needle file, 2x in 25 years.
It's funny what sticks with you in life. Burn my flesh on the pyre, and toss in this saw as well.
Naw, I'll pass it on to the next person who needs a little saw for cutting in tight areas. Maybe Ellie will want it, although she calls it a hateful thing and doesn't like using it.
OK, enough chatter, time to finish the sloped walls of the mortices for the shachi-sen retaining pins.


Finally. This is only half...more is on the way.
And a picture of 1/2 of my work holding arrangement.

A bronze screw, though it could as well be steel. Bronze will still chip a plane blade, I know from experience, haha.
Who needs a vise?! H.O. Studley, eat your heart out.
The lines that the sumisashi make are really beautiful! I really must make one of them, that is exactly the reason I need to use my sumitsubo more. Your layout looks stellar, really crisp. I thought your use of the keyhole saw for cutting the wedge shoulders in the mortise wall, that was really great. I had to use a dovetail chisel with sharp corners and cut in on the end grain, it really felt like there had to be a better way.
ReplyDeleteDo you think you could show a picture of the wooden wear plates you set in to the contact points of your dai? I've been considering some sliding dovetail across the width of the dai for the back and front contact points on my jack plane.
That ryoba-noko is big! You could be ripping boards from trees. I recall reading one of the articles that Mark wrote about Yataiki, describing how he was using a 210mm saw to cut 8" wide boards 5/16" thick from quartered sections of logs. Its the perfect excuse when your wife asks for a project to be done, say, "Ok, I just have to saw the boards and then they dry for a year or two, no problem after that" I've been thinking of quartering some logs to resaw with the 210mm ryoba into 1/4 paneling, but its a four year proposition before the quarters would be dry enough to even saw...the best time to quarter those logs was four years ago, next best time right now.
Gabe!
DeleteStriking the layout using the sumisashi gives me one of those feelings, like.....'m doing things right, you know? It is funny, but much of the way that we are learning this great variety of skills is through remote experience. I watch every YouTube video on "blackening the face" carpentry, and in each example, the daiku places the sashigane.....aims....the touches the sumisashi to the surface. He is smooth, confident, and fast all at once. It is like shooting a gun (to use a strange analogy...I'm not a gun guy). Archery would be a better choice!
I measure, then place the slightest tick. The sumisashi can do the finest mark, and I am actually finding it MUCH easier to use than a pen, though maybe less convenient. Not really though. I just started using a modern inkline, and while I am impressed with the inkline's improvement over chalk, it doesn't give me the same thrill as using the sumisashi. Using the bamboo pen lets me pretend that I'm just like one of those guys I am trying to emulate, haha.
One tip though. Don't let your sumisashi sit in the ink pot overnight. My beautiful 0.2mm lines from yesterday are now coming out at a bloated 0.4mm, haha! The tip of the pen has now swelled slightly. It doesn't matter though, you just cut a new end. I never would've thought that I would be embarrassed by a fraction of a millimeter.... So cool.
I'll post soon on the inlaid contact bars, though it's nothing fancy. I used purpleheart, dovetailed at the mouth of the kanna, then just inlaid at the other two points. It seems to be helpful though.
DeleteI want one of those pens! And where do you get that ink? I'm slightly into calligraphy, and I would love to have such a thin line for flourishes!
ReplyDeleteSteven!
DeleteI have some largish bamboo just lying around here that I have scrounged up. I think that you want to use bigger stuff, like 3" or greater in diameter, but the 2-1/2" that I used was fine. It's easy as pie. Split it up, soak it for a while to soften it, then split the line-drawing side as finely as you can (the little splits act as an ink reservoir and make the pen more supple), then carve it to shape.
http://www.youtube.com/watch?v=9BwSen3HdNs
You can draw insanely fine lines with these things, AND they are the essence of economical. A'course not everyone has bamboo laying around...also, the ink I bought at the hardware store. They actually sell some real Japanese tools at the lumber yard here in Hilo! Very cool.
Forgive me for asking, but I can't remember...are you in the USA or Canada? I can sent you stuff cheap US post, but Canada is a killer.
I'm right in New York, along the lake shore.
DeleteBeen thinking of growing bamboo, but I heard it spreads with a vengeance... may be able to find some bamboo here. There's almost everything at the farmer's market, from apples to live ducks.