Showing posts with label Japanese tool repair. Show all posts

Monday, October 26, 2015

Some thoughts on sharpening Japanese saws– It's the little things


Lately I've been waking up in the morning and *reeeaaly* wishing that more people were writing about sharpening saws, Japanese saws in particular. I guess that I'm just obsessed, but saws have been in my mind for a while now, and I just can't get enough. 3 o'clock in the morning, and I'm wondering if it's too early to get out of bed and get back to work, sharpening more saws.


Yeah.....better not. It's too dark to see, anyways. Have I mentioned that we don't have electricity?


Almost nobody writes about this stuff, not even in the Japanese blogs. Sebastian has been doing a great job resurrecting the sharpening art, and Gabe is doing wonderfully with his big Maebiki-oga's, but.....I want more. What little I find amounts to :

  • Here is a diagram of a rip tooth. Copy it.
  • Here is a diagram of a crosscut tooth. Copy it.


The truth of it is that those directives are absolutely correct, and as a beginner, there is no better way. Look at what a "proper" tooth shape is, then emulate. When your saw starts to behave strangely, it's probably not your imagination, because they do get dull. Just because your saw is a superawesome Japanese tool, well.....it's just steel. Before it gets too dull and something nasty happens, point that bugger up. Freshen up those facets, it's not that hard. If your saw isn't too messed up, you merely copy what's already there. It's easy (almost). Assuming that you've got a decent, non-impulse hardened tooth saw....and a file.


Sebastian, Mark Grable and I went in on buying a Yahoo Japan auction lot of saw files, bought and shipped through the excellent kindness of R-K Trading Company (thank you, Murakami!). I'll tell you this....I'm never paying retail again! Admittedly, it seems like we did get a bit lucky, we got them so cheaply. I wish that we had bid on the other lots as well, but in any event, I now have an embarrassment of 75mm, standard cut, double edged yasuri feather files.


From what I've been able to determine, Japanese saw files come in a standard cut and a finer cut (called "aburame"). If you take two files, one standard and one aburame and place them side by side, you will see that not only does the aburame have a much finer tooth spacing, it also has a thinner cross-sectional shape. These particular 75mm files are almost a perfect cross-sectional match to my fine tooth aburame 125mm file, despite its being almost twice the size. All of these files are incredibly narrow, delicate creatures, but comparatively speaking, these 75mm files are bruisers.


These files are all NOS from an old hardware store or something, Tsubohi File Works and Co., God only knows how old....50 years? These files leave a relatively coarse finish to the saw teeth, not exactly what you'd want for a final sharpening. I've been sharpening every saw within reach, and so far I'm still using the first one that I pulled out of the box, so I would say that these Tsubohi files are both forgiving and VERY durable. What the hell am I going to do with the rest of the 4 boxes.....I need more saws, obviously!


Japanese yasuri saw files come double sided, as these are, and single sided fine cut, a seemingly rare beast. 80-90% of the files that I see at auction are the standard double sided, and this must be indicative of something. I see two immediate possibilities. Assuming that 50 years ago the manufacturer made an equivalent number of all types of saw files, we can see that everyone loved the fine tooth single sided files so much, that they used them all up. All that are left now are the sucky, hated, standard double sided files.


Or....


Standard tooth, double sided files were made in far greater numbers because they are such useful creatures and were used for such important tasks, that the stores needed to keep their shelves well stocked. I don't know, I'm just guessing, but I'm thinking that these files have a specific purpose.....and the fun is in the finding, no?


All this talk about files, but they are actually only peripheral today. Today is about the forgotten side of the tooth, the actual "side" of the saw.


I was working on a saw the other day and I took some pictures to get a better look at things.


Not horrible (aside from the gullets being sloped the wrong way....too much island bliss, I guess), but when I look closely at the "dark" side of the tooth facing the camera, I see little specks of light. Those specks will be tiny jagged areas, perfect for snagging stray wood fibers and clogging the action of the saw.


A few of us have been pestering Mark Grable mercilessly for tips and information, anything Japanese saw related, and he's been wonderfully forthcoming with his knowledge and experience. Often, the briefest statement will have broad influence, importance far in excess of its brevity. Nerdy though it is, I've got a document of "Grable'isms" that I read before working on a saw, and it's amazing how something that you've read a thousand times before, will suddenly being new insight into a problem you are having. Case in point, Mark has mentioned that it's difficult to know what you are seeing, if the saw is all dark and pitted with rust.


What?! Rusty saws?!


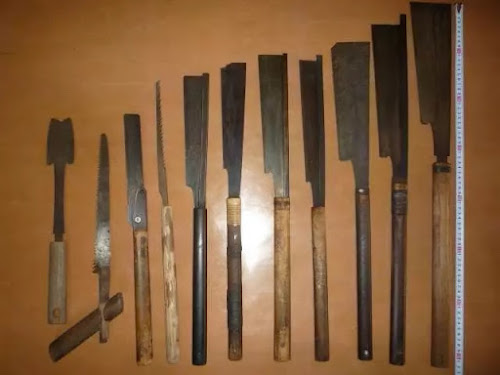
Being attracted to the old and neglected, all my saws are rusty to varying degrees. Check out these treasures.


The little rip kataba in the center you might remember as being the subject of an aborted series on saw rehab I never brought to completion. I may have "massaged" the poor thing to death, just as you can soften metal by using a planishing wheel. The narrow bladed saw just to the right of the kataba has become one of my favorites, though. Ugly, rusty little thing, but it's a handy blade shape for pruning and trimming green wood.


I've already sharpened this a couple of times –I'm currently sharpening the saws at the merest HINT of being dull–, but then I started thinking about the side of the saw tooth. This is the equivalent of the "back" of a plane blade. You can't get a plane iron sharp if you only sharpen the face and ignore the back.


Duh!


The simple solution to the problem is....well...I don't know.


Ignore please, my use of a file here.


What I am really doing is gently scraping any trace of surface rust from the sides of the teeth that are facing toward me. I'm using the forward edge of the file as a scraper because it is easily the hardest steel that I've got handy. Really handy, like, already in my hand, haha.


And for Sebastian.....This is the saw that I mentioned in you comments regarding your universal dozuki. It was originally a purely perpendicular tooth rip pattern, with all teeth being the same size. I gave it more of a short and fat crosscut shape, with a stubby top facet. I'm putting together a post on my experiments with varying tooth geometries, but it might be a little while before things slow down some.


This saw, like most others, has teeth with a slight set, so the teeth are slightly bent to a curve, not straight. To polish the side of the tooth requires a curved implement of some sort. I tried using a curved/rounded edge wooden block with some #220 sandpaper wrapped around it. A flat sanding block will just level out the sides of the teeth, leaving you a saw with no set. Binds-ville, man, Binds-ville.


It works, and if that's all you got, use it. It's a pain though, and the tendency of the sandpaper is to round over the edges of the teeth. That's bad obviously, so try to find something better.


Much better for me, was a little Washita sharpening stone with a radiused edge. Different saw, but the idea remains.


Hey! My saw grew another set of teeth! A synthetic stone was too soft for polishing the edges of the saw teeth. An Norton medium India slipstone would be perfect.


Edit: Added a pic Here.


Here you can get an idea of the polishing effect at the tops of the teeth, although these are far from perfect. Remember, only the teeth that are facing upward are being polished. The ones that face away don't matter. Small steps, incremental change.


More than anything though, this really seems to point out how skilled you are in setting the teeth, because every discrepancy leaps right out at you. It's a good opportunity to even things up, work on your Asari skills.


Of course, once I got started.....


The dark red stone next to the soap is a small offcut of a synthetic #1200 waterstone. I takes a few swipes with that first, to seed the surface with abrasive grit, then do the bulk of the rubbing using the much slower natural stone.


This revealed lots of lumps and bumps.....Oh boy!!!


Off to the anvil, just give me an excuse, any excuse.


The lighter spots are deviations from the average plane of the saw. Lumps. They aren't bad though, so my little tack hammer seems the proper tool. Many small strikes, focusing on the areas around the bumps more than the bumps themselves.


My point here, assuming that there is one, is that the smallest things can have large effects. The teeth of your saw will never be truly sharp unless the sides of the saw blade are clean and smoothly polished. A little bit at a time, if your saw looks as bad as most of mine. If I were to get the blade to a polished state, most of my teeth would be gone, abraded away in the process. Better is to sneak up on polished, taking a little off at each sharpening, so the edges get incrementally improved. With just a slight amount of work, I've probably made the saw 30% sharper, although cleaning and working the sides of the teeth actually dulled them a bit, so some touch up was required.


The big ryoba worked fine with those little bumps and dents along the blade, but as with the rust, it is better to have as straight a blade as possible. Less friction, and it's fun to hit things with hammers.


It's the little stuff, dontcha know.


Oh boy....it's finally getting light out. Time to sharpen something!


Thursday, August 20, 2015

Rainy day projects.....a good day for rust.


This is getting to be a common theme I know, but......it's raining again.


The rain comes down here, nearly every day, but the last few hours have been heavier than the daily norm. It must be due to the tropical storm that just curved around to the south of us and though this isn't a direct hit, it still is dumping out.


The ever present humidity here on the east side of Hawaii is a killer on tools. I am continually presented with reminders to take better care of my tools, ironic, as so many of them came to me in somewhat neglected and rusty condition. The tools that see regular use aren't much problem. After use, they get a quick trip to the stones for a brief hone, then a good wipe with the macadamia nut oil that I've been using for rust prevention. The problem is storage. Put the tools in a box for a week and.....


I might as well put this humidity to good use. A good thick film of oil is the best prevention that I've got right now and a rust blackened finish is ideal for holding oil. Rather than watching stuff rust for all the wrong reasons, I might take advantage of the situation instead.


A little bit ago, Sebastian sent me a wonderful tsuki-nomi, knowing how valuable it would be for my impending journey into timber frame construction. The big 48mm nomi that he sent is the uppermost big guy, right under the iPhone.


The tsuki-nomi is great....really, really nice, but it wants to rust at the drop of a hat. The original forged black finish has worn away through the years, most notably in the areas where you anchor the blade using your left hand as a pivot.

I've written about rust blackening steel tools before, but repetition is something I'm good at (just ask my family, haha). Mostly, I just want to show off Sebastian's giant chisel!


Before I begin, I try to do something to protect any edges or surfaces that I don't want to rust. I used some good Tyvek tape to cover the bevel and back of the blade. Make no mistake, this is REAL rusting here, although it is shallow and doesn't cause pitting or anything.


I put a spoonful of regular salt in a glass or plastic container, then add some hydrogen peroxide.


Mix it up, wipe it on and let it rust.....Then boil to convert the red rust into black iron oxide. It's simple, satisfying magic. Or basic chemistry, take your pick.


The exact measures don't matter. The hydrogen peroxide will only dissolve so much (unless you use heat...then you can form a supersaturated solution, but I find its not worth the extra work), but the extra salt wont cause any trouble.


The only real rule for rust blackening steel is....cleanliness. Wash, degrease, wash again, and then maybe degrease again, it isn't too much work. I sometimes get better adhesion of the rust film if I first give the tools a short soak in a phosphoric acid wash. This gets into the tiniest pockets of rust and also seems to "activate" the surface of the metal.


This chisel was a bit of a bear and didn't want to hold the blackening very well along the upper ridges on the blade, nor along the shaft. When that happens, I wash some more, using good dish soap and some steel wool to micro abrade the surface. Then......the trick. I use the cheap chemical blackening agent, Birchwood-casey Super-blue. If you've ever used the stuff, you know that it might make the steel black, but it will also INSTANTLY rust. The combo of rust-bluing and Super-blue, a match made in heaven. I forgot to take a picture....sorry.


So Birchwood-casey, then more rusting/boiling will eventually build up a nice even coat of black oxide, so much so that the salt/peroxide solution stops rusting the metal. Then, with the metal still hot from the pot, dry it off and wipe on as much oil as it will take.


The cycles of caustic chemicals and boiling water are tough on the tape. It's better than nothing though. Now I need to sharpen this beast and put it to work.


Ellie is already busy today, sharpening stuff.

She just came in from the rain, looking all surly and mean, and figured it was time to put a good edge on the arrow that Brandon sent her. She's working on a chunk of Boiler Bay sandstone that we brought over from Oregon. Good girl.....she favors the natural stones.


Earlier that morning (it was sunny and hot until noon), I took this picture of a little canal that we drive over every day. Usually it is completely dry, but it's been raining a lot recently.


Later in the day, after only two hours of heavy rain.....


Yikes!


They issue flash flood warnings for this part of the island, when it rains heavy like this. Only 4 miles away, it hadn't rained at all. It is the deterioration of this exact drainage channel (and loads of irresponsible development) off of South Kulani road, that leads to notable occasions like this one in 2008, a few miles away, at the intersection of 39th and Pohaku.


We sure are glad that our realtor steered us away from that particular property, haha. See the guys in kayaks?


These rainy days are also good for other ongoing projects. I'm still working on a couple of different saws, slowly learning the art of "hizumi", which I understand as the straightening or massaging of tired and bent saw blades. This particular saw feels like a lost cause however, the rusty little ripsaw kataba/Hawaiian find.


The frustration of this is that at a number of different points I've gotten the blade very close to being good, but then I go a little too far and....damn. The mess really started after I got the blade straightened on the anvil, but then tried some light adjustment on a wooden block.


It's amazing how different it can be, the same steel, but using two different work surfaces. In a series of saw sharpening videos I watched, the presenter talks of preferring a mild steel block for certain procedures, as it "gives" more than the anvil. I would like to try that myself. I also need to polish up a nice block of this hard Ohia. It should make an excellent wooden anvil.


As I've been working this blade, I've been treating it as very much the learning experience, making the blade remarkably distorted, then bringing it back to (nearly) normal. These pictures show a couple different potato chip iterations.


The difficulty with this particular blade lies in the softness of the steel. The temper is just too soft, and the blade grows ever more distorted as I work on it. The steel is just too soft to make a good saw and when I bend the blade into an arc shape, on release it still retains some of the bend. That's not good.


I've learned some, but there is still a lifetimes worth of experience to be gained, many in fact. One of the greatest difficulties lies in finding someone to teach this stuff. Mark Grable has been very, very helpful in sharing his experience, but he's half a world away. I need something to to compare my efforts to.


Two weeks ago, this lot of dozuki and kataba saws came up on Yahoo Japan auction.


The detail photos showed that the saws looked to be old, but high quality. Some of them are missing a few teeth, but that's not my focus here. What really interested me was that there is ample evidence of the saws having seen the attention of a metate, some of the blades being dimpled as the surface of a pond. My thought is that if I examine these saws carefully, I might actually be able to learn something myself.


They arrived a few days ago.


I got a big saw, too.

Saturday, July 18, 2015

Finishing up the Japanese style saw vise


It's about time to finish up this project. The rains have stopped, the rainbows are out, and I've got some saws that are in need of some sharpening. It's time to finish the vise!


I'm great at starting projects, lousy at the finishing stages.. I'm too enthusiastic for my own good.


From the previous post, the two halves of the vise have been shaped, now it's time to attach them. This being my first attempt at a Japanese style saw vise, combined with my choice to run the wood grain the "wrong" way, it would be wiser to attach the halves using some means that would let me adjust or separate them when I undoubtedly need to. So, of course I choose the permanent (but much cooler) means of attachment....riveting them.


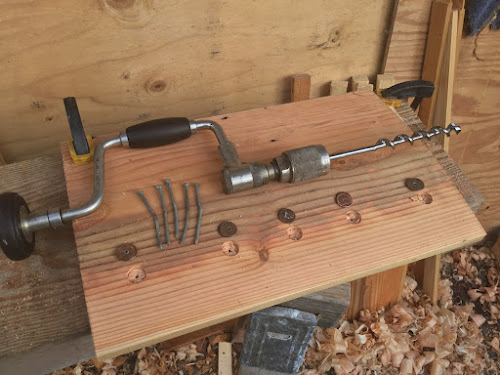
My rivet stock will be some old bent nails that are never in short supply. For the roves, I drill the centers on another thing that is seldom in short supply, pennies.


I bore shallow recesses to get everything below the surface. When I do this next time, I will bore less deep or skip the recessed thing entirely. Although it gives a neater finish, when I inevitably need to grind these off later, access will be a bitch.


The nails are lightly galvanized, but a little phosphoric acid removes that quickly. Jasco Prep&Prime to the rescue!

The zinc galvanizing causes the acid to get all foamy, but the nails are under there. I give it 15 minutes.


The reason for removing the galvanized coating is that I want the nails in as soft a state as possible before peening, so I need to anneal the metal first. Burning off the galvanizing works great, but also causes the formation of nasty gasses that can cause brain damage/kill you/etc. I'm challenged enough as it is, so prudence prevails. I don't get to say that very often.


A propane torch, get 'em red hot, then let things cool, the slower the better.

I thought that the lava rock worked well as a fireproof surface. Talk about an appropriate material.


If you happen to find yourself moving out into the boondocks and haven't yet built your forge (everyone needs a forge, right?), a good propane torch and a decent sized piece of ceramic blanket insulation makes a sort of workable emergency, half-assed forge. The ceramic insulation is key though. I wish that I brought some. 20/20 hindsight.


You can make a small propane forge from a tin can, and using sheet rock mud/sand mix as a refractory lining. It is handy to have around for making small tools and blades, but the key word here is small. A charcoal forge is SOOO much better. Quiet, too.


Peen the nails to lock everything together.


I cut the wedge from more of than mystery ham-wood stuff that I suspect is something like Brazilian cherry.

Whatever it is, it's hard, finishes smooth as glass, and it's more than my crappy kanna blade can handle. Rather than re-sharpening every 10 minutes, I decide that it's finally time to open up my treasure chest of tools. It's time to pull out the big guns!

"Rashomon" kanna, by wholesaler company Cubs torosaburo. Our favorite luthier, Tanaka Kiyoto has a couple of these kanna and was surprised at the blade quality and toughness. He puts the steel toughness just shy of HSS and some of the "super" steels. He doesn't know how actually forged the blades, but he was impressed.


http://kiyond.blogspot.com/2014/11/youtube_13.html


I bought this kanna from my Japanese tools pusher, Junji. It had a huge crack in the main blade and generally looked like hell. I showed some of the blade repair here, but haven't gotten around to fitting the blade into the dai....until now. It feels at least 4x more durable than the plain-Jane kanna that I have been using, yet the blade is still fairly easy to sharpen. Laminated blades are awesome!


The wood that I used for the wedge is probably too hard and slippery. The vise works wonderfully, 'cept the wedge likes to pop out at inopportune moments. I'll try roughing up the surface, see if that helps.

Next step....sharpening my old kataba saws. I plan on converting this old guy into a madonoko tooth pattern but first I will see how well it works as is, with the original modified rip tooth it has now. I've been thinking real hard about the mechanics of saw tooth design, and now is my opportunity to do a fun compare/contrast project.


Ellie is using the ugly saw, but doing great work. She's making a rabbit hutch.....more pets. Ellie, the rabbit farmer.

She did her layout using the bamboo sumisashi.


Focus and intent!


If you look closely, she's spot on the line.

That's my girl!


Wednesday, July 8, 2015

My littlest hammer...and gifts from friends

I bought a little Japanese hammer head from Junji (eBay seller: yusui ), ages ago it seems, but just now got around to making a handle for it. Yet another one of those projects that is so quick to do that you wonder what your problem is, why you didn't do it sooner.

Far and away, this is the smallest hammer that I own.


Mitsu-something,  not sure what the second symbol is. Hand cut symbols.

The small wedge shaped pein is hardened steel, forge welded to the body, but the opposite round face is not hard, actually rather soft. The entire head is visibly hand forged and is slightly asymmetrical, which adds to its charm.


This hammer is a mystery to me. It was so covered in rust when I bought it, I couldn't determine much of anything about its qualities, I mostly bought it because it was inexpensive, haha. I stripped the rust using the electrolysis method, then tried to blacken it back to looking normal again. Birchwood-casey super-blue looked all wrong, and my quick rust bluing method didn't work at all really. Strange.


It any event, the other day I grabbed a Waiwi (strawberry guava) stick from under the stairs, the only dry pile that I could find. I carved away the parts that I didn't want....

And now my little friend has a shapely new handle. The strawberry guava is an invasive pest, pretty well everywhere here, and once established it is nearly impossible to eradicate completely.


But it makes GREAT handles! If allowed to dry slightly with just a minimum of care, the bark will stick tenaciously, which is perfect for handles. The slightly textured bark provides an excellent non-slip grip. The wood itself is dense, moderately heavy and fairly resilient, much better for handles than the native Ohia trees (Which is too brittle for handles).


The little cross-pein head was originally a straight wedge shape, but I decided that this little guy might be an acceptable hammer to use for setting saw teeth. To that end, I filed small serrations across the face, but MAN, talk about hard steel!

I tried my hardest detail files but they just skidded...a first! I had to use diamond and even they were slightly challenged by the hardness of the welded insert.


I don't know what this hammer was originally intended for. Shown here with my small split end tack hammer that I've been using so much lately, you can see how small it is. I weighed them a while back, the tack hammer (w/handle) being 173 grams, while the tiny hammer head I used today weighed only 88 grams.

So...what was this hammer for? I bought it figuring that it would be a good size tap hammer, for adjusting plane blades, while the wedge/pein end would work well for ura-dashi. Now I wonder though....was this originally for saw adjustment? Sebastian has noticed numerous wedge shaped divots in many of the old Japanese saws that he has worked on, and this hammer would make that exact impression in the steel. God knows that the wedge steel insert is hard enough!


Anyone, anyone.....ideas? It should work just fine for asari, I figure.


We've got enough wood laying around. I figure I'll make a shorter anvil stand, so that I can do more work, while still being lazy and sitting on my ass. I've spent close to 30 hours so far, banging on saw blades, seems I could at least be sitting down.

First I scribe the base, then carve out a 1" deep recess for the anvil to rest in. If you throw in a handful of sand, then place the anvil on top, it will deaden some of the resonance. A ringing anvil isn't something that you really want to listen to, day in and day out.


 Another invasive species, BTW, haha.


The world's tiniest, cutest, baby gecko.


The poor little kataba Z-saw that I have been torturing......still working on it. All of my enthusiastic hammering induced a really nice dish shape into the blade, the dreaded oilcan dent ( poka-poka in Japanese ).

Easy to make, not so easy to un-make, but I'm learning that too. Essentially it amounts to equalizing the stressed areas by hammering around the perimeter of the dent. This slightly expands the rest of the blade, neutralizing and distributing the constrained forces that are what turned this saw into a potato chip. More to follow.....


Here is the now-again flattened kataba, right next to another long delayed project. Way back before we moved here to Hawaii, Sebastian sent me some saws, sent them all the way from Graz, Austria. One of them was a big 300 mm ryoba that Sebastian had tuned up, and all it needed was a handle.

8 months later, here we go.


It just so happens that I've found some weedy shrubs growing around here that bear a remarkable resemblance to Pawlonia, an extremely lightweight wood, widely used in Japan for small boxes, clogs, and saw handles too, I think. This might actually be Pawlonia, I suppose.


By itself the wood feels far too brittle, so I tightly wrap the handle with cotton string, then saturate the string with plain old wood glue. When the glue dries, it leaves the handle with a great grippy texture that won't get filthy and unravel after the first use. It's still very lightweight.

I also made the handle long enough for me to use the saw two handed. This is another first for me, two handed cutting, but this saw blade is nice and thick, very stiff and tracks perfectly. You can REALLY put the power to it now.


Thanks again Sebastian, for such wonderful gifts! Since handling this saw, I have been using it almost exclusively, and it is a pleasure.


Underneath the saws is another gift, this from our friend Peter, who came to visit us last week. Finally, the perfect pocket knife for me!

This friction folder knife has laminated blade (but you wouldn't know it unless you sharpen it using the proper stones. I love the feeling of discovery, sharpening these blades for the first time.) and was nicely forged. Perhaps more importantly, the heat treating is spot on. The steel is extremely fine grained and very hard, every bit as well done as one of my best kanna blades.


Thank you Peter! I'm a difficult guy to find gifts for, but this is perfect.


When we first moved in, we had a significant rat population that was causing us no small amount of trouble. You want to know the only surefire way to get rid of rodents?


Get cats.....Lots of cats! We got one from the Humane Society in Keaau, and once we had one cat, then others began to show. Most notable was a new mother cat with a litter of 4 kittens, feral, but she knew an easy touch when she saw us, haha. I'll feed anything that keeps the rats at bay!


The cats are still wild, which is why you don't see any in these photos, but believe me, they are there. Renee is trying to teach them to hand feed, something that our daughter has proven skills in, but we aren't seeing quite the same level of trust.


The cats don't tolerate being pet, but they sure know who gives them food. When the rooster's calls wake me at 4am, I go downstairs to start coffee, then see that I am being watched by no less than 5 pairs of eyes (7 pairs, if the mother and her consort are around). That's a lot of cats.


Haven't seen any rats in quite some time though.