Three blind men describe an elephant......
I am a rank amateur blacksmith, so take this for what it's worth (</= ∅, haha!). While there is loads of information on making bio-char for cooking and ag related applications, the volume of work pertaining to making blacksmithing charcoal is much less. Very little, in fact.
Charcoal is the original fuel for forge work, but was superseded long ago by mineral coal. Per given volume, coal has 5-10x the heat value as wood charcoal, so a little bit goes a long way, and it's relatively cheap, once you find it.
A digression.......
I have always been fascinated by the potential of blacksmithing. Fire, Water, Earth, Air, and Spirit, the elemental five. Forging is directed change, transformative and primal. Forging is magic.
The Art of the blacksmith is taking common materials and reshaping them into a new and (hopefully) more useful form. Heat causes a partial phase change in the iron, making it more malleable. Saturating the iron with carbon and then cooling it quickly will result it steel, an iron crystal of sorts. The "fineness" of the crystal determines the degree of sharpness attainable, and ....by now you can see where I am going with this.
I have no illusions that I will be able to make a better to tool than what is already available. To the contrary, if I can make a tool comparable to even a lower quality Japanese chisel, I will consider it a great triumph! What I HAVE found, is that by making my own tools, I have a much greater appreciation of the TRULY good stuff. The trained eye sees differently.
Where was I going with this? I always wanted to do some smithing, but I kept getting hung up on the requirements. I wanted a forge, but didn't have the money for a rusty old riveting forge, much less a decent propane setup. Heck, I didn't even know that you could USE propane! You can build a great coal forge, but the fire-pot and tuyere are expensive and you can't forge without a proper fire-pot (I thought). And then there was the problem of sourcing the proper blacksmithing coal/hammer/tongs..... The list goes on.
Learning about Japanese tools, and how they are made, brought me back to the possibilities of forging. I learned that (some) blacksmiths still use a charcoal fired forge, just a glorified hole in the ground. Here was something that I could start with, at least.
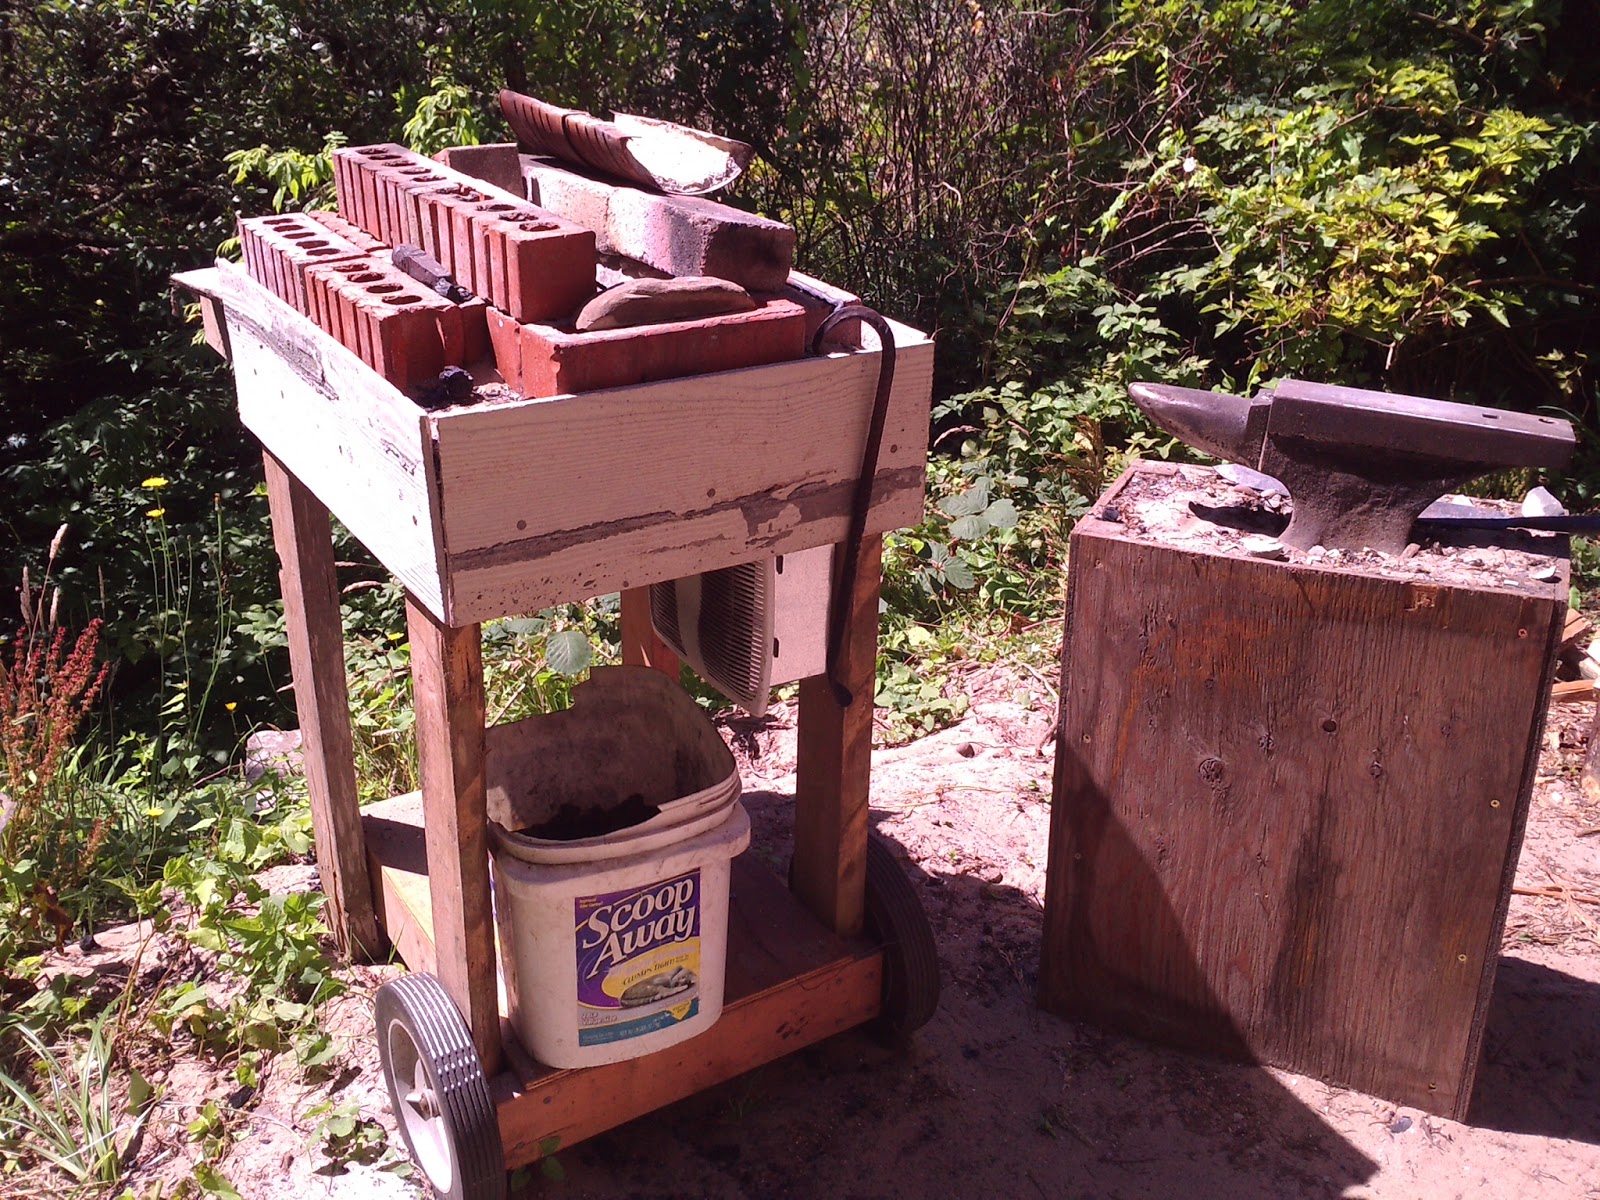
You can build a usable forge out of a stack ordinary bricks from your yard. You can make a blower from a hair dryer. You can fuel your forge using plain old firewood charcoal and it will get hot enough to forge-weld iron...you can even just burn straight wood! A big chunk of steel from the scrapyard makes a good anvil. WHY DIDN'T I KNOW THIS 30 YEARS AGO! Optimal? Probably not. Workable? Absolutely!
When I was young(er) and exceedingly poor, I reeeeeaaly wanted some wood carving tools, but......you know. It turns out that all I needed was a ball-pein hammer, a railroad spike (anvil), a stump (for the anvil), bricks, wood, and a hair dryer. An old coil spring (from a cars suspension) will provide enough carbon steel for a whole set of tools. I had all of this stuff! My startup cost would've been $0!
OK, back to charcoal......
Making blacksmithing charcoal is, while not hard exactly, definitely a refined process. I had no idea that there was so much to know about charcoal! Charcoal is that stuff we use to grill steaks, right? Wrong (well, kinda right). Charcoal briquettes are made from charcoal that has been ground up and combined with additives and fillers to make a product that burns at an even, controlled rate. This is great for your average weekend BBQ, but terrible for forging.
Lump hardwood charcoal is available in the BBQ aisle at the store.
 |
| Hardwood lump charcoal |
I found that it works fine for general hot work, but burns slow (so not very hot), leaves a fair amount of ash, and throws LOTS of sparks. Sparks hurt and make it hard to see and hear what's happening to the metal inside the forge. Hardwood lump charcoal is made from the lumbering offcuts and other less desirable pieces, so the chunks tend to be large knots and other twisty grain stuff. For blacksmithing use, you want a consistent fuel size, so those big chunks need to be chopped up into smaller pieces. By the time I had broken the big stuff down to a good usable size, I was often left with 3-4 largish pieces and a whole handful of small fines. Hardwood lump does work, though! Use what you got!
Softwood pine/spruce/fir charcoal burns hot and fast. Reaching welding temperature is no problem in my small stacked-brick side-draft forge, using a small 50 CFM bathroom fan as a blower.
Charcoal doesn't need much air, meaning that as a beginning smith, I am less likely to overheat (burn) steel accidentally. Less air means less oxidation and less decarburization at the forged edges of the workpiece. It does burn fast, though. I find that softwood charcoal is MUCH nicer to use, problem is, you have to make your own.
Bad charcoal is easy to make. I've got LOTS of this!

- It's easy.
- We don't know any better. Most of us have never seen, much less used good charcoal before. I know I hadn't!
I have also tried packing in the wood, then starting the fire at the top. When the fire reaches the bottom, seal it up, then check the next day. My results were about the same as before. 1/3, 1/3, and 1/3.
The small pieces of soft charcoal are very light and bounce around in the forge, yet feel sticky and resist the metal when you push a length of iron onto the coal bed. The heat from this stuff feels more diffuse to me, softer, and is evidently good for tempering and other operations that call for a gentle heat. In the hand, this stuff is like grabbing a handful of packaging peanuts, and sets my teeth on edge.
You can make smaller amounts of charcoal using the "retort" method.

Fill a lidded metal container with wood, seal the top, and punch a few holes small enough to let some gases out without allowing too much oxygen in. Throw the whole thing in a bonfire and as the wood inside heats, those little holes will be shooting out plumes of gasses. Initially the gas is mostly water vapor, but as the temperature rises the remaining volatile gasses will actual flare off, like the stack at an oil refinery. Let it burn until fire stops shooting out of the holes, then remove the bucket from the heat source, open it when it cools off.
This works, but it's still awfully easy to overcook the charcoal, mostly due to the tendency of the process to self-fuel. Lots of people use a 1 gallon paint can. Mine is a 5 gallon container (and about worn out).
Again, this soft charcoal will work fine, but you can do better.
Lately, this is what I've been making.....

Crisp, tight, splits cleanly but makes VERY few fines. It makes a bright "tinkle-y" sound in the bucket, burns more slowly, and leaves almost no ash. It has a shiny, silver cast and burns with almost no scent. It's not perfect, and a bit overcooked still (I suspect), but it's a step in the right direction.
The soft stuff is on the left. The better stuff is on the right.

Soft and crumbly vs tight and tinkly.
Small cross sections of (free!) lumber scrap tend to carbonize quickly, more evenly, and are very easy to chop into small forge size bits. The small pieces maximize end grain exposure, losing moisture more evenly than longer pieces.

These were originally old stickers (from the lumber yard), used to separate stacks of lumber. Not particularly dry, but well aged and actually air-dry, not kiln-dry. The A/D seems to make nicer charcoal....... More volatiles, perhaps?
I take the same 5 gallon retort and pack it tightly with small precut wood chunks.
This is my charcoal yard. In the middle is the retort full of scraps, waiting for the lid to be clamped down and sealed.

On the left is a section of an old 30 gallon (actually the rusty remains of an old 55 gallon, reshaped) burn barrel, sunk into the ground, with a blue metal tube (chimney) to induce a draft. To the right is the fuel used to actual cook the charcoal. I'll actually only use about half of this small pile.
The outlet to the chimney, at the bottom of the burn barrel. The chimney induces a draft that results in a hotter, cleaner fire.

The two bricks elevate the retort, so that all surfaces are exposed to the heat.
The key element was to bury the burn chamber! The sandy soil insulates the burn barrel, both elevating the overall burn temperature and also regulating the heat produced. I tried the same setup, minus the burying part, but only got the usual overcooked charcoal.

Two chunks of wood on the bottom, then 8 or so pieces loosely stacked around the perimeter, finished by a small pile on top. It doesn't require much. This happens to be the demoed remains of our cedar deck, soft, half rotten stuff that nonetheless burns very quickly. This would be a great use for dried landscaping trimmings and hedge prunings.
Even with the chimney enhanced draft, there is still smoke, unfortunately. Smokeless charcoal is my grail.

Once the fire reaches temp, it will burn clean, with no smoke.

You can't see it in the photo, but the whole lower interior of the barrel is glowing red hot. The retort is jetting flame like a rocket, even sending flame up the chimney.
Once the retort stops jetting flame, I remove it from the barrel, then pile a bit of dirt around the base, to seal off the oxygen. Two hours later (when cool), I check inside.

This batch turned out a touch overdone, maybe 1/2 and 1/2? I should've taken it out a bit sooner. I have been basing the removal time on how much the bucket weighs, but basically just guessing. The weight will be reduced by 1/2 or more.
The volume undergoes a reduction of around 25%.


It splits so nicely! I am shooting for around 2cm³.

This charcoal packs evenly in the forge, so the metal is easy to maneuver, and it burns cleanly, with a vary intense heat. Forge welding is getting easier (well....).
Not only does this stuff burn hot, it also seems to burn a tad longer (but still fast), and makes almost zero ash. In Japan they sell charcoal, to use for cooking on small grills, and for space heating in small ceramic pots. The preferred charcoal is called "white" charcoal, as opposed to "black" charcoal.
Often made from oak, white charcoal is hard, dense, and burns cleanly with little odor. It is a premium product.
 |
| White charcoal ceramic heater |
Sometimes the "white" charcoal isn't actually white.....
 |
| You can buy this from Yahoo JP, 5 lbs for $20, shipping is extra though |
....but often it is.
 |
| "White" white charcoal for sale (from China). |
The process for making the two charcoals differs. White charcoal is made in large kilns, fired over multiple days.

When things are good and hot, the burning charcoal is raked out of the kiln....
 |
| From http://tainainousei.blog66.fc2.com/blog-date-200712.html |
.....then buried in a clay/ash mixture to extinguish it quickly.
 |
| From http://7rinhonpo.jp/archives/25718203.html |
This is what makes the "white" charcoal white.
Black charcoal is softer than "White", not as clean burning, but has higher heat potential. It is produced through applying indirect heat in an absence of oxygen. The lack of direct combustion allows the charcoal to retain much of its volatile elements. It's a balancing act.
A popular means of making the black charcoal in relatively small batches is in an Iwasaki style barrel kiln.

You load the wood into the hopper (shown open in this pic), seal it up, and start a fire in the burn chamber to the right. As shown, this will make soft black charcoal, suitable for ag use/soil amendment. Bury the whole unit in insulating soil, however, and it will produce hard black ("white") charcoal suitable for blacksmithing. That's what I want! This system is currently being used by a very skilled blacksmith on Vancouver island, Dave Friesen of Crossed Heart Forge.
My small-scale charcoal yard has lots of room for improvement, but for the small stuff that I have been working on, it has been adequate. Unfortunately, the components are about worn out, so it's time to put the thinking cap back on.
As far as the good stuff is concerned, I'm not there yet, but this is what I'm doing today......
This comment has been removed by a blog administrator.
ReplyDeleteI'm a beginner blacksmith--and I'm using charcoal as well. Right now I'm buying bags of the lump stuff from the grocery store, but it's expensive. Thanks for these great tips on making high-quality charcoal! I just need to find a 5-gallon metal bucket! I'm on an extremely tight budget, but I'm making it work. Thanks again!
ReplyDeleteHey D, I'm sincerely pleased that any of this might be helpful!
ReplyDeleteIronically perhaps, I have been looking wistfully at my current charcoal kiln, missing this exact process. I just love making charcoal! Good on you for being interested as well. I think that for the beginning blacksmith/bladesmith at least, charcoal might be a good way to start. I have read a fair number of old texts that specify the use of charcoal for duties that require close control of heat and more importantly, the goal of achieving a high hardness for the steel. If you can make it yourself, more's the better!
Recently I've been using a different style of kiln, but it is bigger to be sure, based on on a 55 gallon drum container. It's a toss up..... The 55 Gallon drum takes up more space, but not that much more really. Once you factor in the distress to the neighbors, it probably is better to go big, haha. The charcoal is a higher quality as well.
Search Iwasaski charcoal kiln, or look for some of my more recent posts.... My apologies for not having a decent searchable index of subjects of this darn blog, my bad.
Hammer on!
Hi Jason- How's it going with the puppies? Is it time for a new post?
ReplyDeleteBrian Williams here. Just doing the beginning research of a permaculture project that has been in my mind for some time. That project led me to the idea of making my own tools, which led me to forges, the means to create the fuel for those forges and, finally, this article.
ReplyDeletePrior to reading this I had only read how to create the Styrofoamy charcoal and didn't know there was a better way/product. Thank you for this tutorial/guide.
I don't typically post when I don't have anything to actually contribute, but I feel bloggers often do not know who reads and appreciates their work.
Thank you!
Hey Brian!
DeleteFast forward a year to my Hawaiian guava, charcoal making adventures.....
http://mypeculiarnature.blogspot.com/2015/09/building-charcoal-kiln-1.html
This new and improved (for me, that is) kiln design is loosely based on the Iwasaki style kiln used by Dave Friesen of Island Blacksmith fame. Though my iteration only uses a single 55 gallon drum, it still produces a worthwhile batch of charcoal and the quality has been consistently good for forging. My next charcoal making burn will be Douglas Fir and pine, something that will burn fast and hot in the forge/melting furnace that I've been using to make my own steel. What a rabbit hole this is turning out to be, haha.
Thanks for your encouragement.....I love to share these odd ventures!
Thank you for posting this article, I have been interested in Japanese metalwork for decades and I have just finished a small charcoal forge for some experimenting.
ReplyDeleteI am going to try to use the two drum method for making charcoal, if I understand your article it seems that timing how long it burns for is critical. A downside to the two drum method is that you can't see the gases. However would it be possible to simply put a stopwatch on the process and stop it after a pre determined time? Obviously there would be some trial and error involved.
As a second thought, have you ever considered writing an article or making a video on the finer points of actually running a charcoal forge, I have watched and purchased many videos on the subject, but they all seem to skip over the running the forge and go straight to the hammering!
Thanks,
Matt.
OMG, in trying to resurrect this blog from the dead I forgot that I had so many comments that I never replied to...
DeleteHi Matt! It's been over a year since you took the time and effort to comment, but I hope that the intervening period has been good to you. My sincerest apologies for not posting this earlier.
The two drum method of charcoal production, I assume this would be a retort style burn, one inverted barrel full of wood scraps placed inside a larger outer drum? I haven't tried that one in a larger scale yet but I am curious to see how controllable the process would be. No matter which style of kiln you use, the most important aspect of making bladesmithing charcoal is to use an indirect burn. The flames of your heat source should not actually touch the wood being converted into charcoal. That being said, ANY charcoal making method will get you charcoal that will be OK for forging, but the higher quality stuff is just nicer to work with.
The difficulty in all these charcoaling methods is knowing when to stop the combustion so as to avoid overcooking the charcoal. In my experience, the most reliable indicator of how the charcoal is progressing, is to directly observe the gasses being produced. The stages that the wood goes through as it's being carbonized are distinct and visible, provided that you can see the smoke. White, then yellow ( and stinky!), bluish white and finally, almost no smoke at the end. When the smoke is transitioning away from blue and almost disappears, that's when I choke off the air to stop the burn.
With a retort style kiln, you don't actually see the smoke of charcoal production, so you need to use another indicator. A thermocouple temperature probe that reads up to 1000F would be more than adequate for determining the temperature inside of the kiln, assuming that you want to be making the black stuff for forging. The white charcoal that I mentioned in this post gets to over 1000 degrees and I've got no experience making that stuff, too scary for me, haha! I'm not sure of the actual inside target temperature for black charcoal, but adding a thermocouple is an improvement that I'm intending to make on my next kiln.
Gauging the burn progression by time factor seems to have too many variables to make it consistent and reliable. The moisture content of the wood being carbonized, moisture of the wood used as a heat source, insulation being used around the outer drum….all of these and more are going to affect the finish time. Weight could probably be used but would be quite awkward. As you mentioned, this is one area when a good video would be most instructive, but I'm not aware of any that go into the finer points of charcoaling. I'd love to do one myself but I'm a long way from being able to film anything, mostly a factor of my ridiculously slow internet service here in Hawaii, haha.
And, as if this isn't long enough…..
DeleteProbably the most valuable tip that I could give regarding the actual use of a charcoal forge would be to use plenty of charcoal! I'm way too stingy with the stuff. You can work small bits of metal using just a handful of charcoal and that's fine for some things, but if you are working steel and you care about the carbon content of the finished product, you need to use a decent sized pile to ensure that you are forging in a neutral or carburizing fire. Too little charcoal means that there will be unburned oxygen in the fire, resulting in an oxidative environment. That's bad for steel and contributes to decarburization, the reduction of carbon in the steel. I like about 3” under the air inlet ( I use a side-draft forge, seriously old-school) and at least 6”-8” above the air. At times that feels like a painfully large amount of charcoal though, especially when you are buying it. If you haven't read the newer ( already 2 years old, ugh!) posts on charcoal making fun, you might check them out, starting here…..
http://mypeculiarnature.blogspot.com/2015/09/building-charcoal-kiln-1.html
I did manage to get some useful smoke pictures and basic outlet temperature reads, using a cheap IR thermometer. I'm slowly working towards building yet another, more permanent charcoal kiln and when that happens, I'll definitely write it up.