"Japanese Joinery" by Yasuo Nakahara

As we know, there's not that many informational works on the actual practice of Japanese carpentry. Of the few commonly available and referenced books, this is the only one that I would recommend unreservedly. "The Japanese House" by Engel (my other fav) is a fantastic scholarly exploration of old house construction, but it's not a book that I would recommend to a person who just wants to build in the Japanese style. If you want to actually practice carpentry in the Japanese tradition, this is your book....or a beginning at least.
"Japanese Joinery" is was published in Japan in 1967 as an educational manual for carpenters (I believe), then translated and released for American audiences in 1983. The American edition has a humble (and humbling!) forward, written by the Eastwind company's Len Brackett. Mr Brackett writes a bit about his own apprenticeship that he served in Japan, saying that the five years of 70-80 hours per week were said to be adequate for a decent foundation of knowledge and skill. A foundation, mind you. When I take half the day, putzing around with one of our simple Project Mayhem joints, this is the type of thing that I keep in mind.
I am attracted to this type of work for many reasons, but one of the things that most makes me ache is the intensity of the work, how fully involved these guys are while getting the job done. When laying out the joint, you plant the corner right where you need it to be, place the sashigane just-so, then dip the bamboo pen in the ink pot, get the angle of the pen, aim and....finally.....strike the line. Then swiftly on to marking the next line, about 10x faster than my awkward and wordy explanation can describe. This concentration and skill comes with practice, and that requires time. And knowledge. I'm talking myself in circles here, I know, but this book will give you a bit of the knowledge. The time part is on you.
It's not perfect. Even with my limited knowledge, I've seen a number of errors ( errors of illustration, and some of the descriptions don't seem to match quite right) so you need to think as you are studying, work the process through in your mind.
But.
But!
It's a great start. It's almost entirely descriptive illustrations, and the text blocks are important as well. I found little gems hidden all over. Here are a few.

We start out with the perennial favorite, the Kama tsugi half-lapped goose-neck joint.

This was our second Project Mayhem joint, and all that thinking/staring/guessing that I invested.....it's all right here. Lines, proportions, tips on getting the angles correct. It also shows that the goose-neck is cut with a sloped shoulder, something that the other guys were aware of, but not me, haha. These few pages would've helped me cut a better joint in half the time.
A couple of pages later, we've got Shachi-tsugi (a type of wedged tenon joint) and Shachi-sen (the wedge itself).

Project Mayhem #3 used both of these devices and if you read the comments on my blog back then, you might remember me getting all in a tizzy about some aspects of the shachi-sen, the wedge itself. It had been mysteriously alluded to elsewhere that the shachi-sen was to be tapered in two directions, but after some discussion we decided that was nonsense. The wedge can taper, as can the walls of the mortice. Combine both.....even better. But that's not the same thing as being a compound taper, you know? Well, we were correct! It's all right here.
And at page 45 we have the exact joint in question, Project Mayhem #3, the Yatoi hozo mortice and tenon.

As was shown in this books sister publication "Japanese Woodworking", the use of metal fasteners and reinforcements are now commonly used in modern construction.

This is not a book for the purist aesthete maybe, but it generally shows multiple ways of doing things, sort of a hierarchy of quality. This is good, this is better, this is for the finest work....that sort of thing.
Probably the most valuable part of the book is chapter 4, how to layout joinery that will fit together, even when using non-square timber.

This chapter shows a handful of tips, simple stuff superficially, but this is how you get things to fit together as they should.


Diagonal bracing. It does exist.

Here is more diagonal bracing.

What's interesting to me is that the joinery is so rudimentary. In "The Japanese House", Engel noted a distinct lack of diagonal bracing being used in traditional Japanese house construction. Now it is a commonplace standard, although you might not be able to find many elegant examples for inspiration. These are all tacked together using metal strap.
Mud wall construction! Great information on another obscure topic, one that I intend to use in some of my own work.

There is very helpful info on spacing, keying the mud into the timber, and how to detail the timber boundary so that the division between earth and wood has the cleanest finish.
And more diagonals. And more tie straps.

Here's how that funky 4-way joint gets used in actual construction.

Different versions too.
And up to the roof structure.
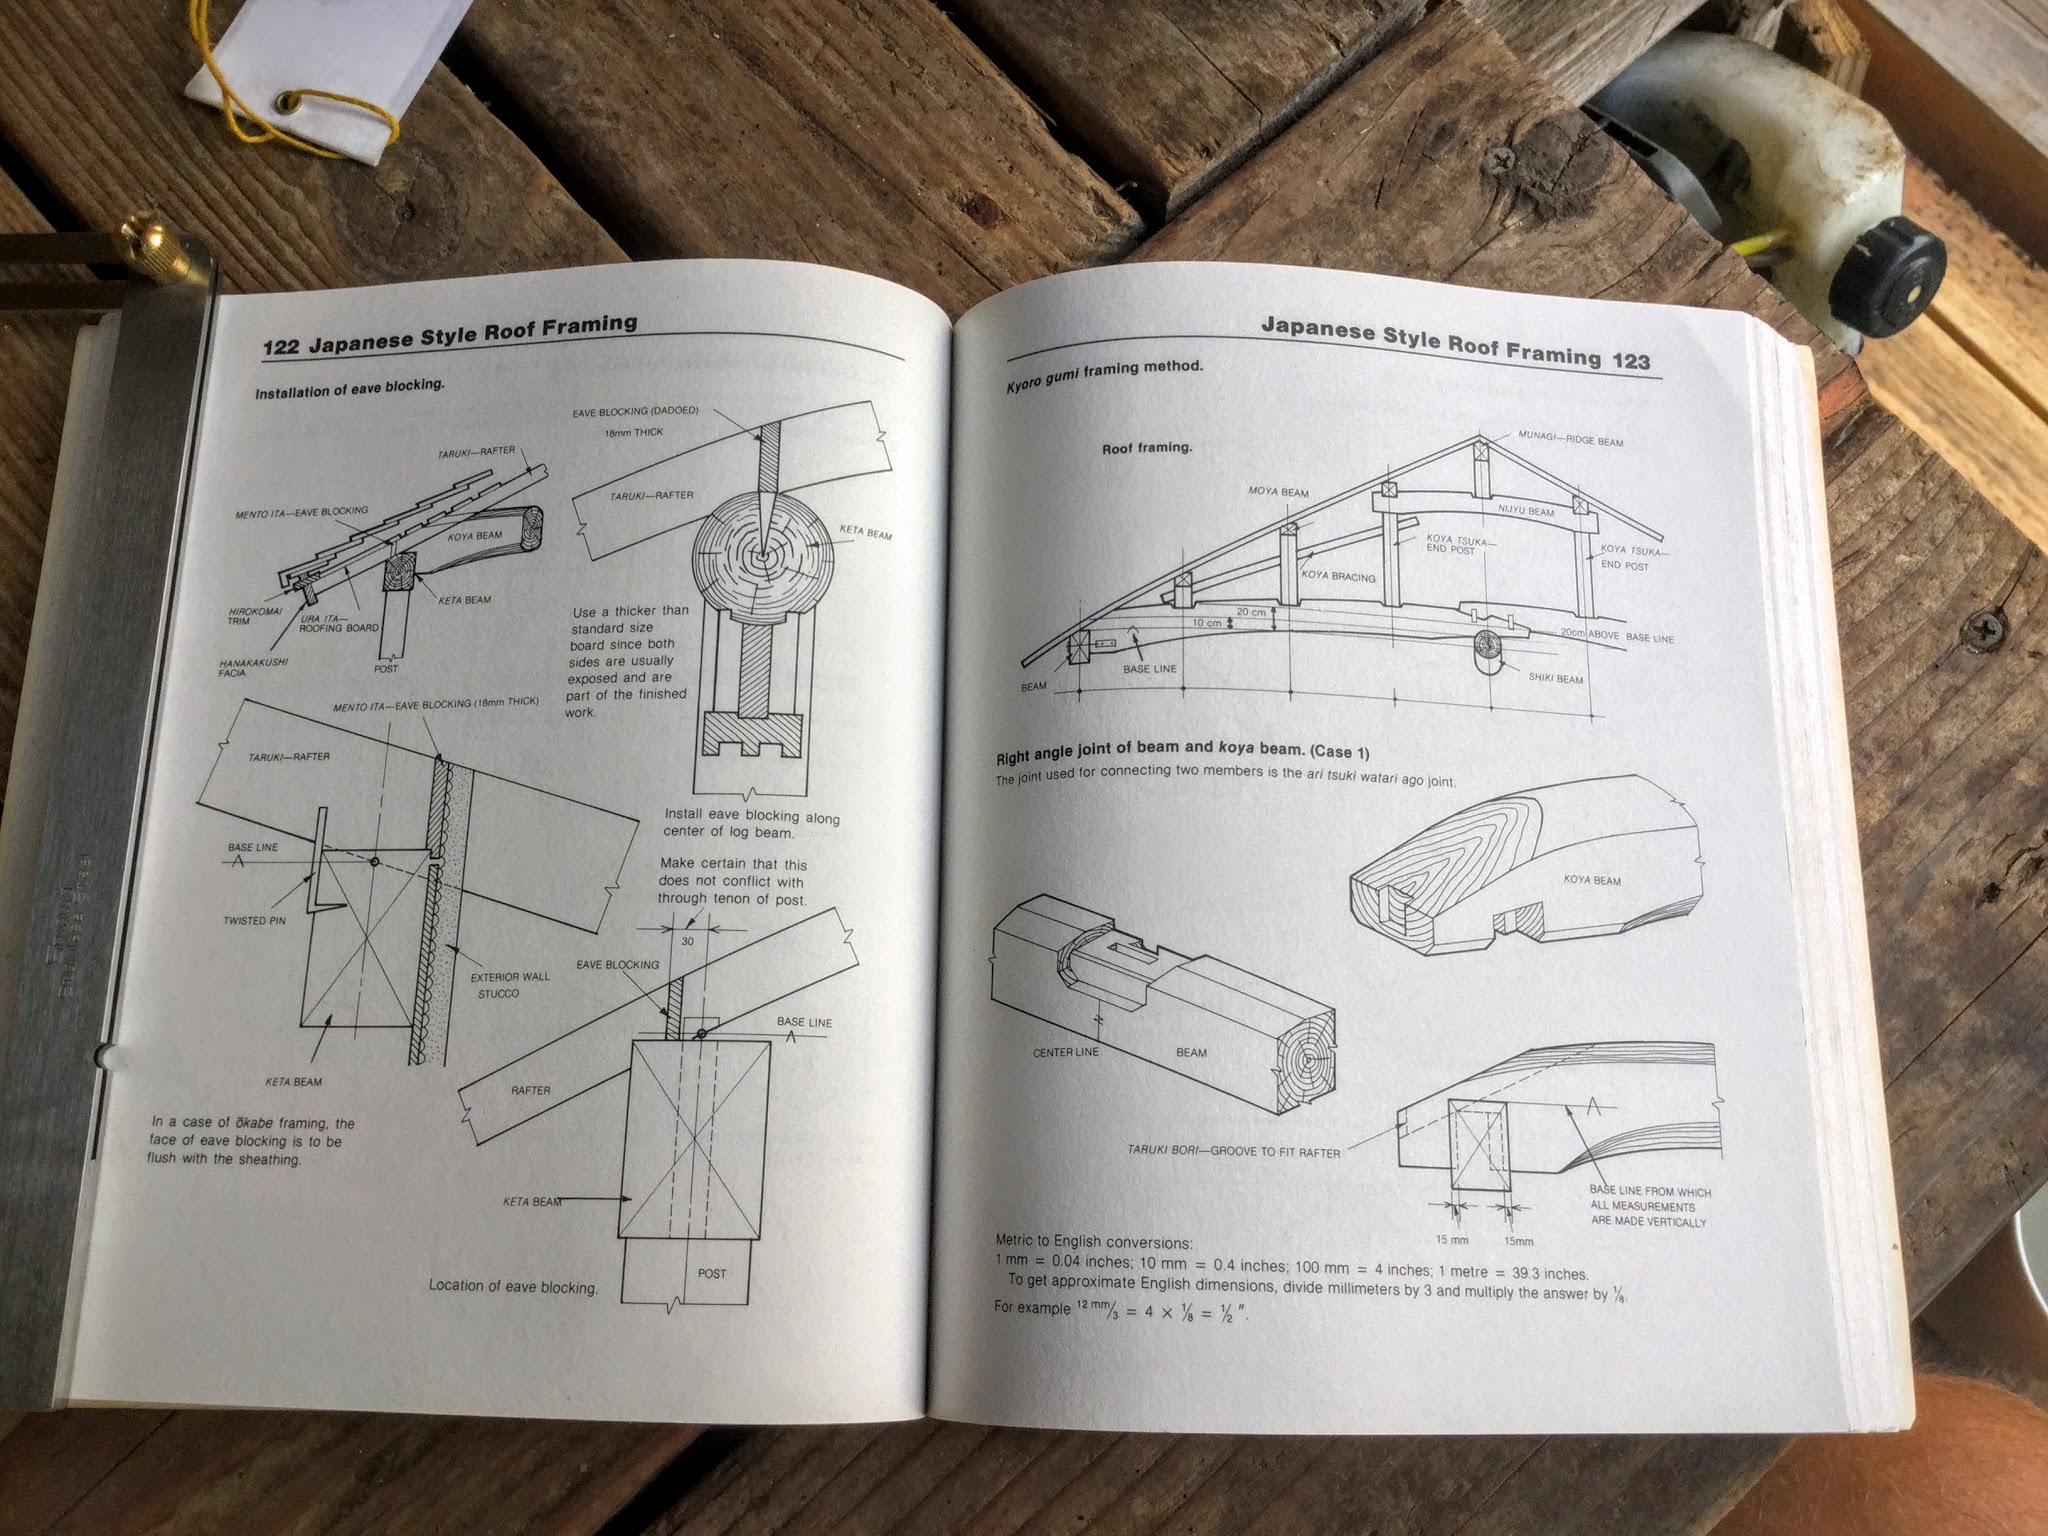
Lots of non-square framing up here.


Hip roof framing.

You can't avoid the hip roof if your studying this stuff, it's the iconic Japanese roof. Here in Hawaii, probably 80% of the roofs are hips and I don't think it's a coincidence.
The complex joinery at the corner, right where the hip rafter meets the uppermost wall beam/top plate. Nakahara offers a good, then a better option for joinery.

I want to try cutting this joint. Maybe Project Mayhem #10?
Here's a great jig for drawing proportional lines, followed by two options for using joinery at the gable roof ends.....

......followed by the quick and dirty, modern expedient solution, a length of threaded rod, haha.

Some classic and beautiful, some efficient and not so beautiful, but there is a lot here, over 200 pages of good stuff. There is much food for thought in this book.
Both "Japanese Joinery" and "Japanese Woodworking" are out of print, but they have been combined and re-released as "The Complete Japanese Joinery". Amazon has it, and I'd say it's a bargain. That said, if you are tight on space on your bookshelf, just get this one. It's good.
love your Gabe™ bevel gauge book marker.
ReplyDeleteHaha, seriously nice bevel gauge! This book hit me in the face when it arrived. I had been missing our project mayhem studies, but this book should be read before I continue because it offers a path forward on so many questions we've had.
ReplyDeleteSeriously though, we should pick another practice joint, would you guys have time in a week or two? I want to get to that hip rafter sill plate connection joint you show! Plus I need something to distract me from my maebiki-oga.
I'm totally down with it. After thursday I'm in Germany at the workshop, so I have tools to work with. I was thinking the same actually, we need to get back to practicing.
DeleteI REALLY want to start the joinery practice again!
DeleteOne suggestion that I would favor.....have a two week interval between the sessions. That would allow more time to do a more thorough writeup. Part of my motivation in the joinery practice is to assist others who are trying the joint for the first time, and we can only do that through explanation of the difficult parts. I don't want to just do a "Yeah, I cut it, it was hard." kind of thing. It's funny though, because after you do a couple of these, there's not much to say. Draw the joint, then cut it out, haha.
Another thing that might be of value.....many of the joints commonly used are deceptively simple. We shouldn't neglect the "easy" ones, concentrate on getting the perfect cut, explore friction fits, "killing the wood" grain compression.....Lots of good primary knowledge there to work on.
And....I still need to do #4,haha. I think that you are the only one who finished, Gabe.
I may be out for a while... :/
DeleteSchool first. And finding a part time job, and commissions... along with independent study to take the AP Government exam, the course isn't offered by school.
so Jason, shall we try it next week? the joint #4 that is. I can finally use some Fichte again, missing that soft looking wood actually. Spruce think its called in your land. (My plan was anyway buy a 4x4 or so and cut to smaller lengths and just make joints the few weeks I'll be in germany.)
DeleteYes, I think that would be great.
DeleteAnd a reminder to anyone else out there......Give it a shot! This is for everyone to try, the more the merrie. Just say that you are "in", and we will include your results (the good and, even better, the not-so-good) as well. That way we all learn.
I've been caring for that baby bird for the last two weeks, feeding every 30 minutes, but he's off on his own now. We're both free! Time to get back to work!
I would like to thank you for the efforts you have made in writing this article. I am hoping the same best work from you in the future as well.. Cut The Wood
ReplyDelete