
I'm not done with this saw yet, not by a long shot. Things are improving, so I must be doing SOMETHING right, haha.

Going from this......
 ......to this. Not perfect yet, but definitely better. Hi Sammy! He likes saws, too.
The dark spots are areas that are still low. If you flip the saw over, you see that the image is nearly the inverse/negative.


The crosscut side isn't quite there yet, and still has a very persistent crease that's causing me difficulty.


The hard part for me is the "seeing" part.
If you sight down the length of the saw, you can tilt things this way and that, and if you get the angles right, those problem areas jump right out at you.
See my thumb towards the left (rip tooth side) of the saw blade? See the crease right next to it?
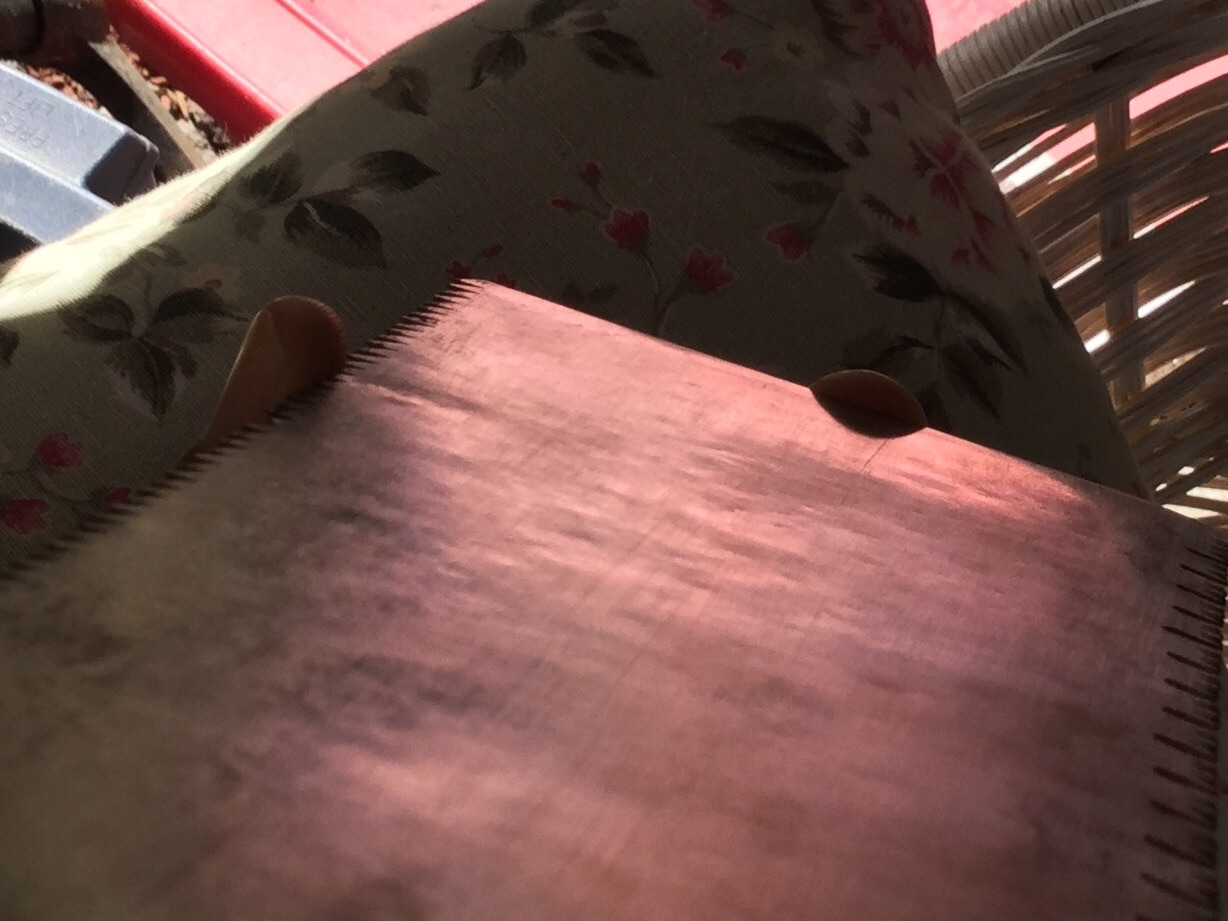
That crease is the repaired crack that was welded. I envision the stresses of that crack projecting out towards the center of the saw blade, towards my index finger. You can see a shadowy dip there in the middle.
Opposite the crack, on the crosscut side, is what remains of the worst crease.

Minimized, but not yet eliminated. You can't help but wonder if the two injuries are related. I would guess that the crack started the mess.
To make these stresses manifest, I need to compress the saw blade from each end, as though bending it into a U-shaped curve. If I just tilt the saw around, looking for clues almost none of this damage is actually visible.
To get these photos, I am holding the end of the handle in my mouth and sort of pulling the blade towards myself, while balancing the iPad and twisting every which way to get the light correct. My daughter came downstairs and asked me if I was trying to take a "selfie" of myself eating my saw. 9 years old and already a smartass.
So.
This saw seems OK, until force is applied, then you start to see all of this craziness. Imagine what happens while you are cutting wood! This is how good saws go bad.
When I compress the blade, I can see how the repaired crack on one side, and the resultant crease on the opposite side, are creating one of those annoying "oil-can" dents, about 50mm in diameter and right in the middle. This type of dent pops back and forth, making a characteristic sound, Poka-poka (the Japanese name, BTW).

Twist things a bit and you see many areas that still need attention.

Many, many areas, haha.
The photos make the damage appear to be much greater than it really is, but that's a good thing. It's really not THAT bad.

If I increase the set of the teeth just a hair and re-set the teeth that I've mucked up the worst, I could use this saw and be totally happy with it. AND it cuts like a monster!
But I am having fun with this, and want to see how far I can take it. How clean can this thing get? My biggest problem is reigning in my enthusiasm! I get to hammering on the steel, the hammer and saw start to feel alive, begin to take on a life of their own. I find myself visualizing symphonies in my mind and hammering out music (It's a good thing my loving wife works in town and we are living out in the country, away from any neighbors, haha.).
As crazy as it sounds, I *KNOW* that you can hammer music into the steel, I can feel it. To my way of thinking, music is artfully applied force, directed into a particular pattern. Sound comes in waves. As you cut wood with these saws, each of those tiny teeth experiences vibration. You can tell a lot about a kanna by the sound that it makes as it shears the wood fibres. A saw is the same way. It sings in use. A choppy saw that grabs and scars the wood? It's out of tune. We want a harmony. This is more than a simple analogy.
Every strike of the hammer leaves a mark, even if it is not visible to the untrained eye. Hammering compresses the steel, making it microscopically thinner at the center of the strike, and raising ripples, like concentric circles. Again, think of ripples in a pond.
Sebastian just posted some perfect work on imaging and modeling this exact thing.
http://laborlimaetoolworks.blogspot.com/2015/06/straightening-saws-or-going-with-hip.html
http://laborlimaetoolworks.blogspot.com/2015/06/more-colours.html
To borrow one of his images, a saw like this won't sound right.

The harmonics will be all distorted. This picture happens to fairly well describe what my saw looked like.
Also interesting....when I began the straightening work, if I flicked the saw blade with my finger, the saw gave out a muted ring. As we remove the irregularities that have been introduced into the saw plate, making it clean and straight, the harmonics improve. Now when I flick the blade, it gives out a clearer tone, similar to a tuning fork. And I'm not done yet.
A simple, flat saw blade, made in a factory and using modern steel, can give out a ring, loud and clear. But loud, brassy and sharp.

Nice and clean, but there is no complexity. This saw blade is a good piece of steel, but the thickness of the saw plate is an even thickness, as shown below.

The handmade saws are carved to shape using a Sen, to be thinner in the center. The thickness is retained at the base near the tang, and also towards the toe end of the saw. I am trying to keep the above image in mind as I examine the saw blade for distortion. This will also be in my mind when it comes time to tension the saw.
Below is my ideal. Courtesy of the incomparable Kunimoto.
Hand carved by sen, then burnished to even out the ridged surface and smooth the steel surface.

The sen and burnishing tool have really brought out the grain of the steel. I see thousands of marks from the hammer.......And all of those tiny black specks? I suspect tamahagane steel.
I don't know who made this saw, but I can assure you that it is a complex symphony.
Nice.
The worst of the cheap saws is that you have all the modes oscillating at the end of the cut, when there is just a part left of the saw outside the wood and this vibrates a lot. I love the last picture too, you can barely see the hammer marks if you look with the side of your eye, like when trying to see a very small star.
ReplyDeleteSorry for the poorly jointed teeth, and I guess the gullets are a bit uneven too...
You are seriously bringing light to a remote area of knowledge, I'm very looking forward to the third part and the video of the saw once it can sing again.
Thanks a lot my friend!
I just love this little saw more and more. I spend so much time looking at it,it has become like a little love affair.....oh....wait....that's kinda weird, huh?
DeleteHaha haha haha. You already warned me about sleeping with my saws! This saw is far and away, my favorite saw though. Thank YOU my friend.
What a perfect way to collaborate on some ideas. The cheap saw that vibrates....this sounds like a whole 'nother line of inquiry.....hmmmmm....do you think that it is solely related to the tensioning (or lack thereof)?
I guess so. I tried "tensioning" (ie hammering along and to the length of the saw with the setting hammer on both sides, as I've seen in some of my saws) and I'm pretty sure the tone of the saw changed into a more pure one. I do need record this to compare objectively but my hunch is that it works. Chumasaru in one of his videos (the one in belgium) is tensioning a disposable blade so at least seems possible.
Deleteand if you make some sen, send one over here too :)
Great work! Have you tried annealing and heat-treating a saw plate before? I'm hoping that is where this series is leading, to the making of a saw from scratch. I think if we really want to understand the steel and resolving the tension to a flat state it will happen at the anvil, forming a new plate to be scraped. And since saw blades are forged in a stack together, send me one? Lol, I can dream.
ReplyDeleteHave you tried a cross peen hammer for the tight creases. The distortion looks biased in one dimension, although as Sebastian has pointed out, the cumulative dents and bends create their own problems. I was thinking recently about the front tooth that was bent over in shipping my maebiki-oga. There is a degree of bend beyond which the metal permanently bunches up on one side when bent back. Trying to hammer down the compressed high spot only pushes the bend back in to the plate.
How about forging a couple sen?
Gabe!
DeleteYou have been peeking! Hahaha! We are in agreement, I need a cross-peen.
As you have noticed on your Maebiki-oga, there are no shortage of indications that a cross-peen was used. One of the things that is hanging me up right now is that I don't have one. Then I start wanting to forge my own....laminated of course......then start thinking about hammers and forging them......'cept I need a fuego for the forge......and I need some thin cedar for the walls of the fuego.....if only I had a saw.....and here we are again.
I've got a great kataba that is crying out to be made into a madonoko, perfect for ripping Is it any wonder that I don't get anything done, haha! I have forged out a couple of really crappy Sen, but the rebar that I was using for the handles kept breaking.
Lesson learned? When making a Sen.....1) make the blade separate from the handle, so that it can quenched more simply and 2) rebar is crap.
I even read somewhere that recycled steel that gets too contaminated in the melt gets turned into rebar. Copper, brass, lead, mystery tool steel....a little of everything, it's handy and everywhere and usually free, but I'm trying not to use it for anything from the forge. Now that I've learned how to "look" for old metal, I see it everywhere, so I don't need to use rebar.
I also completely agree that to understand this blade distortion thing we need to compare what we are learning about fixing up old beaters, with the experience and understanding of forging new. I am conflicted. I get so interested in these questions, I just want to learn more and more.
Like the kanna, there are SOOO many really great saws out there already, it is a shame not to put them back into use. It is possible that I will end up beating this poor saw to death but, at the least, I will have learned a lot. As the blade gets progressively "harder" ( I suspect that "work-hardening" is a bit of a misnomer here) it may be that it becomes brittle and prone to breaking teeth.....I don't know. It's fun though!